# Clickatell Chat Commerce Platform

Your key to digital transformation.

Explore how the Chat Commerce Platform's capabilities can benefit your customers and your business:

<table data-view="cards"><thead><tr><th></th><th></th><th data-hidden data-card-cover data-type="image">Cover image</th></tr></thead><tbody><tr><td><a href="/spaces/RYzqAHmKKYdD03EPS3QN/pages/USSQtA3XkiYOIz59lRjL">Broadcasts</a></td><td>Create custom messaging broadcast campaigns within minutes.</td><td><a href="/files/okIMe1OJNHHvDJnmigQ2">/files/okIMe1OJNHHvDJnmigQ2</a></td></tr><tr><td><a href="/spaces/AeMbivaErQPM4rXdM6fm">Live Agents</a></td><td>Enable real-time communication with your customers via a single web interface.</td><td><a href="/files/zDwRny22wgKDjuosjGRJ">/files/zDwRny22wgKDjuosjGRJ</a></td></tr><tr><td><a href="/spaces/joAgInTNsBfDdfx1I23z">Automation</a></td><td>Design &#x26; deploy automated conversational experiences (chatbots) across multiple chat applications.</td><td><a href="/files/VUFo00GbhfmtSiHXNd8d">/files/VUFo00GbhfmtSiHXNd8d</a></td></tr><tr><td><a href="/spaces/2HSaFrTLkRdmHl1qkc7s/pages/R5Ica3YHXsStuQzNQEco">Payments</a></td><td>Accept payments from your customers in their favorite messaging channels.</td><td><a href="/files/SYwtgaxsk0Ei7f3qr4xI">/files/SYwtgaxsk0Ei7f3qr4xI</a></td></tr><tr><td><a href="/spaces/oWRgvijy1ATGVCMu4fQU/pages/BplzA7DyhvXE1KHAyUlh">Intelligence</a></td><td>Leverage AI technologies to understand customer intent and deliver accurate, contextually relevant responses.</td><td><a href="/files/btxcMKjYT0UazlPO0nAE">/files/btxcMKjYT0UazlPO0nAE</a></td></tr><tr><td><a href="/spaces/VjQu0dbzheAk8WKJeaIl/pages/Grmx43irUkpoN2vfUB1a">Data &#x26; Analytics</a></td><td>Make more effective data-driven decisions based on real-time reporting for each of your applications.</td><td><a href="/files/y79LhHvKXKCW0T9B74Bt">/files/y79LhHvKXKCW0T9B74Bt</a></td></tr></tbody></table>

##

##

## Discover Messaging Channels

Explore how you can deploy the powerful capabilities of our Chat Commerce Platform across your customers' favorite messaging channels:&#x20;

<table data-view="cards"><thead><tr><th></th><th></th><th data-hidden data-card-cover data-type="image">Cover image</th></tr></thead><tbody><tr><td><a href="/spaces/4IuWpxq11GnZijbn0y1v/pages/YexAPSm2gxOroWKzigvA">Global SMS</a></td><td>Send and receive text messages globally using our SMS APIs.</td><td><a href="/files/0c37pTROyGAApSWBHEDC">/files/0c37pTROyGAApSWBHEDC</a></td></tr><tr><td><a href="/spaces/H9mbp0ZlSZKdmkQMXA0U/pages/o2T5qMZtYJJ92gwSUfka">WhatsApp Business</a></td><td>Enhance customer experiences with our WhatsApp Business API.</td><td><a href="/files/aaADNgm01gAjgpV1ytLs">/files/aaADNgm01gAjgpV1ytLs</a></td></tr><tr><td><a href="/spaces/Yxs28KAf6XRlo2OJxkyq/pages/35hxW6Uo5R1vZSybyygL">Regional USSD</a></td><td>Cost-effective and scalable enterprise solution to engage and transact with your customers in emerging markets.</td><td><a href="/files/E1hs9SLEvS9cboMk5CSG">/files/E1hs9SLEvS9cboMk5CSG</a></td></tr><tr><td>Apple Messages for Business</td><td>Use the full power of Apple messaging to engage and transact with your customers via the Messages app and Apple Pay.</td><td><a href="/files/8bcWQzdHDI0EW3kgdlpS">/files/8bcWQzdHDI0EW3kgdlpS</a></td></tr></tbody></table>


# Connect

Outbound messaging at scale.

[***Connect***](https://www.clickatell.com/connect/) *provides the **communication** layer of the Chat Commerce Platform.*

*It includes a foundational set of features and infrastructure that ensure businesses can send messages to large groups of customers, reliably, quickly, and at scale.*

***

### ✅ Why Connect?

Easy-to-implement messaging APIs ensure you reach your customers globally, at scale, and without a hitch. Streamline communication, whether SMS or WhatsApp, sending targeted, personalized campaigns, alerts, and notifications that reach your audience wherever they may be. Maintain customer trust and adhere to compliance through effective opt-out management that respects user communication preferences.

### 🔑 Key features

* Enterprise-grade messaging APIs
* Channel management&#x20;
* Campaign messaging
* Opt-out management

### 🚀 What exactly do I get?

* [**Channel access and management**](/platform-capabilities/messaging-channels) (including Opt-Out Management)
  * SMS, WhatsApp & USSD\* *(\*certain regions only)*
* [**Campaign Messaging**](/platform-capabilities/broadcast-messenger-1)
* **Data & Analytics:**
  * [Dashboards in Clickatell Portal](/data-and-analytics/dashboards-in-clickatell-portal)
  * [Additional Data Templates](/data-and-analytics/raw-data-access)
* **Additional Features & Services:**
  * [User Portal](/clickatell-user-portal/user-portal)
  * [Standard Support](/clickatell-user-portal/infrastructure-and-support)
  * [99.98% Uptime SLA](/clickatell-user-portal/infrastructure-and-support)
  * [Regulatory Compliance](/clickatell-user-portal/security-and-compliance)&#x20;
    * ISO27001, SOC2 Type 2, GDPR, CCPA, and POPIA

{% hint style="success" %}
[Compare our packages](/platform-packages/features-by-package) or contact our [Sales Team](https://www.clickatell.com/contact/contact-sales/) to find out more!
{% endhint %}


# Interact

Two-way conversational messaging.

[***Interact***](https://www.clickatell.com/interact/) *provides the **conversational** layer of the Chat Commerce Platform.*

*It includes everything offered in* [*Connect*](https://www.clickatell.com/connect/) *plus additional features and applications that enable businesses to deliver rich, interactive two-way messaging experiences through self-service, automated with chatbots and app-like menu trees, or by messaging with live agents. Rich integration and orchestration capabilities make it possible to deliver digital services on messaging channels.*

***

### ✅ Why Interact?

Messaging a self-service chatbot allows customers to find answers quickly, anytime. For more complex inquiries, live agent support integrates seamlessly, providing a human touch when needed. A powerful workflow builder enables sophisticated user experiences and delivers deep integration capabilities that connect existing business systems and powerful orchestration to ensure a smooth flow of customer interactions, engagement, and data across channels. A help desk web app offers a single interface for live agents to manage customer interactions.

### 🔑 Key features&#x20;

All key features of [Connect](/platform-packages/connect#key-features), PLUS:

* Self-service chatbot
* Live agent chat
* Integration
* Orchestration

### 🚀 What exactly do I get?

* [**Channel access and management**](/platform-capabilities/messaging-channels) (including Opt-Out Management)
  * SMS, WhatsApp, Apple Messages for Business & USSD\* *(\*certain regions only)*
* [**Campaign Messaging**](/platform-capabilities/broadcast-messenger-1)
* [**Self-Service Chatbot**](/platform-capabilities/automations)
* [**Live Agent Chat**](/platform-capabilities/live-agent-chat)
* [**Integrations**](/platform-capabilities/integrations) *(CRM)*
* **Data & Analytics**
  * [Dashboards in Clickatell Portal](/data-and-analytics/dashboards-in-clickatell-portal)
  * [Additional Data Templates](/data-and-analytics/raw-data-access)
* **Additional Features & Services:**
  * [User Portal](/clickatell-user-portal/user-portal)
  * [Business Support](/clickatell-user-portal/infrastructure-and-support)
  * [Customer Enablement Services](/clickatell-user-portal/customer-enablement-services)&#x20;
    * Onboarding, flow-building, and training
  * [99.98% Uptime SLA](/clickatell-user-portal/infrastructure-and-support)
  * [Regulatory Compliance](/clickatell-user-portal/security-and-compliance)&#x20;
    * ISO27001, SOC2 Type 2, GDPR, CCPA, and POPIA

{% hint style="success" %}
[Compare our packages](/platform-packages/features-by-package) or contact our [Sales Team](https://www.clickatell.com/contact/contact-sales/) to find out more!
{% endhint %}


# Transact

Digital commerce in messaging.

[***Transact***](https://www.clickatell.com/transact/) *provides the **commerce** layer of Clickatell's Chat Commerce Platform.*

*It includes everything offered in* [*Connect*](https://www.clickatell.com/connect/) *and* [*Interact*](https://www.clickatell.com/interact/) *plus features required for businesses to provide innovative, digital commerce experiences with rich payment acceptance functionality.*

***

### ✅ Why Transact?

Clickatell delivers seamless payment enablement capabilities to offer smooth checkout experiences in chat channels. Card tokenization enables one-touch payments, securely and conveniently across channels and brands without having to enter credentials again. Messaging also helps improve order and fulfilment management, facilitating an end-to-end shopping experience right within the chat interface.

### 🔑 Key features

All key features of [Connect](/platform-packages/connect#key-features) and [Interact](/platform-packages/interact#key-features), PLUS:

* Account authentication
* Payment gateway
* Card tokenization
* Order and fulfilment management

### 🚀 What exactly do I get?

* [**Channel access and management**](/platform-capabilities/messaging-channels) (including Opt-Out Management)
  * SMS, WhatsApp, Apple Messages for Business & USSD\* *(\*certain regions only)*
* [**Campaign Messaging**](/platform-capabilities/broadcast-messenger-1)
* [**Self-Service Chatbot**](/platform-capabilities/automations)
* [**Live Agent Chat**](/platform-capabilities/live-agent-chat)
* [**Integrations**](/platform-capabilities/integrations) *(CRM and OMS)*
* [**Digital Commerce**](/platform-capabilities/digital-commerce)
* **Data & Analytics**
  * [Dashboards in Clickatell Portal](/data-and-analytics/dashboards-in-clickatell-portal)
  * [Additional Data Templates](/data-and-analytics/raw-data-access)
* **Additional Features & Services:**
  * [User Portal](/clickatell-user-portal/user-portal)
  * [Business Support](/clickatell-user-portal/infrastructure-and-support)
  * [Customer Enablement Services](/clickatell-user-portal/customer-enablement-services)&#x20;
    * Onboarding, flow-building, and training
  * [99.98% Uptime SLA](/clickatell-user-portal/infrastructure-and-support)
  * [Regulatory Compliance](/clickatell-user-portal/security-and-compliance)&#x20;
    * ISO27001, SOC2 Type 2, GDPR, CCPA, POPIA, and PCI DSS

{% hint style="success" %}
[Compare our packages](/platform-packages/features-by-package) or contact our [Sales Team](https://www.clickatell.com/contact/contact-sales/) to find out more!
{% endhint %}


# Upgrades & extras

Extend the functionality of your chat commerce solution.

You can upgrade the standard package configurations to suit your needs better. Add generative AI capabilities, enterprise support SLAs, workflow building, data services, and more. Each upgrade increases the total package fee.

<figure><img src="/files/uenu5P2qtT8FBT6o8E9B" alt=""><figcaption></figcaption></figure>


# Features by package

A break-down of all the features included per package.

<figure><img src="/files/UKuEKUEeL8rvn7WRGRZo" alt=""><figcaption></figcaption></figure>


# Messaging channels

### 💬 What messaging channels can I use?

<table><thead><tr><th width="246"></th><th data-hidden data-type="checkbox">Connect</th><th data-hidden data-type="checkbox">Interact</th><th data-hidden data-type="checkbox">Transact</th></tr></thead><tbody><tr><td><a href="/pages/1XQQg27AUFnXsoFpfkRk">SMS</a></td><td>true</td><td>true</td><td>true</td></tr><tr><td><a href="/pages/QaauWAX5c59CbBTV3lrF">WhatsApp</a></td><td>true</td><td>true</td><td>true</td></tr><tr><td><a href="/pages/wYvGgiD3sAqOkBSE9Q8k">USSD</a>*</td><td>true</td><td>true</td><td>true</td></tr><tr><td><a href="/pages/FUWmACpvHsPZvMg415xG">Apple Messages for Business</a></td><td>false</td><td>true</td><td>true</td></tr></tbody></table>

*\*Available in certain regions only.*

### 🔑 What features are included?&#x20;

* Enterprise-grade APIs
* Number provisioning
* Throughput management
* Message templates *(WhatsApp only)*
* Anonymous messages *(WhatsApp only)*
* Delisted number management
* Read/delivery receipts


# Global SMS

{% hint style="success" %}
Available to all Clickatell clients.
{% endhint %}

Clickatell's SMS channel offers reliable, scalable messaging for businesses to reach a global audience (230+ territories, 1000+ networks). It provides a range of features and use cases, including two-way messaging, data encryption, and more, enabling one-way or two-way brand engagement.

Available as a full-service SMS Gateway or via API with multiple integration options. &#x20;

{% hint style="info" %}
See our comprehensive [**SMS User Guide**](https://guides.clickatell.com/sms-channel) for details on using SMS messaging.
{% endhint %}

### **✨ Benefits of Clickatell’s SMS offering**

* Extensive global reach.
* Business mobile-initiated or customer mobile-initiated SMS offering.
* Cost-optimized or premium dedicated routing.
* Central management of various in-country governance requirements.
* Sender ID management and registration.
* Seamless number acquisition and management.
* Scalable message per second capacity can cater to large batch volumes and priority real-time sending.
* Access to subject matter experts with global industry experience.

### 📱SMS Features

* Standard 160-character GSM alphabet
* Unicode 70-character alphabet with UTF-8 encoding
* One- and two-way messaging
* Multipart messages
* Sandbox environment
* Short codes
* Long numbers
* US 10LC registration process
* Toll-free numbers (TFNs)
* Sender ID
* Reverse-billing
* Parent/Child hierarchies
* Do not contact (DNC) list
* Send and receive receipts
* Two-way messaging callbacks
* Two-way status callbacks
* Advanced messaging

{% hint style="success" %}
Contact our [Sales Team](https://www.clickatell.com/contact/contact-sales/) to discover how SMS messaging can benefit your business!
{% endhint %}


# WhatsApp Business

{% hint style="success" %}
Available to all Clickatell clients.
{% endhint %}

Clickatell's WhatsApp Business solution enables companies to deliver secure, engaging customer support globally through the world's leading messaging channel. As a WhatsApp Business Solution Provider (BSP), Clickatell helps businesses set up and leverage the WhatsApp Business API to drive better consumer engagement. The Chat Commerce Platform enables advanced messaging functionality through access to the WhatsApp Business API as part of our cloud-hosted platform and allows sending up to 500 messages per second.

{% hint style="info" %}
See our comprehensive [**WhatsApp User Guide**](https://guides.clickatell.com/whatsapp-channel) for details on using WhatsApp messaging.
{% endhint %}

### **✨ Benefits of Clickatell’s WhatsApp offering**

* Supercharged service delivery and customer support using the Chat Commerce Platform to automate and orchestrate great customer experiences via the WhatsApp interface.
* Reuse of integration across multiple touchpoints.
* Access to the latest WhatsApp Business API features.
* Access to subject matter experts and WhatsApp beta programs.

### 📱WhatsApp Features

#### Text messages

* Plain text messages
* Rich text messages
* URL preview

#### Interactive messages

* List messages
* Reply buttons
* Call-to-action buttons
* Location request
* Call-to-action URL button on free-form message

#### Commerce messages

* Multi-product messages
* Product catalog template
* Shopping cart experience

#### Media

* Images
* Audio
* Document
* Video
* Voice notes

#### Message templates

* Text message templates
* Language packs
* Media message templates
* Interactive message templates

#### Other

* Location sharing
* Contact sharing
* Ads That Click to WhatsApp
* Conversational components (Icebreakers and Commands)
* Business read receipt

{% hint style="success" %}
Contact our [Sales Team](https://www.clickatell.com/contact/contact-sales/) to discover how WhatsApp can digitally transform your business!
{% endhint %}


# Apple Messages for Business

Apple Messages for Business (AMB) enables direct customer communication through the Messages app, allowing businesses to use the full power of Apple’s messaging framework to resolve issues, schedule appointments, make purchases, and process payments. Apple must review and approve every AMB implementation, and both live agent ([Chat Desk](/platform-capabilities/live-agent-chat)) and automated support ([Chat Flow](/platform-capabilities/automations)) capabilities are required for this service.

### **✨Benefits of Clickatell’s Apple Messages for Business**

* Easy setup and management of rich and interactive customer journeys.
* Integrated solution allowing re-usability of integration across multiple touchpoints.
* Ability to manage both automated and assisted journeys through one platform.
* Seamless updates with new version releases require no investment or development funding.

### 📱Apple Messages for Business Features

#### Text messages

* Plain text messages
* Rich text messages
* URL preview

#### Interactive messages

* List picker
* Quick-reply buttons
* Time picker
* Form messages
* iMessage app

#### Attachments

* Audio (.caf)
* Documents (.doc, .xls, .xlsx, .pdf, .ics)
* Passes (.pkpass)
* Augmented reality (.usdz)

#### Rich links

* Supports images, videos & maps

#### Miscellaneous

* Capability list
* Tapbacks
* Typing indicator
* Intent-and group-based routing
* Entry points
* Closed conversations

{% hint style="success" %}
Contact our [Sales Team](https://www.clickatell.com/contact/contact-sales/) to discover how Apple Message for Business can benefit your business!
{% endhint %}


# Regional USSD

{% hint style="warning" %}
Not available for self-serve clients.
{% endhint %}

Clickatell's USSD gateway offers a reliable and secure channel for enterprises to engage with users in **South Africa** and **Nigeria**. As an aggregator, Clickatell provides API access to its managed USSD gateway, enabling enterprises to offer USSD-based services to their customers, while managing connections to the mobile network operators.

Clickatell offers two types of USSD products:

* **Mobile-initiated (MI):** Also known as USSD Pull, the end-user initiates the USSD session on their handset.&#x20;
* **Network-initiated (NI):** Also known as USSD Push or Mobile Terminating USSD, the application starts the USSD session on the handset. Handsets handle the notification differently, but most handsets will beep and display the text sent by the application. This is often presented as an interactive menu end-users can respond to. USSD Push enables various use cases like subscriber surveys, payment verification, and marketing messages. *(Available in selected territories and networks.)*

Clickatell's USSD gateway integrates with additional Clickatell services, enabling non-technical staff to design rich automated experiences. [Chat Flow](/platform-capabilities/automations) allows visual creation and management of customer communications and workflows across multiple channels (SMS, USSD, WhatsApp). Additionally, Transactional APIs enable customers to purchase prepaid mobile, data, electricity, and even make donations.

{% hint style="info" %}
See our comprehensive [**USSD User Guide**](https://guides.clickatell.com/ussd-user-guide) for details on using USSD messaging.
{% endhint %}

### **✨ Benefits of Clickatell’s USSD offering:**

* Hosted solution significantly reducing the capital requirements and the need for in-house mobile technical skills.&#x20;
* Attractive volume-based per session tapered pricing.
* Single point of contact for billing, technical, and operational areas.
* A single secure access point across all networks (selected countries) and services.
* Quality of service across the USSD value chain through active monitoring of USSD systems and carrier/client connections.
* An enterprise-grade experience through a fully managed USSD connectivity service and enterprise-level support.
* Reporting and analytics.
* Ability to blacklist mobile numbers if not already blacklisted by the network operator.
* Service code management.
* Access to a subject matter expert.
* USSD usage can be reverse-billed to the institution.

### 📱USSD Features

* USSD gateway configuration
* Network-initiated interactive messaging
* Mobile-initiated interactive messaging
* USSD service code acquisition
* Reporting

{% hint style="success" %}
Contact our [Sales Team](https://www.clickatell.com/contact/contact-sales/) to discover how USSD can expand the reach of your business!
{% endhint %}


# Broadcast Messenger

With over three billion users worldwide and an average open rate of 98%, WhatsApp is a must-have channel in your conversational marketing mix. Clickatell's Broadcast Messenger for WhatsApp will quickly get you ramped up and running to start driving value from this channel.

{% hint style="info" %}
See our comprehensive [Broadcast Messenger](https://guides.clickatell.com/broadcast-messenger) overview for details on using the application.
{% endhint %}

### ✅ What can Broadcast Messenger do for you? <a href="#what-can-whatsapp-campaign-manager-do-for-you" id="what-can-whatsapp-campaign-manager-do-for-you"></a>

* Simplify and personalize your marketing efforts.
* Expand your reach by leveraging WhatsApp.
* Optimize your results with quick campaign creation and robust analytics.
* Improve customer engagement via rich two-way communication.
* Onboard, set up, and execute campaigns immediately without integration.
* Provide better customer service by setting up auto-replies and managing opt-outs.
* Use pre-approved message templates for quicker turn-around time.
* Track the progress and performance of your campaigns online.

### 🔑 What features are included? <a href="#what-features-are-included" id="what-features-are-included"></a>

* Broadcast Messenger tool (web app)
* One- and two-way messaging
* Campaign scheduling and management
* Contact management
* Message responses
* Opt-out management
* Template management
* Auto-response
* High-volume deliverability
* Delivery logs
* Engagement triggers

<figure><img src="/files/N9QD1YPGLPjvwc5Iprao" alt=""><figcaption></figcaption></figure>


# Broadcast Messenger

Amplify your marketing impact with Broadcast Messenger.


# SMS Campaign Manager

Increase the effectiveness of your marketing campaigns with well-orchestrated campaign management. Campaign Manager lets you launch SMS campaigns in minutes, increasing customer conversion rates in a targeted and cost-effective manner.

### ✅ What can SMS Campaign Manager do for you? <a href="#what-can-sms-campaign-manager-do-for-you" id="what-can-sms-campaign-manager-do-for-you"></a>

* Engage more of your customers, creating brand awareness and driving sales.
* Grow your brand, making it more relevant and attractive to mobile-first customers.
* Reach more customers and drive better results at lower business costs.
* Communicate securely, reliably, and instantly with your customers.
* Provide a single interface for business marketers to execute SMS campaigns.
* Onboard, set up, and execute campaigns immediately without integration.
* Engage with your customers via two-way communication and auto-replies.
* Track the progress and performance of your campaigns online.

### 🔑 What features are included? <a href="#what-features-are-included" id="what-features-are-included"></a>

* Campaign Management (new campaign, campaign templates, scheduling).
* Message sending (single and bulk SMS messages).
* Opt-In/Opt-Out Management (keywords, manage subscribed/unsubscribed numbers, new subscriber alerts).
* Contact & List Management (add, import/export, edit contacts, and manage distribution lists/groups).
* Subscription Management (set up & manage sent number and manage top-ups).
* User Management (add, edit, delete users, manage user roles & permissions).
* Reports/analytics (generate logs for inbox and outbox).
* Tools (create short links, click counter, export short links, non-GSM character checker).
* High volume deliverability (50 Transactions Per Second – for more contact your account manager).
* Performance reporting.

{% hint style="success" %}
Contact our [Sales Team](https://www.clickatell.com/contact/contact-sales/) to find out more about using our SMS Campaign Manager!
{% endhint %}

<figure><img src="/files/rmA7f0juqqEVQrdaVKNj" alt=""><figcaption></figcaption></figure>


# Automations

Build meaningful conversations with your customers using Chat Flow.

### What is Chat Flow?

[Chat Flow](https://www.clickatell.com/products/chatflow/) is an easy-to-use web-based application that allows you to quickly and collaboratively design, build, and deploy automated conversational experiences across multiple chat applications and connect them to your organization’s core functional APIs.&#x20;

Chat Flow provides app-like experiences to your customers without them having to download another app, delivering powerful functionality from right within their trusted chat app.&#x20;

{% hint style="info" %}
See our comprehensive [**Chat Flow User Guide**](https://guides.clickatell.com/flow) for details on using the application.
{% endhint %}

<figure><img src="/files/t2ZxCCxFMZz1RawlZPiN" alt=""><figcaption><p>A powerful drag-and-drop web app used to build sophisticated conversational workflows.</p></figcaption></figure>

### 💬 What channels are supported?

Build conversational experiences on one or more of the following messaging channels:&#x20;

* [WhatsApp](/platform-capabilities/messaging-channels/whatsapp-business)
* [SMS](/platform-capabilities/messaging-channels/global-sms)
* [Apple Messages for Business](/platform-capabilities/messaging-channels/apple-messages-for-business)
* [USSD](/platform-capabilities/messaging-channels/regional-ussd) *(Available in certain regions only.)*

### 🔑 What features are included?

* Drag-and-drop workflow builder (web app)
* Interactive messaging
* API orchestration
* 3rd party integrations (CRM Integration)
* Keywords & shortcuts
* Previewer (emulator)
* Debugger
* Workflow management
* Multi-channel routing
* Customer authentication
* Message encryption
* Two-way media sharing
* Location sharing
* Environment management
* Regular expression management
* System integration testing (SIT)
* Handover to live agent
* Handover to AI assistant

{% hint style="success" %}
Contact our [Sales Team](https://www.clickatell.com/contact/contact-sales/) to discover how Chat Flow can help you serve customers quicker and more efficiently!
{% endhint %}


# Live Agent Chat

Deliver better customer service experiences with Chat Desk.

### 🗣 What is Chat Desk?

[Chat Desk](https://www.clickatell.com/products/chat-desk/) is Clickatell’s easy-to-use customer support software that enables real-time, live agent communication with customers on multiple messaging channels via a single web interface.&#x20;

Chat Desk integrates seamlessly with [Chat Flow](/platform-capabilities/automations), Clickatell's self-service chatbot builder, for businesses that want to deliver both automated messaging and human support agents.&#x20;

Chat Desk also makes monitoring queries, chats, agent performance, and SLAs easier to ensure customers receive the best and most efficient service.

{% hint style="info" %}
See our comprehensive [**Chat Desk User Guide**](https://guides.clickatell.com/chat-desk) for details on using the application.
{% endhint %}

<figure><img src="/files/kHP8cykiKAqLNTSRdnf2" alt=""><figcaption><p>Real-time, live agent communication with customers on multiple chat channels via a single web interface.</p></figcaption></figure>

### 💬 What channels are supported?

Chat to your customers in real-time on one or more of the following messaging channels:&#x20;

* [WhatsApp](/platform-capabilities/messaging-channels/whatsapp-business)
* [SMS](/platform-capabilities/messaging-channels/global-sms)
* [Apple Messages for Business](/platform-capabilities/messaging-channels/apple-messages-for-business)

### 🔑 What features are included?

* Help desk support (web app)
* Call deflection
* Auto responses
* Supervisor view
* Department management
* Agent transfer
* Internal comments
* Suggested responses via AI assistant
* Customer profile
* Chat queue management
* Chat management
* Media sharing
* Location sharing
* Chat surveys

{% hint style="success" %}
Contact our [Sales Team](https://www.clickatell.com/contact/contact-sales/) to discover how Chat Desk can streamline your customer service!
{% endhint %}


# Digital Commerce

Send a message, receive a payment.

### 💸 What is Chat 2 Pay?

Clickatell makes it easy and convenient for customers to pay with a simple reply in their favorite messaging channel.&#x20;

[Chat 2 Pay](https://www.clickatell.com/products/chat2pay/) lets you embed a payment link in an SMS or WhatsApp message that customers can use to submit their payment information on a secure Clickatell-hosted checkout page. This information is used when you process their payments via your payment processor/gateway. With our innovative tokenization and customer profile feature, repeat customers can simply reply with a text message to complete a purchase.

{% hint style="info" %}
See our comprehensive [**Chat 2 Pay User Guide**](https://guides.clickatell.com/chat-2-pay-user-guide) for details on using our in-channel payment capability.
{% endhint %}

### 💬 What channels & applications are supported?

Deliver in-channel payment experiences using the following channels and applications: &#x20;

* [WhatsApp](/platform-capabilities/messaging-channels/whatsapp-business)
* [SMS](/platform-capabilities/messaging-channels/global-sms)
* [Chat Flow](/platform-capabilities/automations) (automations)
* [Chat Desk](/platform-capabilities/live-agent-chat) (live agent chat)
* [Salesforce Order Management Integration](/platform-capabilities/integrations)

### 🔑 What features are included?

* Payment acceptance
* Payment link
* Hosted checkout
* Tokenization
* Product catalog
* Branded order page
* Messaging checkout
* Account authentication
* Customer profile
* Fraud & risk management
* Reconciliation
* Accept major credit cards
* Merchant onboarding
* Chargebacks
* Refunds
* MID & key management

{% hint style="success" %}
Please contact our [Sales Team](https://www.clickatell.com/contact/contact-sales/) to discover how you can bring chat commerce to life!
{% endhint %}


# Artificial Intelligence

Chat has never been more intelligent.

### 🪄 What is Clickatell AI?

Clickatell AI leverages an array of AI technologies to understand customer intent and deliver automated, conversational responses that are accurate, insightful, and contextually relevant.

The Clickatell AI service enables you to build, customize, and train modern AI assistants built on a hosted large language model (LLM) and pre-trained on specific information provided by the business. It lets customers ask questions and extract accurate answers from either a bot or a live agent (assisted by the AI).

The service is available across the Clickatell platform, retaining the history of interactions while ensuring a robust per-customer divide in data.​ It is channel-agnostic and can be used across business divisions.

{% hint style="info" %}
See our comprehensive [**Clickatell AI User Guide**](https://guides.clickatell.com/clickatell-ai-user-guide) for details on using the application.
{% endhint %}

### 🔑 Overview of the service

* **Trained on your information:** Businesses can fine-tune the model’s responses by uploading their own information, enabling customer-tailored responses and significantly reducing hallucinations.
* **Continuous learning:** Clickatell AI learns in real-time, enhancing its own capabilities over time. This reduces the reliance on costly LLM calls for every interaction while reducing the need for manual bot programming.
* **Built to be modular:** This allows the service to be extended as needed, as well as hot-swappable between components, integrations, technologies, and language models.​
* **Support for multiple LLMs:** LLMs are trained on different datasets and have different strengths. To utilize this, we support multiple LLMs and configurations.

###

{% hint style="success" %}
Contact our [Sales Team](https://www.clickatell.com/contact/contact-sales/) to discover how Clickatell AI can take your customer service to the next level!
{% endhint %}


# Integrations

Integrations to take chat commerce even further.

Bring additional functionality into the conversation by integrating other applications and platforms to make messaging with customers more effective than ever.

## 🧩 Overview of integrations

You can integrate your [Chat Flow](/platform-capabilities/automations) and [Chat Desk](/platform-capabilities/live-agent-chat) applications with various 3rd-party applications such as Salesforce, Zendesk Sell, and Shopify. Sync data across your existing platforms to facilitate personalized conversations and enhance customer engagement, improving customer experiences.

{% hint style="info" %}
See our comprehensive [**Integrations User Guide**](https://guides.clickatell.com/integrations) for details on using these integrations.
{% endhint %}

<figure><img src="/files/S71370Y0sOqcWsIKVaC2" alt=""><figcaption></figcaption></figure>

### 📱 What 3rd-party applications are supported?

* Zendesk Support
* Salesforce
* Shopify
* Zendesk Sell

### 🔑 What features are included?

* CRM integration
* Sales lead capture
* Customer profile retrieval
* Customer ticket management
* Customer purchase retrieval
* OMS Integration
* Fulfillment
* Delivery management

<table><thead><tr><th></th><th data-type="checkbox">READ</th><th data-type="checkbox">WRITE</th></tr></thead><tbody><tr><td><a href="/pages/84xtR8WIfJiDqsH7ngEw">Chat Flow</a></td><td>true</td><td>true</td></tr><tr><td><a href="/pages/czrD6OJUfvgkQ5vl5PI9">Chat Desk</a></td><td>true</td><td>false</td></tr></tbody></table>

####

{% hint style="success" %}
Please contact our [Sales Team](https://www.clickatell.com/contact/contact-sales/) if you are interested in using Integrations.
{% endhint %}


# Dashboards in Clickatell Portal

The dashboards in the Clickatell User Portal give you an overview of activities and performance across your channels and applications.&#x20;

{% hint style="info" %}
Also see [here ](/data-and-analytics/raw-data-access)for our Data Sharing Service giving you access to your raw data.
{% endhint %}


# Messaging channels

You get access to the following channel-specific reports in the Clickatell Portal:

* [​Full Analytics](#full-analytics)​
* ​[Channels Report​](#channels-report)
* ​[SMS Stop List](#sms-stop-list)

{% hint style="success" %}
These reports can be **downloaded** as PDFs. If any filters were applied, only the filtered results are exported.

Where applicable, view **Definitions** for terms used in the reports via the button in the top right.
{% endhint %}

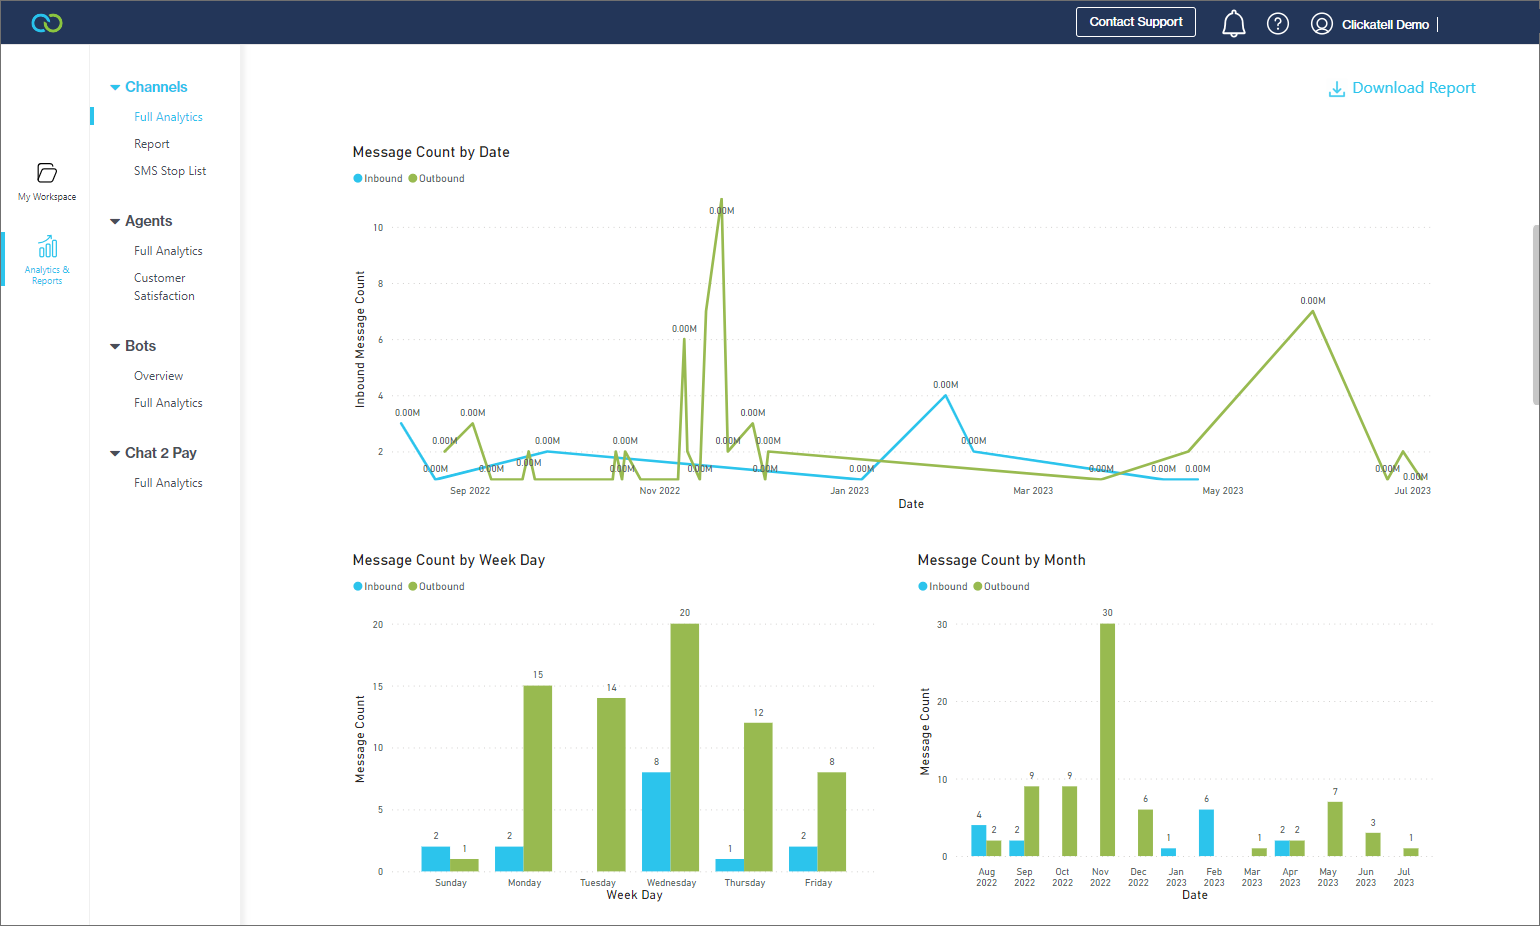
## **Full** Analytics <a href="#full-analytics" id="full-analytics"></a>

Get a full view of all your channels' data over different periods.

* Use the buttons at the top to switch views between [SMS](#sms-full-analytics), [WhatsApp](#whatsapp-full-analytics), and [WhatsApp Message](#whatsapp-templated-report) [Templates](#whatsapp-templated-report).
* You can filter the data based on **Environment**, **Country, Date,** and/or **Template.**
* At the top, you'll find key metrics.
* Scrolling down, you'll find graphical representations of the messaging data.

### SMS Full Analytics ![](/files/HwqA11vd1L879lgTZ5wO) <a href="#sms-full-analytics" id="sms-full-analytics"></a>

<figure><img src="/files/U3fJ51s8QIW2T3whuoES" alt=""><figcaption></figcaption></figure>

<figure><img src="https://files.gitbook.com/v0/b/gitbook-x-prod.appspot.com/o/spaces%2FPn4e68r3JCRsHcNKJ78y%2Fuploads%2Fj0CJ9oXsIgetx4ZCtFzX%2Fimage.png?alt=media&#x26;token=0f774f10-ffad-43ec-bade-a28ae6c74f57" alt=""><figcaption><p>Example of SMS graphs</p></figcaption></figure>

### WhatsApp Full Analytics <a href="#whatsapp-full-analytics" id="whatsapp-full-analytics"></a>

<figure><img src="/files/ifImDZRGR4c0QX9X1dRe" alt=""><figcaption><p>Example of the WhatsApp channel view</p></figcaption></figure>

<figure><img src="/files/P2s5tDb5gOL2W109Ggm9" alt=""><figcaption><p>Example of WhatsApp graphs</p></figcaption></figure>

### WhatsApp Templated Report

<figure><img src="/files/2kKdNGKfKIoO8Z9T9jFC" alt=""><figcaption><p>Example of the WhatsApp templated messages view</p></figcaption></figure>

<figure><img src="/files/5GpaAuAOe9vkd2KlMydJ" alt=""><figcaption><p>Example of the WhatsApp templated messages graphs</p></figcaption></figure>

## Channels Report

Create, view, and download (PDF) custom reports based on your channel activity. This can be done for sent and received messages respectively.&#x20;

Select the applicable filters and click *Generate Report* to generate the results in table format.

<figure><img src="/files/3iKo71ltwdP8xTtCKr18" alt=""><figcaption></figcaption></figure>

## SMS Stop List

View and download (PDF) a list of the customers who opted out from your account's SMS channel for a specified date range.  &#x20;

<figure><img src="/files/78eXfALWfcHL7DbJTKl0" alt=""><figcaption></figcaption></figure>


# Chat Desk (Agent Service Desk )

You get access to the following Chat Desk reports in the Clickatell Portal:

* [​Full Analytics​](#full-analytics)
  * ​[Summary](#summary-report)​
  * ​[Agents](#agent-report)​
  * ​[Templates](#templates-report)
* [​Customer Satisfaction](#customer-satisfaction)

{% hint style="success" %}
These reports can be **downloaded** as PDFs. If any filters were applied, only the filtered results are exported.

Where applicable, view **Definitions** for terms used in the reports via the button in the top right.
{% endhint %}

## **Full Analytics** <a href="#full-analytics" id="full-analytics"></a>

This report provides a full view of your Chat Desk data over different periods.

* Use the buttons at the top to navigate to the [Summary Report](#summary-report), [Agent Report](#agent-report), or [Templates Report](#templates-report).&#x20;

### Summary Report  <a href="#summary-report" id="summary-report"></a>

The Summary Report provides an in-depth view of **chat activities**.

* The report can be filtered by period and default month.
* At the top of the report, various **metrics** summarize how Chat Desk and your agents are performing.

<figure><img src="/files/Yqw9BLUgPN22rg6GUcEu" alt=""><figcaption></figcaption></figure>

Metrics include:

* Total number of chats and the daily average number of chats
* Number of tickets
* Number of closed chats
* Number of tickets closed by an agent
* Average number of outbound and inbound messages
* Average number of messages per conversation
* Number of active, new, and returning end-users
* Total number of business interactions

Scrolling down, you'll find **graphical** representations of your data.

<figure><img src="/files/cg52krHNK2YFWEOpIEqd" alt=""><figcaption></figcaption></figure>

<figure><img src="/files/MNwMyEf5WY5sEv6aH3PL" alt=""><figcaption></figcaption></figure>

### **Agent Detail Report** <a href="#agent-report" id="agent-report"></a>

The Agent Detail report provides an in-depth view of **agent performance**. The report can be filtered by period and time of day.

At the top of the report, various **metrics** summarize how your agents are performing.

<figure><img src="/files/q64bQNJTmLLI91MF9EB3" alt=""><figcaption></figcaption></figure>

Metrics include:&#x20;

* Total number of active agents
* First chat resolution rate and repeat chat rate
* The ratio of agents to chats
* Average response time and average handle time
* Transfer rate
* Number of tickets created outside of business hours
* Average duration between interactions and between messages

Scrolling down, you'll find **graphical** representations of your data.

<figure><img src="/files/N1mTpMCXLAY7dXRuxMJ7" alt=""><figcaption></figcaption></figure>

<figure><img src="/files/8XOkO99SaLipr2IeLLFW" alt=""><figcaption></figcaption></figure>

<figure><img src="/files/PxPyuXSR7ckABmru3KO7" alt=""><figcaption></figcaption></figure>

### **Templates Report** <a href="#templates-report" id="templates-report"></a>

This report provides information on the usage of message templates in Chat Desk and includes data on the following:

* Outbound templates and inbound responses by date&#x20;
* Outbound templates and inbound response by time of day&#x20;
* Outbound templates and inbound responses by day of the week&#x20;
* Outbound templates and inbound response by interaction type&#x20;
* Outbound templates and inbound response by sub-category &#x20;
* Outbound templates and inbound responses by template name&#x20;
* Outbound templates by agent name&#x20;
* Outbound templates by department name and template name

<figure><img src="/files/jPYZRLh5Bte6FdHCvNyH" alt=""><figcaption></figcaption></figure>

## **Customer Satisfaction**

Get an overview of today's NPS and CSAT survey results (given these surveys have been [set up in Chat Desk](https://guides.clickatell.com/chat-desk/chat-desk-dashboard/settings)).

The report includes:

* Total surveys presented and answered
* Net Promoter Score and Average CSAT Score
* Rating per question

<figure><img src="/files/b5MKZUEp6eP3hmVeRnsW" alt=""><figcaption></figcaption></figure>


# Chat Flow (Automations)

You get access to the following Chat Flow reports in the Clickatell Portal:

* [​Full Analytics​](#full-analytics)

{% hint style="success" %}
These reports can be **downloaded** as PDFs. If any filters were applied, only the filtered results are exported.

Where applicable, view **Definitions** for terms used in the reports via the button in the top right.
{% endhint %}

## **Full Analytics** <a href="#full-analytics" id="full-analytics"></a>

This report provides a full view of the user's Chat Flow data over different periods.

* Use the buttons at the top to switch between the [General ](#general-report)and [Flow Feature](#flow-feature-report) views.

### General Report <a href="#general-report" id="general-report"></a>

At the top of the report, various **metrics** summarize how Chat Flow is performing.

<figure><img src="/files/gHMvSeVjIZ4wvZOs7wZY" alt=""><figcaption></figcaption></figure>

Metrics include:

* Total interactions and total sessions
* Total number of active, new, and returning users
* Top flow by interactions and by sessions
* Top channel by interactions and by sessions
* Top keyword used

Scrolling down, you'll find **graphical** representations of your data.

<figure><img src="/files/4pmXflxcK6HDRyKVpH7p" alt=""><figcaption></figcaption></figure>

### Flow Feature Report

The Flow Feature report provides an in-depth view of the **flow features** you've set up in Chat Flow (Clickatell will help you set these up using your [data collections](https://guides.clickatell.com/flow/reporting-and-analytics/collections-and-reporting-labels)).

Flow features let you map customer journeys from initial contact to final outcome or transaction. For example, a series of steps in a flow for checking in to a flight can be grouped as a "CheckInStart" feature and tracked for drop-offs, successes, failures, or the number of users that visited that step.&#x20;

This type of journey mapping offers deep insight into your customers' behavior and how they move through your workflows, which flows are used most, and where the drop-off rates are the largest.&#x20;

{% embed url="<https://vimeo.com/868275762/a9f2dd664a?share=copy&ts=53000>" %}
Map your customers' behavior as they move through your workflows.
{% endembed %}

At the top of the report, various **metrics** summarize your flow features.

<figure><img src="/files/xD2yHm4BCbJkYEcBxQS2" alt=""><figcaption></figcaption></figure>

Scrolling down, you'll find **graphical representations** of your data.

<figure><img src="/files/b0yj45UP4NBG0Lbzh0Ld" alt=""><figcaption><p>Interactive graph to track specific user journeys</p></figcaption></figure>

<figure><img src="/files/nCndBJ2a0oQqSYVg8xUA" alt=""><figcaption></figcaption></figure>

<figure><img src="/files/zxnWbSwz7AeqqZkauZmO" alt=""><figcaption></figcaption></figure>


# Chat 2 Pay (Payments)

You get access to the following Chat 2 Pay reports in the Clickatell Portal:

* [Full Analytics](#full-analytics)

{% hint style="success" %}
These reports can be **downloaded** as PDFs. If any filters were applied, only the filtered results are exported.

Where applicable, view **Definitions** for terms used in the reports via the button in the top right.
{% endhint %}

## **Full Analytics**

Get an overview of the **Chat** **2 Pay** activity on your account. You can view it for a selected date range, channel, or integrator.

At the top of the report, various **metrics** summarize how Chat 2 Pay is performing.&#x20;

<figure><img src="/files/mMaAwWDHiTxk9BJy3IG9" alt=""><figcaption></figcaption></figure>

Metrics include:

* Number of **successful payments**, their value, and the success rate.
* Number of **unsuccessful payments** and their value.
* Payment link click rate.
* Month-on-month growth rate of active customers.
* Percentage of returning customers.

{% hint style="success" %}
The report can be **downloaded** as PDF by selecting *Download Report* in the top right. If any filters were applied, only the filtered results are exported.

View **Definitions** for terms used in this report via the button in the top right.
{% endhint %}

Scrolling down, you'll find **graphical** representations of your data.

<figure><img src="/files/5kuXv6ksxA2PriIydT2W" alt=""><figcaption></figcaption></figure>

<figure><img src="/files/c0zjA4Hpw7G4QKWQ3BdB" alt=""><figcaption></figcaption></figure>

<figure><img src="/files/eS1yJWLDmfVkUHQgBAdw" alt=""><figcaption></figcaption></figure>


# Integrations

You get access to the following Integrations reports in the Clickatell Portal:

* [Full Analytics](#full-analytics)

{% hint style="success" %}
These reports can be **downloaded** as PDFs. If any filters were applied, only the filtered results are exported.

Where applicable, view **Definitions** for terms used in the reports via the button in the top right.
{% endhint %}

## Full Analytics

This report provides a full view of your Integrations data over different periods.

You can filter the data on:

* Environment (All, Production, Sandbox)
* Provider (All, Salesforce, Zendesk Sell, Zendesk Support, Shopify)
* Application name (All, Chat Flow, Chat Desk)

<figure><img src="/files/Ht1N41rFJDhtuNG4vUR3" alt=""><figcaption></figcaption></figure>

At the top of the report, various **metrics** summarize your Inegrations usage.

Metrics include:

* Total number of API calls made.
* Number of providers used.
* Total number of API integrations and how many are active.
* Number of API limit reached responses (429).

Scrolling down, you'll find **graphical** representations of your data.

<figure><img src="/files/7nPGSNKgXi6Snaqi5Z2f" alt=""><figcaption></figcaption></figure>

<figure><img src="/files/jDlBlaTlyemGBxx2Co3A" alt=""><figcaption></figcaption></figure>


# Raw Data Access

In addition to the [online dashboards](/data-and-analytics/dashboards-in-clickatell-portal), clients can also retrieve raw data from a secure server, enabling you to analyze and apply your own insights in your environment and keep the history in your data lakes.

The raw data is supplied as standardized, templated sets of data elements referred to as "data templates". *Data Templates* are generic datasets created for each application and normalized for clients' easy consumption. You can download these sets of raw data (CSV files) from a Clickatell-hosted cloud SFTP server.&#x20;

The **weekly** Data Sharing service is included as standard in all packages. You can [upgrade ](/platform-packages/upgrades-and-extras)to a higher frequency delivery at an **additional cost**. The table below describes the options available.

<figure><img src="/files/JwuImbnZm5xU73zmgC9x" alt="" width="563"><figcaption></figcaption></figure>

### The Data Sharing service includes:

* A set of standard **data templates** based on the package purchased. Each template includes a standard set of data elements. Data can be downloaded on a fixed schedule based on the selected delivery frequency.&#x20;
* The associated **manifest file** containing a summary view of the data in each template (if downloads occur daily or more frequently – see below).&#x20;
* A **data dictionary** with detailed definitions of each data element and possible values.&#x20;
* One setup per account – setup includes automatic mapping of datasets and pipeline augmentation based on package selection.

### Delivery Conditions

&#x20;A detailed Data Sharing Agreement between Clickatell and you, the client, outlines the terms and conditions for data sharing. This establishes clear guidelines to ensure the responsible and ethical use of the shared data and to protect the interests of all parties involved.&#x20;


# User Portal

The Clickatell Portal is a central, web-based site where you can access and manage your Clickatell account and all your applications and messaging channels.&#x20;

The image below shows the main sections of the Portal. Depending on your [package](https://www.clickatell.com/packages/), you'll have access to certain channels and applications and your view might differ slightly.

### My Workspace

This serves as the "main dashboard".  View and manage all channels, applications, numbers, test phones, and API integrations on your Clickatell account.

<figure><img src="/files/4MJcw8MVf7mUFz7c6Amk" alt=""><figcaption><p>The My Workspace tab</p></figcaption></figure>

### **Analytics & Reports**

{% hint style="info" %}
Learn more about Dashboards[ here](/data-and-analytics/dashboards-in-clickatell-portal).
{% endhint %}

Get an overview of the activities across your channels and applications. View key metrics and graphical data.

<figure><img src="/files/0j7NYBqCXLfbxRBJPV1K" alt=""><figcaption><p>The Analytics &#x26; Reports tab</p></figcaption></figure>

### Account Settings

The Clickatell User Portal also provides access to:

* [Account Management](/clickatell-user-portal/user-portal/account-management)
* [User Management](/clickatell-user-portal/user-portal/user-management)
* [View & Edit API Integrations](/clickatell-user-portal/user-portal/view-and-edit-api-integrations)

<figure><img src="/files/JyGBWSPSyw6ObBTRElVY" alt="" width="409"><figcaption></figcaption></figure>


# View & edit API integrations

{% hint style="success" %}
If you are on one of our paid packages, Clickatell will set up API integrations on your behalf.
{% endhint %}

There are two types of API integrations you can set up in your Clickatell account:

* **Basic HTTP API:** Ideal if you want to use SMS as your only channel.&#x20;
* **One API:** Allows you to use both WhatsApp and SMS channels without having to program them individually. Future-proof your implementation as Clickatell continues to add support for additional channels.&#x20;

An API integration is created as part of the wizard when creating a new SMS or WhatsApp setup.

* **WhatsApp** setups automatically make use of **One API.**
* For **SMS** setups, you can choose between **HTTP** and **One API** *(recommended)*.

{% hint style="info" %}
For more detailed information about our APIs, see our[ Developer Documentation](https://help.clickatell.com/developers-documentation/).
{% endhint %}

1. Navigate to *My Workspace* -> *API Integrations* for a list of all the integrations in your account.&#x20;

<figure><img src="/files/COvdE87VhbbGyXsi45c1" alt=""><figcaption></figcaption></figure>

2. To view or update an API's details, select it from the table.&#x20;

<figure><img src="/files/6MSkUpXakxQShSOBAa1s" alt=""><figcaption></figcaption></figure>

3. Click *Update Changes*.

<figure><img src="/files/q0SwtRrUOdRJCZhruKSj" alt=""><figcaption></figcaption></figure>


# Account Management


# Account details

### View and edit account details

You can view and edit your account details under *Account Details* in the Clickatell Portal.&#x20;

<figure><img src="/files/GrbfcApS7yl1IFbTdfMH" alt="" width="222"><figcaption></figcaption></figure>

Update your account details and click *Save*.

<figure><img src="/files/zERaobrmN8TqQHeb3y2U" alt=""><figcaption></figcaption></figure>

### Account Package Information&#x20;

You can view the details of the account package you are on.

Select the *Account Package* tab to see what is included in your package and what your current usage is. &#x20;

<figure><img src="/files/wbCIxSjYIZlsRleKtw99" alt=""><figcaption></figcaption></figure>

### Close your account

**Account owners** can also close the account from here.

Click the *Close Account* button in the bottom right **(only visible if you are the account owner)** and confirm that you want to close the account.&#x20;

{% hint style="danger" %}
IMPORTANT:

* Once closed, your account cannot be reopened.&#x20;
* All subscriptions and account balances are lost when you close your account.
* Only account owners can close an account.
  {% endhint %}

<figure><img src="/files/OX9ZM6x8vjT7ut8CuZBW" alt=""><figcaption></figcaption></figure>


# Billing and Payments

To view and manage your billing and payment details, click the profile icon in the top right of your screen and select *Billing and Payments*.

<figure><img src="/files/8tMcUay9WzMbGJQkjdWv" alt="" width="196"><figcaption></figcaption></figure>

From here you can:

* Add and edit billing details.
* Add and manage payment methods *(self-serve only).*
* View your invoices and transaction history *(self-serve only).*

### Add and update billing details

{% hint style="info" %}
Billing details are required before any numbers or subscriptions can be purchased.
{% endhint %}

1. Go to the *Billing Details* ta&#x62;*.*
2. Add or update your billing information and set your billing currency.

Note that you cannot change your billing currency once it is saved.

<figure><img src="/files/xo626rzZlYseUV2OQL3N" alt=""><figcaption></figcaption></figure>

### Add and manage payment methods

{% hint style="info" %}
Only relevant to self-serve clients.
{% endhint %}

1. Go to the *Payment Methods* tab to see all the payment methods added to your account are listed.&#x20;
2. You can:
   * **Add** a new payment method: Click the *+Add New Payment Method* button, and choose between adding a debit/credit card or linking a PayPal account.
   * **Delete** a payment method: Click the *bin* icon on the right.
   * **Change your default** payment method: Select the radio button next to the payment method you want to use as default.

<figure><img src="/files/9pFNFPW2X4foiEgiP4Sl" alt=""><figcaption></figcaption></figure>

3. When adding a new payment method, complete the information and agree to Clickatell's Terms and Conditions.
4. To use the specific card for automatic payments, make sure to select the appropriate boxes when adding the payment method:

<figure><img src="/files/kUHirNghQ87guYXVuoU5" alt=""><figcaption></figcaption></figure>

#### View current balance <a href="#view-current-balance" id="view-current-balance"></a>

Your account balance must be positive to send any messages.&#x20;

To see your current balance:

1. Click the profile icon in the top right of your screen.
2. Your current balance is displayed as shown below.

<figure><img src="/files/YsTAOgMkx9KIhKGPQ9uy" alt="" width="389"><figcaption></figcaption></figure>

#### Invoices and transaction history

{% hint style="info" %}
Only available for self-serve clients.
{% endhint %}

#### View and download your invoices <a href="#view-and-download-your-invoices" id="view-and-download-your-invoices"></a>

1. Go to the *Invoices* ta&#x62;*.*
2. Choose the date range you want to view the invoices for or use the search bar to search for a specific invoice.
3. You can also download an invoice as a PDF by clicking *View* on the right.

<figure><img src="/files/z2XaRyErb3hU4SA3WIPR" alt=""><figcaption></figcaption></figure>

#### View transaction history <a href="#view-transaction-history" id="view-transaction-history"></a>

1. Go to the *Transaction History* ta&#x62;*.*
2. Choose the date range you want to view your transactions for or use the search bar to search for a specific transaction.

<figure><img src="/files/6B610ei6WrMcwxOIVysV" alt=""><figcaption></figcaption></figure>


# Profile settings

### View and edit profile settings

To update your profile, click the profile icon in the top right of your screen and select *Profile Settings*.

<figure><img src="/files/9daFFX14XW2RmIWyFWxV" alt="" width="201"><figcaption></figcaption></figure>

Update your profile and click *Save Changes*.

<figure><img src="/files/vI7HcR2O8EN5YL4a1VRp" alt=""><figcaption></figcaption></figure>


# My Purchases

{% hint style="info" %}
Only available to self-serve clients.
{% endhint %}

### View purchases and subscriptions

To view all phone numbers and subscriptions that you've purchased, click the profile icon in the top right of your screen and select *My Purchases*.&#x20;

<figure><img src="/files/2LfvKLo5JOye5dBLjV5D" alt="" width="200"><figcaption></figcaption></figure>

All your purchases (e.g., short codes, long numbers, subscriptions, and renewals) and their details are listed. Any subscriptions that have expired or were canceled are also listed.

<figure><img src="/files/ZrxQ4qa0Il9trqxpYfie" alt=""><figcaption></figcaption></figure>

Clicking on any number from the *Phone Numbers* table displays the subscription details linked to this number. You can change your subscription package, enable/disable auto-renewal, and view a history of payments made on this number subscription (ordered with the most recent at the top).

<figure><img src="/files/B8OxXg5kP2lx5uGQIapu" alt=""><figcaption></figcaption></figure>

Clicking on any subscription from the *Subscriptions* table displays the details of this subscription. You can update your subscription, pay subscriptions due, and view payment history. You can also view how much of your monthly message bundle you've already used.&#x20;

<figure><img src="/files/rQpzkiEyNQOSzIBFxuJM" alt=""><figcaption></figcaption></figure>


# User Management

You can add as many users as you need to your Clickatell account.&#x20;

1. Click on the profile icon in the top right corner and select *User Management*.
2. From here you can:
   * [Add and edit users](#add-and-edit-users)
   * [Create and assign custom roles](#create-and-assign-custom-roles)
   * [Enable SAML & Social Login](#enable-saml-and-social-login)

<figure><img src="/files/M5Gk291HQUO5zuteQbvw" alt="" width="219"><figcaption></figcaption></figure>

### Add and edit users

#### Adding a new user <a href="#adding-a-new-user" id="adding-a-new-user"></a>

1. Click *+ New User*.

<figure><img src="/files/PWE8uwQuUBHOzaA9pSBi" alt="" width="563"><figcaption></figcaption></figure>

2. Add the user's details.
3. Assign one or more roles to the user.&#x20;
   * Select a role from the drop-down for more information about the permissions associated with the role (view in the blue block).
   * If you've added any [custom roles](#create-and-assign-custom-roles), these are also listed in the drop-down to select from.

<figure><img src="/files/2GPu1r2LYJDgb4jssugD" alt=""><figcaption></figcaption></figure>

4. Click *+ Add Role* to assign this role to the user.
   * You can assign more than one role per user.
   * To remove an assigned role, click the "X" icon next to it.
5. Click *Invite User* to send an email invitation to the user.
   * The email contains a link the user uses to set a password and access the portal according to the roles and permissions you've assigned to them.
   * The password must be a minimum of 12 characters and contain at least one lowercase letter, one uppercase letter, one number, and one special character.

<figure><img src="/files/DmrmnTtW4SYrApQRrs3T" alt=""><figcaption></figcaption></figure>

6. The new user is added to the *Users* table with the status of "*Invite Pending*". This will change to "*Active*" once the user accepts the invitation and logs in to the portal.

<figure><img src="/files/ONJWenMPoIHIEGNmrewG" alt=""><figcaption></figcaption></figure>

#### Editing an existing user <a href="#editing-an-existing-user" id="editing-an-existing-user"></a>

1. Select the user you want to edit from the *Users* table.

<figure><img src="/files/sUDOTqb3kp8Lc4B7XiLc" alt=""><figcaption></figcaption></figure>

2. Make your changes and click *Save*.
3. You can also **delete** the user from here.

<figure><img src="/files/eKJ6IOVpQhNzYavoNKFF" alt=""><figcaption></figcaption></figure>

### Create and assign custom roles

You can add and edit custom roles with a bespoke combination of permissions to assign to users.

#### Add a new custom role <a href="#add-a-new-custom-role" id="add-a-new-custom-role"></a>

1. Click *Custom Roles*.
   * All custom roles already added to your account are listed in a table.

<figure><img src="/files/MpVB4YumiCtgllIWkwC4" alt=""><figcaption></figcaption></figure>

2. Click *+New Custom Role*.

<figure><img src="/files/08YL4ej9Ocktoaypjzrr" alt=""><figcaption></figcaption></figure>

3. Give a name and description for the custom role and select the permissions that must be associated with this new role.
4. Click *Add Role*.

<figure><img src="/files/TwYynDqBpPXMjTyBxRHG" alt=""><figcaption></figcaption></figure>

5. The new custom role is added to the *Custom Roles* table and is available to assign to users when[ adding new or updating existing users](#add-and-edit-users).

<figure><img src="/files/VXv6JHrrciA4i09izSTx" alt=""><figcaption></figcaption></figure>

#### Edit a custom role <a href="#edit-a-custom-role" id="edit-a-custom-role"></a>

To **edit** an existing custom role:

1. Select the role you want to edit from the table.
2. Make your changes and click *Save.*
3. You can also **delete** a role from here.

<figure><img src="/files/xXkjGFuCXxEBNtO5jWzC" alt=""><figcaption></figcaption></figure>

### Enable SAML & Social Login

In addition to logging in to their Clickatell account with a username and password, you can also let users log in using:&#x20;

* [**SAML Login:**](#saml-login) Enables single sign-on using the credentials you've set up for your identity provider (IDP) in the Clickatell Portal.
* [**Social Login:**](#social-login) Enables sign-in via a Google account.

{% hint style="success" %}
SAML and Social Login enable quicker and easier sign-in without compromising the security of user accounts.
{% endhint %}

#### SAML login <a href="#saml-login" id="saml-login"></a>

You must configure a specific Identity Provider (IDP) for SAML Login. Once enabled, users will log in to their IDP first through single sign-on before accessing their Clickatell accounts.

To enable SAML login:

1. Navigate to *User Management ->* *SAML.*
2. Click the *Add Domain & Configuration* button.

<figure><img src="/files/9MeIRjBHeGtNxUOSpZDK" alt=""><figcaption></figcaption></figure>

3. Follow these steps to complete the SAML setup:
   1. **Add and verify the domain** to which you want to add SAML, e.g., newtest123.com.
   2. To complete the verification of the domain, you will be required to login to your DNS provider and follow the steps below:
      * ***Note**: Domain verification could take a couple of hours.*

<figure><img src="/files/E8E9WJEiW26VViBsPgbA" alt=""><figcaption></figcaption></figure>

&#x20;        c. Once your domain is verified, add a **name** to identify your provider.&#x20;

&#x20;        d. In the **general settings**, copy the *Identifier* and *Reply URL* displayed after saving your *Provider Name*, and use them in your identity provider configuration to generate a metadata document.

&#x20;        e. In the **metadata**, specify the identifier within the SAML response where a user's email address    is found, then upload the metadata file.

<figure><img src="/files/JunEPrcc20Xrg6TnZqqw" alt=""><figcaption></figcaption></figure>

4. When the SAML configuration is complete, enable SAML login for the domain using the toggle switch.

<figure><img src="/files/ykBeVxK20VPPpoD6s18H" alt=""><figcaption></figcaption></figure>

5. On sign-in (after entering their email addresses), users can use the *Single Sign-On* button to access their Clickatell accounts.

<figure><img src="/files/2FejcFlsaxXuooSxXDbQ" alt="" width="289"><figcaption></figcaption></figure>

{% hint style="info" %}
SAML login is **optional** by default. You can make SAML login **mandatory** by enabling the *Required for login* toggle switch. Mandatory SAML login can be disabled again at any time.

**Note: Enabling mandatory SAML login will affect all users of your organization.**
{% endhint %}

<figure><img src="/files/jT6iUuMstBj6N2FHIFt5" alt=""><figcaption></figcaption></figure>

#### Social Login <a href="#social-login" id="social-login"></a>

{% hint style="warning" %}
You can only enable Social Login on Clickatell accounts linked to Gmail accounts.
{% endhint %}

To enable Social Login via Google:

1. Navigate to *User Management ->* *Social Login.*
2. Enable the toggle switch for Google login.

<figure><img src="/files/IRXBbBi5kDh0Yxr9r9kh" alt=""><figcaption></figcaption></figure>

3. Users can now use the *Sign in with Google* button as an additional method of signing in to their Clickatell accounts.

<figure><img src="/files/tkWeTI4z6DbK3ldk5bMg" alt="" width="287"><figcaption></figcaption></figure>

### Logging in when you have multiple accounts <a href="#logging-in-when-you-have-multiple-accounts" id="logging-in-when-you-have-multiple-accounts"></a>

It is possible to have multiple accounts linked to your Clickatell Portal and you can select the specific account you want to access when logging in.

For both Social Login and SAML Login, only the accounts for which it has been specifically configured and enabled are displayed for you to select from.


# Help & Message Center

## Find help

If you need help at any stage, click the question mark icon in the top right corner to access the following:

* **User Guide:** Quick access to this user guide.
* **FAQs:** Find answers to some frequently asked questions.
* **Developer Documentation:** Visit our Developer Knowledge Base for more technical, developer-focused information about using our APIs.

<figure><img src="/files/pwtqCd1xZnlFxzHg3bzF" alt="" width="216"><figcaption></figcaption></figure>

Click *Contact Support* (top right) to send us your query. This creates a ticket with our Support Team.

<figure><img src="/files/2vUsAzqsdj2mDIVRfX9J" alt="" width="370"><figcaption></figcaption></figure>

<figure><img src="/files/5a7LRYBETkyeMScH7Xrw" alt="" width="496"><figcaption></figcaption></figure>

There are tooltips throughout the portal with additional information. Click on *Need more help with this item* to send a custom question directly to our Support Team.&#x20;

<figure><img src="/files/VzmVw1EuWgEz0Jkcfhnm" alt=""><figcaption></figcaption></figure>

<figure><img src="/files/AzXte0KOBAM1GSeeFtbO" alt="" width="421"><figcaption></figcaption></figure>

## View notifications

All account notifications can be found by clicking the bell icon in the top right. A green counter indicates the number of new notifications.

<figure><img src="/files/L6NUMiyOzjRANnSwg3GR" alt="" width="366"><figcaption></figcaption></figure>

Clicking this icon opens a list of your latest notifications.

<figure><img src="/files/ZCSNHcvRJBmbOjFVH1Qm" alt="" width="379"><figcaption></figcaption></figure>


# Infrastructure & Support

{% hint style="success" %}
**Standard support** is included for all Clickatell customers. More robust support plans (**Business and Enterprise support**) are available as[ package upgrades](/platform-packages/upgrades-and-extras).
{% endhint %}

With robust, scalable infrastructure engineered for high performance, reliability, and security, the Clickatell platform ensures that enterprises can engage confidently with their customers across the globe. Our platform also complies with all security best practices and regulatory requirements to ensure customer privacy, banking-grade security, and sensitive data handling required by enterprises.

This solid foundation is complemented by dedicated enterprise support, providing large businesses with 24/7 access to expert assistance. From initial integration to ongoing operations, our team is committed to helping your business leverage the full potential of chat commerce customer experiences.

#### CONNECT

* Year-round technical and operational support.
* Guaranteed 99.90% uptime.&#x20;
* Real-time reporting dashboards.&#x20;
* Higher message throughput usually required by large businesses such as banks, airlines, or retailers with millions of customers.
* Frequent performance updates and feature enhancements such as new channels.

#### INTERACT

On the Interact package, you also get:

* A dedicated customer account manager.
* Year-round technical and operational support.
* Guaranteed 99.98% uptime.&#x20;
* Real-time reporting dashboards.&#x20;
* Frequent performance updates and feature enhancements such as new channels or new integrations.

#### TRANSACT

On the Transact package, you also get:

* A dedicated customer account manager.
* Year-round technical and operational support.
* Guaranteed 99.98% uptime.
* Real-time payments dashboards and daily reconciliation.&#x20;
* Frequent performance updates and feature enhancements such as new channels or integrations, new commerce features, or new supported payment methods.


# Security & Compliance

{% hint style="success" %}
Security and regulatory compliance are available to all Clickatell clients.
{% endhint %}

Clickatell has established rigorous policies and procedures to keep client data safe, to ensure confidentiality, integrity, and availability of data, and to protect them from potential data breaches. We are committed to establishing and maintaining the most stringent controls needed to ensure the highest level of security and compliance.&#x20;

We are certified/compliant with the following standards:

<figure><img src="/files/9oyvEPBPvwKl0dwrrzJI" alt=""><figcaption></figcaption></figure>


# Customer Enablement Services

{% hint style="success" %}
Customer Enablement services are included in the [**Interact** ](/platform-packages/interact)and [**Transact**](/platform-packages/transact) packages.
{% endhint %}

At Clickatell, we work closely with our clients to deliver successful projects. We want you to get maximum value out of our solutions, ensuring that you adopt our technology swiftly and leverage it to its fullest potential.&#x20;

Our Customer Enablement services are designed to get your business sending messages quickly so you can utilize the full power of the Chat Commerce Platform right away. We deliver a comprehensive suite of services that facilitate smooth onboarding, configuration, and integration, as well as account management to help you achieve your business objectives efficiently, driving solution adoption and maximizing ROI.


# All User Guides

An index with links to all Clickatell's user guides.

#### Messaging Channels

* [SMS](https://guides.clickatell.com/sms-channel/getting-started/sms-overview)
* [WhatsApp](https://guides.clickatell.com/whatsapp-channel)
* [USSD](https://guides.clickatell.com/ussd-user-guide)

#### Applications

* [Broadcast Messenger](https://guides.clickatell.com/broadcast-messenger)
* [Clickatell AI](https://guides.clickatell.com/clickatell-ai-user-guide)
* [Chat Desk (live agent chat)](https://guides.clickatell.com/chat-desk/overview/overview)
* [Chat Flow (self-service chatbot)](https://guides.clickatell.com/flow)

#### Payments

* [Chat 2 Pay](https://guides.clickatell.com/chat-2-pay-user-guide)

#### Other

* [Integrations](https://guides.clickatell.com/integrations)
* [Embedded Client Authentication](https://guides.clickatell.com/embedded-client-authentication-user-guide)


# WhatsApp

WhatsApp is the ideal chat channel for your business to see higher delivery, open, and conversion rates.

Using WhatsApp as a communication channel, you can get the benefit of:

* Two-way conversations.
* Bulk message-sending capabilities.
* End-to-end encryption that ensures conversations with customers are secure and private.
* Access to WhatsApp users from around the world.
* Engaging communication using interactive messages, images, videos, etc.
* Send one-time pins (OTPs) using authentication templates.
* Automated, self-service customer support.
* Innovative chat commerce experiences with on-demand, real-time, and safe transactions.

## How can I use WhatsApp with Clickatell?

As an authorized WhatsApp provider, Clickatell enables you to engage with your customers using the WhatsApp Business API. With Clickatell's WhatsApp Business API integration, you can:

* Create and manage a WhatsApp Business [account ](/whatsapp/getting-started/create-a-whatsapp-business-account)and [profile](/whatsapp/getting-started/add-and-manage-whatsapp-business-profiles).
* Use simplified [REST-based APIs](/developers-documentation/channels/whatsapp-and-sms-one-api) to send and receive messages via WhatsApp.
* Get a fully managed WhatsApp verification, approval, and onboarding process.
* Receive supercharged service delivery and customer support using Clickatell's Chat Commerce Platform to automate and orchestrate great customer experiences via the WhatsApp interface.&#x20;
* Utilize Clickatell's other powerful applications:
  * **Chat Flow** - Automations.
  * **Chat Desk** - Agent service desk.
  * **Chat 2 Pay** - Payments & commerce.
* Reuse the integration across multiple touchpoints.&#x20;
* Get access to the latest WhatsApp Business API features.&#x20;
* Access subject matter experts and WhatsApp beta programs.&#x20;

{% hint style="info" %}
Learn [how to get started](/whatsapp/getting-started/quick-start-guide-whatsapp) with WhatsApp.
{% endhint %}


# Quick start guide (WhatsApp)

## Using the WhatsApp channel via Clickatell

1. Create a WhatsApp Business [account ](/whatsapp/getting-started/create-a-whatsapp-business-account)and [profile](/whatsapp/getting-started/add-and-manage-whatsapp-business-profiles) (with Clickatell's assistance).
2. [Register template messages](/whatsapp/channel-capabilities/whatsapp-message-templates) (required for 1-way messages and business-initiated conversations outside the 24-hour interaction window).
3. Start sending messages:
   * Via Clickatell's [One API](https://docs.clickatell.com/channels/one-api/one-api-reference/) to send and receive messages directly via WhatsApp.
   * Via Clickatell's [Chat Flow](broken://spaces/nUgQbWh03Ps6ClRcI2Z0/pages/6eFVjWV0Qz7DzeK9G1Px) and[ Chat Desk](/chat-desk) applications.

{% hint style="info" %}
Although you can start using your WhatsApp API immediately, you are limited to the following:&#x20;

* Adding **2** numbers to your account
* Sending business-initiated templated messages to a maximum of **250** unique recipients per day
* Unlimited user-initiated messages

To remove these limitations, [verify your Business Account](/whatsapp/getting-started/get-business-verified).&#x20;
{% endhint %}


# Create a WhatsApp Business account

{% hint style="info" %}
As a registered BSP, Clickatell assists you with the application, but we do not have control over the approval of your application.
{% endhint %}

You need a **verified WhatsApp Business Account** to start talking to your customers via WhatsApp. Follow the steps below to get this set up with Clickatell's assistance.

Once set up, you can send WhatsApp messages to your customers directly via [One API](/developers-documentation/channels/whatsapp-and-sms-one-api), or our [Chat Flow](broken://spaces/nUgQbWh03Ps6ClRcI2Z0/pages/6eFVjWV0Qz7DzeK9G1Px) and [Chat Desk](https://help.clickatell.com/chat-desk/) applications.

1. [Add a new account & profile.](#add-new-account-and-profile)
2. [Complete the sign-up journey in Facebook Business Manager.](#complete-the-sign-up-journey-in-facebook-business-manager)
3. [Add a WhatsApp Subscription](#add-a-whatsapp-subscription).
4. [Link your API.](#link-your-api)
5. [View & test your integration.](#view-and-test-your-integration)

### Add a new account & profile

1. In your [Clickatell Portal](https://app.clickatell.com/), navigate to *My Workspace -> WhatsApp*.&#x20;
2. Click *+ New WhatsApp Account & Profile*.&#x20;

<figure><img src="/files/pQx9sD0rX9pq0Zi6MXqp" alt=""><figcaption></figcaption></figure>

### Complete the sign-up journey in Facebook Business Manager

3. Click the *Continue with Facebook Business Login* button.&#x20;
   * This starts the part of the journey that is completed within your **Facebook Business** environment.&#x20;
4. Follow the prompts to complete the process.&#x20;

{% hint style="info" %}
You must complete the entire flow once you start. You will have to start over if you exit the process before the end.

See [here](https://developers.facebook.com/docs/whatsapp/embedded-signup) for more details on completing the steps inside the Facebook environment,&#x20;
{% endhint %}

<figure><img src="/files/MmbV3QWFN4J5qPYkA4AO" alt=""><figcaption></figcaption></figure>

5. Once these steps are done, you are returned to the Clickatell Portal. You may have to wait a few minutes for Clickatell to retrieve your information from Facebook.&#x20;

<figure><img src="/files/y3PsFQ7b8s9y8uDUHhgg" alt=""><figcaption></figcaption></figure>

### Add a WhatsApp Subscription&#x20;

6. You receive a specific WhatsApp subscription as part of your package. Click *Next* to create your profile (see below).

<figure><img src="/files/nvYSpr9kGosNJwKuAvmK" alt=""><figcaption></figcaption></figure>

### Link your API

7. Once your profile status changes to "Active", click the *Set Up API* button.&#x20;
8. Select *Use Existing One API* and choose the API already added for you.
9. You can adjust some details.
10. Click *Done*.

<figure><img src="/files/kyVQAHIRXHbLIv8zGqUk" alt=""><figcaption></figcaption></figure>

### View & test your integration

11. You can now [test ](/whatsapp/getting-started/test-your-integration)your integration.&#x20;
12. You can also view your Business Details and view and manage your API Details and Subscription.

<figure><img src="/files/uTmGXLZ9UdmDRjfrfxlc" alt=""><figcaption></figcaption></figure>

{% hint style="warning" %}
Note that, although you can start using your API, you are limited to the following until your business is verified:

* Adding **2** numbers to your account
* Sending business-initiated templated messages to a maximum of **250** unique recipients per day
* Unlimited user-initiated messages

To remove these limitations, [verify your Business Account](/whatsapp/getting-started/get-business-verified).&#x20;
{% endhint %}


# Add & manage WhatsApp Business profiles

A **Business Profile** is what your customers use to communicate with your business and is linked to a specific profile name and number.

If your business is [verified](/whatsapp/getting-started/get-business-verified), you can add **up to 25** Business Profiles to a WhatsApp Account. You have to go through the same application process for every new Business Profile.

{% hint style="success" %}
You can use your Business Profile to interact with customers only if:

1. Your **profile name and number** have been approved and verified.
2. You have an active WhatsApp **subscription***.*
3. You've connected the Business Profile to an **API** on the **Production** environment.
   {% endhint %}

## Add a new Business Profile

1. Navigate to *My Workspace -> WhatsApp* and select the account to which you want to add the new business profile.

<figure><img src="/files/UcrmrlVpDiXnVI4zFDra" alt=""><figcaption></figcaption></figure>

2. Click *+ New Business Profile* and follow the steps as prompted by the setup wizard.

<figure><img src="/files/7ddcRbQBGUVdShgfBsPT" alt=""><figcaption></figcaption></figure>

## **Manage your Business Profiles**

1. Navigate to *My Workspace -> WhatsApp* and select the WhatsApp account from the table.&#x20;
2. Select the Business Profile from the table.&#x20;
   * This opens the *WhatsApp Profile Details* page (see below)

<figure><img src="/files/oK5cm0BDAHI5l1RlPRkN" alt=""><figcaption></figcaption></figure>

{% hint style="info" %}

* You can connect an API to the business profile only once the profile is **active**.
* A "**deactivated**" status could indicate that the number connected to this profile has been deleted from your Meta Business Manager. You'll need to [add ](#add-a-new-business-profile)this profile again from scratch.&#x20;
  {% endhint %}


# Test your integration

Once your WhatsApp [Account ](/whatsapp/getting-started/create-a-whatsapp-business-account)and [Profile ](/whatsapp/getting-started/add-and-manage-whatsapp-business-profiles)setup is complete and has an "Active" state, you can test your WhatsApp API integration to ensure it is working as expected.

## Test your integration

1. Navigate to *My Workspace -> WhatsApp* and select a WhatsApp account.&#x20;
2. Click the *Test API* button next to the profile you want to test.

<figure><img src="/files/A9WXRLRZ6TQbpP3NrpAu" alt=""><figcaption></figcaption></figure>

3. Add **up to 10** test phones to your account.

   * Test phones are automatically linked to all integrations.
   * Test phones are automatically added to the WhatsApp whitelist.
   * A test phone can be unlinked from One API.

   <figure><img src="/files/1ndnEhwuPkwKB9hehWEw" alt=""><figcaption></figcaption></figure>
4. To verify and activate your test phone number, a 5-digit PIN is sent to the phone you've added.
5. Enter this value and click *Submit*.

<figure><img src="/files/ueb5nlI9UhssInZw72An" alt=""><figcaption></figcaption></figure>

6. Select one or more of your test numbers, select a template from the drop-down, and click the *Send One-Way Test Message* button  (This test environment only supports text templates. You cannot use templates with headers, footers, media, and buttons).

<figure><img src="/files/oc96jMXEGRKwmg2Ge6TP" alt=""><figcaption></figcaption></figure>

7. Once you have sent your test message you will receive confirmation that your test message has been sent and you can view the status of the test message in your [*Channels Report*](https://clickatell.gitbook.io/chat-commerce-platform/navigation-and-access/reporting-and-analytics/messaging-channels#channels-report) in the Clickatell Portal.&#x20;

{% hint style="info" %}
Note that when testing your integration, the following limitations apply:

* You can send a maximum of 100 messages per day. After 100 messages have been sent in a 24 hour period, the messages will be simulated.
* You can send a maximum of 1000 messages per month.
* Limits are configurable, and can be configured by Clickatell Admins. If you would like to find out if you qualify for any changes to the limitations on your account, please reach out to our Support Team or your Technical Account Manager.
* When you send a message to a WhatsApp number you will be billed at WhatsApp rates.

{% endhint %}


# Get business verified

## Why get verified?

You can start using the WhatsApp Business APIs even if you are not business verified.

However, it is strongly recommended that your business gets verified. If you are not business verified the following limitations apply:

* You can only have **two** business telephone numbers per WhatsApp account.
* You can only send **250** business-initiated templated messages within a 24-hour period.
* You can receive unlimited user-initiated messages.

## Verify your business

{% hint style="info" %}
Business verification can take 1 - 5 business days.
{% endhint %}

To verify your business and remove the above limitations:&#x20;

1. Go to [Facebook Business Manager](https://business.facebook.com).
2. &#x20;If you already have one, select your business account. If you do not have a Facebook Business Manager account, you can create one by visiting <https://business.facebook.com/create>.
3. On the left navigation, click *Settings*.
4. From the *Settings* page, go to *Security Center* on the left navigation.
5. Click on *Start Verification*.
6. Complete your Business Details in the next form.

{% hint style="success" %}
Refer to[ this page](https://www.facebook.com/business/help/2058515294227817?id=180505742745347) for more information.
{% endhint %}

## **Required documentation** <a href="#required-documentation" id="required-documentation"></a>

* **Legal Name Document** – *one of the below documents* \
  – Business Registration (BR) \
  – Company Incorporation Certificate \
  – Tax/VAT Certificate
* **Address Proof Document** – *one of the below documents* \
  – Bank Account Statement \
  – Utility Bill (Phone/Electricity Bill)
* There might be additional documentation required depending on your country of residence. This will be outlined when you enter your business verification information.

## Why would your business verification be rejected? <a href="#why-would-your-business-verification-be-rejected" id="why-would-your-business-verification-be-rejected"></a>

* Legal Name Document and Address Proof Document have different addresses.
  * *Please make sure all documents have the exact same address*
* Business Legal Name is not mentioned on the website submitted.
  * *It is advised to mention your company’s legal name in the footer of your website*
* Business Email Address not used during verification.
  * *It is advised to use the business email address for Facebook Business Verification*


# Initiate WhatsApp conversations

You need to follow the below guidelines when initiating conversations with your customers via the WhatsApp channel.

## Business-initiated conversations

When initiating a conversation with customers via WhatsApp, you have to use a WhatsApp [message template](/whatsapp/channel-capabilities/whatsapp-message-templates). This starts the conversation, but the customer needs to respond to the message template to give consent for the interaction and open the conversation window.&#x20;

Once the conversation window is open, your business can freely communicate with the customer using free text messages (i.e., not a template) for a period of 24 hours.

{% hint style="info" %}
WhatsApp message templates go through an approval process before they can be used for sending. Find out more about WhatsApp message templates, template types, and how they are used [here](/whatsapp/channel-capabilities/whatsapp-message-templates).
{% endhint %}

Business-initiated conversations via template messages can be used for:

* Time-sensitive notifications, e.g., flight status changes
* Shipping order or delivery status updates
* Two-factor authentication codes
* Payment updates
* And many more

## Customer-initiated conversations

When customers initiate conversations with your WhatsApp Business account, a message template is **not** required. The fact that the customer initiated the conversation automatically provides consent for interaction between them and your business.


# Message types

All message types, except for template messages, can only be sent to a WhatsApp user when a [24-hour customer service window ](https://developers.facebook.com/docs/whatsapp/pricing#customer-service-windows)is open between you and the user. Template messages can be sent to a WhatsApp user at any time, as long as the user has opted-in to receive messages from you.

{% hint style="success" %}
See our [Developer Documentation](https://docs.clickatell.com/channels/one-api/one-api-reference/) for details about using our APIs.
{% endhint %}

## Message types

The WhatsApp Business API can be used to send the following types of messages (listed alphabetically):

### Audio messages

Display an audio icon and a link to an audio file. The audio file is downloaded and played when a customer taps the icon.

<figure><img src="/files/nb0T5cqZP84CzSGuEqFl" alt="" width="375"><figcaption></figcaption></figure>

### Authentication message

A highly structured template that allows One Time Pins to be delivered via the WhatsApp channel.

<figure><img src="/files/pxDCM4d9rWy9P4Vsstzh" alt=""><figcaption></figcaption></figure>

### Commerce messages

Commerce messages are interactive messages used in conjunction with a product catalog. Catalog messages are free-form messages that allow you to showcase your product catalog entirely within WhatsApp.&#x20;

{% hint style="info" %}
See [WhatsApp Commerce Messages](/whatsapp/channel-capabilities/whatsapp-commerce-messages) for more details.
{% endhint %}

<figure><img src="/files/DOD3BlXxOaZfHWRg2yWq" alt="" width="375"><figcaption></figcaption></figure>

### Contacts messages

Send rich contact information such as names, phone numbers, physical addresses, and email addresses directly to customers.

<figure><img src="/files/jBAfooibkOBA9gx8XDGb" alt="" width="375"><figcaption></figcaption></figure>

### Document messages

Display a document icon, linked to a document that a customer can tap to download.

<figure><img src="/files/ccPm1ZuVRqtvK6glX9Yb" alt="" width="375"><figcaption></figcaption></figure>

### Image messages

Display a single image and an optional caption.

<figure><img src="/files/9BDrr1aLA0cbFhlnSlIi" alt="" width="375"><figcaption></figcaption></figure>

### Interactive CTA URL button messages

Map any URL to a button, so you don't have to include raw URLs in the message body.

{% hint style="info" %}
See [Interactive messages](/whatsapp/channel-capabilities/interactive-messages-lists-reply-buttons-location-requests) for more details.
{% endhint %}

<figure><img src="/files/YnOx0emwhe1V9pDDYZMU" alt="" width="375"><figcaption></figcaption></figure>

### Interactive list messages

Present customers with a list of options to choose from.

{% hint style="info" %}
See [Interactive messages](/whatsapp/channel-capabilities/interactive-messages-lists-reply-buttons-location-requests#when-to-use-interactive-messages-1) for more details.
{% endhint %}

<figure><img src="/files/6t9N5TAXCEqE4fdnK3KX" alt="" width="375"><figcaption></figcaption></figure>

### Interactive location request messages

Display body text and a *Send location* button. When a customer taps the button, a location-sharing screen appears that they can use to share their location.

{% hint style="info" %}
See [Interactive messages](/whatsapp/channel-capabilities/interactive-messages-lists-reply-buttons-location-requests#how-to-set-up-interactive-messages-1) for more details.
{% endhint %}

<figure><img src="/files/C4PNArmFo3GIKYUY6LOJ" alt="" width="375"><figcaption></figcaption></figure>

### Interactive reply buttons messages

Send up to three predefined replies for customers to choose from.

{% hint style="info" %}
See [Interactive messages](/whatsapp/channel-capabilities/interactive-messages-lists-reply-buttons-location-requests#reply-buttons) for more details.
{% endhint %}

<figure><img src="/files/JpGOwMptm7KhQbjMWxht" alt="" width="375"><figcaption></figcaption></figure>

### Location messages

Send a location's latitude and longitude coordinates to a customer. Tapping the map opens the location in the mobile phone's map app.

<figure><img src="/files/MqDYvWBjMv0GaeqkF9Po" alt="" width="375"><figcaption></figcaption></figure>

### Text messages

Messages containing only a text body and an optional link preview.

<figure><img src="/files/n14ZfiMHJ258WOU9xK7O" alt="" width="375"><figcaption></figcaption></figure>

### Template messages

Send marketing and utility templates to customers. Unlike all other message types, template messages do not require a 24-hour customer service window to be open between you and the customer before the message can be sent.

{% hint style="info" %}
See [WhatsApp message templates](/whatsapp/channel-capabilities/whatsapp-message-templates) for more detail.
{% endhint %}

<figure><img src="/files/1nvwOCOTFlnhYyxSfTID" alt="" width="299"><figcaption></figcaption></figure>

### Video messages

Display a thumbnail preview of a video image with an optional caption. When your customer taps the preview, it loads the video and plays it.

<figure><img src="/files/np6Zzs6fGuFJy4qNGuaV" alt="" width="299"><figcaption></figcaption></figure>

{% hint style="info" %}
Message types currently not supported by Clickatell:

* Address messages
* Interactive flow messages
* Sticker messages
* Reaction messages
  {% endhint %}


# WhatsApp message templates

## How to use WhatsApp message templates

1. [​Apply for a WhatsApp message template](/whatsapp/channel-capabilities/whatsapp-message-templates/add-message-templates)
2. [Send the approved message template](/whatsapp/channel-capabilities/whatsapp-message-templates/send-message-templates)&#x20;

## What is a WhatsApp message template?

A WhatsApp message template is used to send an outbound, business-initiated message to a customer. If your business wants to initiate a conversation with a customer for the first time or more than 24 hours after the customer last messaged the business, it is **required** to use a message template.

All message templates must be **approved** by WhatsApp before they can be sent to customers. Templates can only be sent to customers who have **opted in** and given you permission to send them messages.

### Template categories

All message templates fall into one of only three categories that is selected when [applying](/whatsapp/channel-capabilities/whatsapp-message-templates/add-message-templates) for a new template:

* **Marketing** – Send promotional offers, product announcements, and more to increase awareness and engagement.
* **Utility** – Send account updates, order updates, alerts, and more to share important information.
* **Authentication** – Send codes or One-Time Pins (OTPS) that allow your customers to securely authenticate themselves or perform a function.

For more information and examples of Template Categorization, see [here](https://developers.facebook.com/docs/whatsapp/updates-to-pricing/new-template-guidelines).

### Template types <a href="#template-types" id="template-types"></a>

{% hint style="success" %}
See [Meta's documentation](https://www.facebook.com/business/help/722393685250070) for sample message templates.
{% endhint %}

The following template types are available:

* **Text template:** Create rich text-based message templates. Formatting options like bold, italic, pre-formatted, and strike-through are supported.
* **Media template:** Include media formats like images, documents, videos, and location in the header of the message. This allows you to send your customers rich notifications like a boarding card (PDF), movie ticket (QR code image), or pickup address.
* **Interactive text and media templates:** Include predefined buttons for interactive engagement with your customers. Two button types are supported:
  * *Call to action:* Let your customers call a phone number or visit a website.
  * *Quick reply:* Let your customer return a simple text message.

### Template languages

To see which languages Clickatell supports, [see this FAQ](https://www.clickatell.com/help-center/whatsapp/message-templates/what-languages-do-clickatell-support-for-whatsapp-message-templates/).

### Template variables

When using **variables** in your templates, ensure that you use number-type variables, e.g., **{{1}}, {{2}},** ... Clickatell does **not** currently support name-type variables.


# Add message templates

## Create a custom message template

{% hint style="info" %}
Refer to [this section](#add-a-chat-2-pay-template) if you want to add Chat 2 Pay templates.
{% endhint %}

To take full advantage of all template functionality, you need to be [business verified](/whatsapp/getting-started/get-business-verified). You can create a limited number of templates in an unverified business state. &#x20;

1. Navigate to *My Workspace -> WhatsApp* and select a WhatsApp account from the table.

<figure><img src="/files/r1bBwIqFqT5EWnW7clCE" alt=""><figcaption></figcaption></figure>

2. Click *Manage & Create Templates in Facebook Business Manager.*
3. You will be directed to your Facebook Business Manager Account (FBBM).

{% hint style="info" %}
This only applies to clients who have used the new WhatsApp Embedded Signup flow to onboard. Clients who used the legacy on-behalf-of signup flow still create templates within the Clickatell Portal as described [here](broken://pages/64249eDtiRnAxtlZHV8w).
{% endhint %}

<figure><img src="/files/DvxkPsOXZlFVOlBKm3Hh" alt=""><figcaption></figcaption></figure>

3. Follow [the steps](https://www.facebook.com/business/help/2055875911147364?id=2129163877102343) to apply for a WhatsApp Message Template from within FBBM. (Also shown in the video below.)

{% hint style="info" %}

* When using **variables**, ensure that you use number-type variables, e.g., **{{1}}, {{2}},** ... Clickatell does **not** currently support name-type variables.
* To see which **languages** Clickatell supports, [see this FAQ](https://www.clickatell.com/help-center/whatsapp/message-templates/what-languages-do-clickatell-support-for-whatsapp-message-templates/).
  {% endhint %}

{% embed url="<https://vimeo.com/873266553/e5f586be5a?share=copy>" %}

3. Once submitted, the template is reviewed by WhatsApp.

{% hint style="warning" %}
You cannot edit your template once you've submitted it for approval.&#x20;
{% endhint %}

4. Return to the *WhatsApp Account Details* page in your Clickatell Portal. You will be prompted to sync your templates.&#x20;

<figure><img src="/files/hPptw7Zo6aqcW15w6pbr" alt="" width="563"><figcaption></figcaption></figure>

6. Once synced, the template appears in your table of message templates with its status.
7. Click on a template in the table to see its details, including a preview and status.
8. Once it has an "Approved" status, your template is now [ready to use](/whatsapp/channel-capabilities/whatsapp-message-templates/send-message-templates).&#x20;
   * Note that the time it takes for WhatsApp to approve your template may vary.&#x20;
   * It might take a few minutes for all templates to sync and appear in your Clickatell Portal.

{% hint style="warning" %}
Clickatell currently supports Authentication, Marketing, and Utility template categories.
{% endhint %}

{% hint style="info" %}
**Also see:**

* [Use media in templates](/whatsapp/channel-capabilities/whatsapp-message-templates/use-media-in-message-templates)
* [Use interactive buttons in templates](/whatsapp/channel-capabilities/whatsapp-message-templates/use-interactive-buttons-in-message-templates)
* [Use interactive messages](/whatsapp/channel-capabilities/interactive-messages-lists-reply-buttons-location-requests)
* [Showcase product catalog in templates](/whatsapp/channel-capabilities/whatsapp-message-templates/showcase-product-catalog-in-message-template)
  {% endhint %}

## Add a Chat 2 Pay template

To use our [Chat 2 Pay](/chat-2-pay) application, you need two message templates: ["payment request" and "confirmation" messages](https://clickatell.gitbook.io/chat-2-pay-user-guide/cybersource-and-salesforce/configuration-details/message-configurations).

We've added these two pre-approved message templates to save you time and improve the chances that your templates will be approved by WhatsApp. All you have to do is link them to the Chat 2 Pay product.

{% hint style="info" %}
You cannot edit any of the content within these two templates
{% endhint %}

1. Navigate to *My Workspace --> WhatsApp* and select a WhatsApp account from the table.
2. Click + New Chat 2 Pay Template.

<figure><img src="/files/h0F603vwyS9PQgSVI3pH" alt=""><figcaption></figcaption></figure>

3. Select the *Chat 2 Pay t*emplate type from the dropdown.
4. Enter your company name.&#x20;
5. You can preview the two templates at the bottom.&#x20;
6. Click *Submit*.

<figure><img src="/files/xTT4teUZEnAFlfRk7K3q" alt=""><figcaption></figcaption></figure>


# Send message templates

## How can I send message templates?

You can make use of one of the below options to send message templates to your customers. Note that you cannot send message templates directly from the Clickatell Portal.

* **One API:** Once the message template you've [added ](/whatsapp/channel-capabilities/whatsapp-message-templates/add-message-templates)is approved and active, you can specify the template name and the relevant parameters in your [API call](https://docs.clickatell.com/channels/one-api/one-api-reference/#tag/One-API) when sending a message to the customer.&#x20;
* **Broadcast Messenger:** You can send WhatsApp and SMS message templates directly from Broadcast Messenger as part of a marketing campaign or to reengage customers. [Find out more.](https://guides.clickatell.com/campaign-manager/manage-campaigns/add-a-new-campaign)
* **Chat Flow:** You can send WhatsApp message templates directly from Chat Flow as part of your workflows or to kick-start a conversation. [Find out more.](https://guides.clickatell.com/flow/channel-capabilities/use-whatsapp-with-chat-flow/send-whatsapp-message-templates)
* **Chat Desk:** As an agent, you can send WhatsApp message templates to customers directly from Chat Desk. [Find out more](https://guides.clickatell.com/chat-desk/agent-chat-desk/send-whatsapp-message-templates).

{% hint style="info" %}

* Clickatell currently only supports number-type variables, e.g., **{{1}}, {{2}},** ... and **not** name-type variables. Take this into account when [creating your templates](/whatsapp/channel-capabilities/whatsapp-message-templates/add-message-templates).
* To see which **languages** Clickatell supports, [see this FAQ](https://www.clickatell.com/help-center/whatsapp/message-templates/what-languages-do-clickatell-support-for-whatsapp-message-templates/).
  {% endhint %}

## Template Statuses

Templates can have one of the following statuses:

* **In-Review:** Indicates that the template is still under review. Review can take up to 24 hours.
* **Rejected:** The template has been rejected during Meta's review process or violates one or more policies. See [Appeals](https://developers.facebook.com/docs/whatsapp/message-templates/guidelines#appeals).
* **Active - Quality Pending:** The message template has yet to receive quality feedback from customers. Message templates with this status can be sent to customers. See [Quality Rating](https://developers.facebook.com/docs/whatsapp/message-templates/guidelines#quality-rating).
* **Active - High Quality:** The template has received little to no negative customer feedback. Message templates with this status can be sent to customers. See [Quality Rating](https://developers.facebook.com/docs/whatsapp/message-templates/guidelines#quality-rating).
* **Active - Medium Quality:** The template has received negative feedback from multiple customers and may soon become paused or disabled. Message templates with this status can be sent to customers. See [Quality Rating](https://developers.facebook.com/docs/whatsapp/message-templates/guidelines#quality-rating).
* **Active - Low Quality:** The template has received negative feedback from multiple customers. Message templates with this status can be sent to customers but are in danger of being paused or disabled soon, so we recommend that you address the issues that customers are reporting. See [Quality Rating](https://developers.facebook.com/docs/whatsapp/message-templates/guidelines#quality-rating).
* **Paused:** The template has been paused due to recurring negative customer feedback. Message templates with this status cannot be sent to customers. See [Template Pausing](https://developers.facebook.com/docs/whatsapp/message-templates/guidelines#template-pausing).
* **Disabled:** The template has been disabled due to recurring negative customer feedback. Message templates with this status cannot be sent to customers.

You can view a template's status by going to *WhatsApp Manager -> Overview*, hovering over the suitcase icon (*Account tools*), and clicking *Message templates*. If you have multiple WhatsApp Business Accounts, select the account whose template statuses you want to view from the list of accounts in the dropdown menu in the top-right corner.

<figure><img src="/files/mSfmN7RK6mnSKIxjpZh3" alt=""><figcaption></figcaption></figure>

## Template Pacing

As of 12 October 2023, Meta introduced the concept of **template pacing** when sending **marketing** templates.&#x20;

Template pacing is a mechanism that allows customers to provide early feedback on newly created or un-paused marketing templates. Templates sent as part of a messaging campaign are sent normally until a certain threshold is reached, after which further sending of this template is held to allow for customer feedback. This feedback enables businesses to adjust their templates before sending them to too many clients and mitigates the risk of negative feedback impacting their business.

{% hint style="info" %}
Find out how this impacts your template sending [here](https://developers.facebook.com/docs/whatsapp/message-templates/guidelines/#template-pacing).
{% endhint %}

## Template Groups

You can consolidate approved templates into groups and track their performance at the group level. Create a template group to monitor data such as cost metrics, engagement rates, and button interactions.

<figure><img src="/files/1Z2uGK8ogzvgNlNZpUe1" alt=""><figcaption></figcaption></figure>

<figure><img src="/files/DchtAiuaOnK8XnJvhGbc" alt=""><figcaption></figcaption></figure>

##


# Use media in message templates

To use media in your message template, you must:

1. [Select the media type](#select-media-type)
2. [Upload the media file](#upload-media)
3. [Send the message template via One API](/whatsapp/channel-capabilities/whatsapp-message-templates/send-message-templates)

## **Select media type**

1. When [creating your template](/whatsapp/channel-capabilities/whatsapp-message-templates/add-message-templates) in Facebook Business Manager, you can select to add "Media" as the header. &#x20;
2. Select the type of media you want to add to your template.&#x20;
   * Note: The [*Location* ](/whatsapp/channel-capabilities/whatsapp-message-templates/use-location-in-message-templates)media type is only available on Cloud.
3. Add a sample for the header content.

{% hint style="info" %}
All variables (e.g., {{1}}) are set when [sending the message via One API](https://docs.clickatell.com/channels/one-api/one-api-reference/#operation/sendMessageREST_1), where you can specify the parameters in the payload.&#x20;
{% endhint %}

<figure><img src="/files/QY0iPwfl6foVH17Tagbp" alt=""><figcaption></figcaption></figure>

## **Upload media**

{% hint style="warning" %}
You can only send the template after uploading the media file.
{% endhint %}

1. Once your template is approved, upload the media file to be included in your message template onto the Clickatell server by using the [*Upload media file*](https://docs.clickatell.com/channels/one-api/one-api-reference/#operation/uploadFile) and [*Get media file metadata*](https://docs.clickatell.com/channels/one-api/one-api-reference/#operation/getMetadata) endpoints as described in the [One API Reference](https://docs.clickatell.com/channels/one-api/one-api-reference/) document.
2. The successful upload of your media will return a ***fileID*** which is the unique reference to the media file you’ve uploaded. You'll use this in the next step.

{% hint style="info" %}
Although the template is not limited to a single media file, it is registered for a **specific media type** only.
{% endhint %}

## **Send message template via One API**

1. Once you have successfully uploaded your media file, you can send the message template to customers via our One API using the [Sends one or more messages endpoint](https://docs.clickatell.com/channels/one-api/one-api-reference/#operation/sendMessageREST_1) as described in the [One API Reference](https://docs.clickatell.com/channels/one-api/one-api-reference/) document.
2. As part of the One API call, you need to include the template name and the *fileID* as returned in the step above.


# Use location in message templates

Location headers appear as generic maps at the top of the template and are useful for order tracking, delivery updates, ride-hailing pickup/dropoff, locating physical stores, etc.&#x20;

The template will reflect a static location defined by the business for a particular use case, for example, a pickup spot for a particular order with a particular user. When tapped, the user's default map app will open and load the specified location.&#x20;

{% hint style="info" %}
Location headers can only be used:

* In **Utility** and **Marketing** templates (see [template categories](/whatsapp/channel-capabilities/whatsapp-message-templates#template-categories))
* In the **Cloud** environment

Real-time (live) locations are **not** supported.
{% endhint %}

## Add location to template header

1. When [creating your message template](/whatsapp/channel-capabilities/whatsapp-message-templates/add-message-templates) in WhatsApp Business Manager, add a media header and select *Location*.
2. The location's name and address are specified when you [send](/whatsapp/channel-capabilities/whatsapp-message-templates/send-message-templates) the template.

<figure><img src="/files/cay29ndtwIm9bw9KV99m" alt=""><figcaption></figcaption></figure>

<figure><img src="/files/XOf8Ejx8j9lNqCfDwyqL" alt="" width="375"><figcaption><p>Customer experience on WhatsApp</p></figcaption></figure>


# Use interactive buttons in message templates

When [creating your template](/whatsapp/channel-capabilities/whatsapp-message-templates/add-message-templates) in Facebook Business Manager, you can add one of two types of interactive buttons to your template:&#x20;

* [**Call to Action**](#call-to-action-buttons)
* [**Quick Reply**](#quick-reply-button)

A template can have a mixture of **up to 10 buttons in total.** Limitations may apply to individual buttons of the same type, as well as to the combination of buttons allowed.

<figure><img src="/files/GtYoInEFqEecq3hlhVgO" alt=""><figcaption><p>You can add quick reply and call-to-action buttons to your message template.</p></figcaption></figure>

## **Call to action buttons**

This allows your customer to **call a phone number**, **visit a website**, or **copy a code** with the tap of a button.

From the drop-down select the type of action button you want to add:

* [Visit Website](#visit-website)
* [Call Phone Number](#call-phone-number)
* [Copy Offer Code](#copy-offer-code) *(shared model only)*

<figure><img src="/files/4JS1WsIqkrwg4Wotd0kt" alt=""><figcaption><p>Example of the available action buttons you can add to your template.</p></figcaption></figure>

#### ***Visit Website***

When tapping this button, the customer is directed to the specified website in their device's default browser.

The website URL is expected in the format:

* Static URL: **http(s)://[www.example.com](http://www.example.com)**
* Dynamic URL: **http(s)://[www.example.com/{{1](http://www.example.com/{{1)}}**&#x20;

{% hint style="info" %}

* Only **two** URL buttons per template are allowed.
* All variables (e.g., {{1}}) are set when [sending the message via One API](https://docs.clickatell.com/channels/one-api/one-api-reference/#operation/sendMessageREST_1), where you can specify the parameters in the payload.&#x20;
  {% endhint %}

#### ***Call Phone Number***

When tapping this button, a call is initiated from the customer's device to the specified number.

* Specify the country linked to the phone number.
* Enter the phone number in the international format, e.g. “**+14111111111**”.&#x20;

{% hint style="info" %}

* Only **one** phone number button per template is allowed.
  {% endhint %}

#### *Copy Offer Code*

When tapping this button, a text string ("code") is copied to the customer device's clipboard.

{% hint style="info" %}

* Templates are limited to **one** copy code button.
* Coupon code templates are currently not supported by WhatsApp Web.
* Codes are limited to 15 characters.
* Button text cannot be customized.
  {% endhint %}

<figure><img src="/files/FAsvh3hL5FdRLLdFrFJ1" alt="" width="311"><figcaption><p>Example of the copy code button on a customer's device.</p></figcaption></figure>

## **Quick reply button**

These custom text-only buttons allow your customer to **respond** **quickly** with a **custom**, **pre-defined** text message. When tapping this button, the customer sends the response to the business as part of the conversation.

From the drop-down select the type of action button you want to add:

* **Custom**
* **Marketing opt-out** *(Marketing templates only)*
  * Adding the optional "[Opt-Out](https://www.facebook.com/business/help/448422200528701)" quick-reply button gives your end-users an easy way to opt out of all marketing messages.
  * Note that it is still *your* responsibility to remove these customers from your contact list.&#x20;

<figure><img src="/files/Dud8cXyhaQLy3mepaNr8" alt=""><figcaption></figcaption></figure>

{% hint style="info" %}

* The quick-reply button text can be a maximum of **25** characters long.
* The text on every button used in a template must be **unique.**
  {% endhint %}

If using quick reply buttons with other buttons, buttons must be **organized into two groups**: quick reply buttons and non-quick reply buttons. If grouped incorrectly, the API will return an error indicating an invalid combination.

If a template has more than three buttons, two buttons appear in the delivered message and the remaining buttons can be seen when tapping *See all options*.

<figure><img src="/files/CINqd1RK5ReKghYIzNSi" alt="" width="563"><figcaption><p>Example of a combination of interactive buttons on a customer's device. If more than three buttons, only two will be shown immediately, and the rest can be viewed by tapping "See all options".</p></figcaption></figure>


# Showcase product catalog in message template

You can present your product catalog to your customers entirely within WhatsApp.&#x20;

Catalog templates display a product thumbnail header image of your choice and custom body text. The text header, sub-header, and button text are non-editable.

<figure><img src="/files/AOh9TUGhLpanEQZjNya7" alt="" width="562"><figcaption></figcaption></figure>

When a customer taps the *View catalog* button in a catalog template message, your product catalog appears within WhatsApp.

<figure><img src="/files/7HwucxUBZ4DV2TFjgguo" alt="" width="294"><figcaption></figcaption></figure>

## Add catalog to message template

1. When [creating your template](/whatsapp/channel-capabilities/whatsapp-message-templates/add-message-templates) in Facebook Business Manager, select *Marketing -> Product messages* as the category.&#x20;

{% hint style="info" %}
**Prerequisite:** You must have [inventory uploaded to Meta](https://developers.facebook.com/docs/whatsapp/cloud-api/guides/sell-products-and-services/upload-inventory) in an e-commerce catalog [connected to your WhatsApp Business Account](https://www.facebook.com/business/help/158662536425974).
{% endhint %}

<figure><img src="/files/6PQ3NKoUewuXjfls80Dr" alt=""><figcaption></figcaption></figure>

2. Follow the steps to complete all required information and submit for approval.


# Message templates: best practices & examples

## Best practices

Improve the chance of your templates being approved by following the guidelines below.

{% hint style="success" %}
Remember that someone outside of your business will be reviewing your templates. Providing more clarity gives reviewers context around how the template will be used.
{% endhint %}

When creating a new message template, please ensure you follow these best practices:

#### **Template name**

A unique name to identify the template use case for the business.&#x20;

* Must be in lowercase.
* Maximum of 512 characters.
* May not contain any spaces. Use an underscore to indicate a space.
* Make your message template name clear. E.g., instead of using a name like “*template\_014*” rather use “*order\_update*”.

#### **Template category & language**

The type of information contained in the template (e.g., marketing, utility) and the language of the content. Select these from a predefined set of categories and languages during registration.

**Template parameters**

* A template message must contain at least one parameter.
* Parameters cannot have new line/tab characters.&#x20;
* Parameters may not have more than four consecutive spaces.&#x20;
* All parameters will be defined within curly open/close braces and listed in chronological order starting at {{1}} (use the *+ Variable* button as a shortcut to easily add these).&#x20;

**Template content**

* Limited to 1024 characters.

{% hint style="warning" %}
For possible reasons why your message template was rejected, [see here](/whatsapp/channel-capabilities/whatsapp-message-templates/message-template-rejection-reasons).
{% endhint %}

## Template examples

<table><thead><tr><th width="189">Template name</th><th width="144">Template Tag</th><th width="197">Template message</th><th>Parameter details</th></tr></thead><tbody><tr><td>optin_confirmation</td><td>Marketing</td><td>Dear {{1}}. You are now subscribed to receive account-related alerts for your account ending in {{2}}.</td><td><p>{{1}} – Name of the recipient, eg. John </p><p>{{2}} – Last 4 digits of the account, eg. 1234</p></td></tr><tr><td>transfer_update</td><td>Utility</td><td>Your funds transfer request of {{1}} from account ending in: {{2}} has been initiated.<br><br></td><td><p>{{1}} – Total amount, eg. $50 </p><p>{{2}} – Last 4 digits of the account, eg. 1234</p></td></tr></tbody></table>

{% hint style="success" %}
For more examples, see Meta's documentation [here](https://www.facebook.com/business/help/722393685250070).
{% endhint %}


# Message template rejection reasons

All templates must be submitted to WhatsApp and approved before they can be used. Message templates are reviewed daily by a Meta (Facebook) team. Strict guidelines apply to reduce potential abuse and spam.

If your message template(s) was rejected, it may have been for one of the following reasons:

* **Variable parameters** **are missing** or have mismatched curly braces. The correct format is `{{1}}`.
* Template **starts or ends with a variable,** e.g., `{{1}}` thanks!
* **Variable parameters are not sequential.** For example, `{{1}}`, `{{2}}`, `{{4}}`, `{{5}}` are defined but `{{3}}` does not exist on the template.
* **Variable parameters appear directly next to each other, e.g.,** {{1}} {{2}}
* **Variable parameters contain special characters** such as a `#`, `$`, or `%`.
* **The purpose of your template is unclear and variable parameters are not defined.** All parameters must have a known purpose. Your template will be rejected if it is not clear what goes into a specific parameter. A sample template will help with your submission.
* **Spelling or grammatical errors.** Messages with misspellings or grammatical errors may prompt customers to view these messages as spam or a hoax.
* **Language defined does not match the content.** E.g., Spanish was selected but the content is in English or the content is a mixture of languages containing both Spanish and English.
* **Submission format for testing your API connection is incorrect.** The correct format is:
  * Message template name: test
  * Content: Hello `{{1}}`
* **The URLs for your links are shortened.** Short links obscure the intended link destination.
* **The URL domain in your links does not belong to your business.**
* **The body of your template has more than two consecutive new line characters (\n).**
* **Text headers include emojis, asterisks, formatting markup, or the \n newline characters.**
* **Media headers (video, image, document) didn’t include a sample with submission.**
* **Call to action button URL contains a direct link to WhatsApp** (e.g., *<https://wa.me/14154443344>*).
* **The content contains potentially abusive or threatening content**, such as threatening a customer with legal action or threatening to publicly shame them.
* **The template’s content is identical to that of an existing template**. If a template is submitted with the same wording in the body and footer as an existing template, the duplicate template will be rejected. A rejection notification that includes the rejection reason will appear in Account Quality on WhatsApp Manager and be sent via email. You may refer to the Account Quality notification to see the name and language of the existing template with the same content as the rejected duplicate template. You may also choose to edit the template and resubmit.
* **The message template(s) contains content that violates WhatsApp’s Commerce Policy**: When you offer goods or services for sale, all messages and media related to your goods or services, including any descriptions, prices, fees, taxes, and/or any required legal disclosures, are considered as transactions. Transactions must comply with the [WhatsApp Commerce Policy](https://l.facebook.com/l.php?u=https%3A%2F%2Fwww.whatsapp.com%2Flegal%2Fcommerce-policy%2F\&h=AT0o0FbzuE9lvOTKMm1Lx-UPGFb0jzK2Bd5X3_xWGaNoNFZVFCxQooOT4Er4VyR8gjycCzGXICiD7FHICmCz596g80sLdZ8B0fA1Qn2gFVj6oik0qYZ-UvMwJ6rHy9-VVr8).
* **The message template(s) contain content that violates WhatsApp’s Business Policy**: Do not request sensitive identifiers from users. E.g., do not ask people to share full-length individual payment card numbers, financial account numbers, National Identification numbers, or other sensitive identifiers. This also includes not requesting documents from users that might contain sensitive identifiers. Requesting partial identifiers (e.g., the last 4 digits of their Social Security Number) is acceptable. All messaging must comply with the [WhatsApp Business Policy](https://www.whatsapp.com/legal/business-policy).


# Interactive messages: lists, reply buttons, location requests

## What are interactive messages?

Interactive messages give your customers a simpler and more consistent way to find and select what they want from your business on WhatsApp.

Clickatell supports three types of interactive messages.&#x20;

* [**List Messages**](#when-to-use-interactive-messages)
* [**Reply Buttons**](#reply-buttons)
* [**Location Request Messages**](#how-to-set-up-interactive-messages-1)

{% hint style="info" %}

* These interactive messages cannot be used as notifications. Currently, it can only be sent within 24 hours of the last message received from the customer. If you try to send a message outside the 24-hour window, you will get an error message.
* Supported platforms: iOS, Android, and web
* For more information on interactive messages, you can also see [this page](https://developers.facebook.com/docs/whatsapp/guides/interactive-messages/) created by WhatsApp.
  {% endhint %}

<figure><img src="/files/y1fssDzK9Wx1GaJD1wZh" alt=""><figcaption></figcaption></figure>

## How to set up interactive messages <a href="#how-to-set-up-interactive-messages" id="how-to-set-up-interactive-messages"></a>

1. You can send interactive WhatsApp messages via our **One API**. This allows you to populate the lists/buttons dynamically in real-time and personalize them to the customer or situation. These messages also do not require [template](/whatsapp/channel-capabilities/whatsapp-message-templates) creation or pre-approvals.

{% hint style="info" %}
To send interactive WhatsApp messages via API, see our [One API Reference Documentation](https://docs.clickatell.com/channels/one-api/one-api-reference/).
{% endhint %}

2. If you are on the [Interact ](https://www.clickatell.com/products/interact/)or [Transact ](https://www.clickatell.com/transact/)package, you can set up interactive lists and buttons as part of your workflow in [**Chat Flow**](https://clickatell.gitbook.io/flow/). These are easy to set up and do not require any API integrations. Options/buttons are static and not dynamically populated.

{% hint style="info" %}
To set up interactive messages in Chat Flow, refer to the [Chat Flow user guide](https://clickatell.gitbook.io/flow/channel-capabilities/use-whatsapp-with-chat-flow/whatsapp-interactive-messages).
{% endhint %}

## Interactive Message Types <a href="#when-to-use-interactive-messages" id="when-to-use-interactive-messages"></a>

### List Messages <a href="#when-to-use-interactive-messages" id="when-to-use-interactive-messages"></a>

* Include a menu with **up to 10 options** for users to select.&#x20;
* Only one option can be selected by a customer per list message.
* Best for presenting longer lists of options, e.g.:
  * Customer care or FAQ menus
  * Take-out menus
  * Lists of nearby stores or locations
  * Available reservation times
  * Choosing a recent order to repeat

<figure><img src="/files/lOB273WFBc74BiZBdXpj" alt="" width="563"><figcaption><p>Example: list message​</p></figcaption></figure>

### **Reply Buttons**

* Include **up to 3 buttons**, each presenting an option for the customer to select.&#x20;
  * Reply buttons have the same user experience as [interactive templates with buttons](/whatsapp/channel-capabilities/whatsapp-message-templates/use-interactive-buttons-in-message-templates).&#x20;
* Only one option can be selected by a customer per button message.
* Best for selecting quick responses from a limited set of options, e.g.:
  * Recharging airtime
  * Changing personal details
  * Reordering a previous order
  * Requesting a return
  * Adding optional extras to a food order
  * Choosing a payment method
* Reply buttons are particularly valuable for "personalized" use cases where a generic response is not adequate.

<figure><img src="/files/IXXPXNBvQvqv52lt5a18" alt="" width="314"><figcaption><p>​Example: reply buttons​</p></figcaption></figure>

### Location Request Messages <a href="#how-to-set-up-interactive-messages" id="how-to-set-up-interactive-messages"></a>

These messages request your customer's location. They contain body text and a *Send location* button that customers can tap. Tapping the button displays a location-sharing screen that the user can then use to share their location.

{% hint style="info" %}
Sharing of a live location is **not** supported.&#x20;
{% endhint %}

<figure><img src="/files/broZcMrn2JrqDThFaZYN" alt=""><figcaption><p>Example: location request message</p></figcaption></figure>


# Ads That Click to WhatsApp

*Ads That Click to WhatsApp* is an ad format from Meta that shortens the customer's journey, taking them from an ad on social media directly to a WhatsApp conversation with your business by tapping a button.&#x20;

It is supported on feeds and stories on Facebook and Instagram, as well as Facebook Marketplace, and is an easy way to connect with new and existing customers where they’re already spending their time.

You can easily set it up in two steps:

1. [Connect your WhatsApp Business account to your Facebook Business Page.](#step-1-connect-your-whatsapp-business-account-to-your-facebook-business-page)
2. [Create the ad campaign in Facebook Ads Manager](#step-2-create-the-a-d-campaign-in-facebook-a-ds-manager).

### Before you start <a href="#step-1-connect-your-whatsapp-business-account-to-your-facebook-business-page" id="step-1-connect-your-whatsapp-business-account-to-your-facebook-business-page"></a>

* [Create](https://www.facebook.com/business/help/473994396650734?id=939256796236247) a **Facebook Business Page** if you don't have one.
  * You’ll need Admin access to this Page.
* Set up a **WhatsApp Business account** if you haven't already.
  * A personal WhatsApp number won’t work.
  * Ensure this WhatsApp number isn’t linked to any other Facebook pages.

### Step 1: Connect your WhatsApp Business account to your Facebook Business page <a href="#step-1-connect-your-whatsapp-business-account-to-your-facebook-business-page" id="step-1-connect-your-whatsapp-business-account-to-your-facebook-business-page"></a>

1. Log in to your [Facebook Business Manager](https://business.facebook.com/) account and select *All tools* in the left panel and then *Page Settings*.

<figure><img src="/files/ercH8d8IqaXVJMdITI2g" alt=""><figcaption></figcaption></figure>

2. Select *Linked accounts* in the left panel.

<figure><img src="/files/WhRcLRNtSnnHa1KcAABQ" alt="" width="177"><figcaption></figcaption></figure>

3. Select WhatsApp in the left panel and enter the WhatsApp number you want to connect. Click *Send WhatsApp Code*.

<figure><img src="/files/MfaCv8nmy5N5SLEkfrsH" alt=""><figcaption></figcaption></figure>

4. You'll receive a confirmation code via WhatsApp on the number you've entered above. Enter the code and click *Confirm.* Your WhatsApp account is now connected to your Facebook Page.

<figure><img src="/files/4mYniCrgbPJVRDm726K8" alt=""><figcaption></figcaption></figure>

{% hint style="info" %}
You can also find the steps in Meta's documentation [here](https://www.facebook.com/business/help/1583303048513172?id=2129163877102343).
{% endhint %}

### Step 2: Create the ad campaign in Facebook Ads Manager <a href="#step-2-create-the-a-d-campaign-in-facebook-a-ds-manager" id="step-2-create-the-a-d-campaign-in-facebook-a-ds-manager"></a>

1. In [Facebook Business Manager](https://business.facebook.com/), select *All tools* in the left panel. Select *Ads Manager*.

<figure><img src="/files/D1W81ZcDWkwayTn20bIi" alt=""><figcaption></figcaption></figure>

2. Click on the green *Create* button.

<figure><img src="/files/3VB2IEcG0vXrVy01USMy" alt="" width="482"><figcaption></figcaption></figure>

3. Choose your campaign objective and click *Continue*.

{% hint style="info" %}
Select an objective from the list to see more information about it on the right. The steps that follow [may differ slightly](https://www.facebook.com/business/help/447934475640650?id=371525583593535) based on the objective selected.
{% endhint %}

<figure><img src="/files/TCFkAXVDEunglbwUfKuB" alt=""><figcaption></figcaption></figure>

4. View/edit the Campaign Name and Campaign Details. If appropriate, you can declare your WhatsApp Ad as a Special Ad or set up an A/B test. Click *Next.*

<figure><img src="/files/iZG3BR4XPPLs9ycqlE5C" alt=""><figcaption></figcaption></figure>

5. In the *Conversion* section select "Messaging apps" and under *Ad type*, select "Click to message".

<figure><img src="/files/XlMHJIV6YoqH97uUXSTV" alt=""><figcaption></figcaption></figure>

6. Scroll down and select "WhatsApp" as the destination app. Select the phone number connected to your page where you want to direct customers to continue the conversation when they click on the button in the ad.

<figure><img src="/files/pnAGRsw4ZboqC8kBcWyx" alt=""><figcaption></figcaption></figure>

7. Choose your engagement goal. Set the budget, schedule, and audience for your ad set. Click *Next*.

<figure><img src="/files/iuJwDl2E6RqWwn2XaEhi" alt=""><figcaption></figcaption></figure>

8. On this page, you can configure what your ad looks like. A preview is shown on the right.&#x20;

* Add the **media** that will be used in your campaign.
* Enter the **primary text** (main message).
* Add the **headline** - this is the call-to-action message that will appear next to the WhatsApp button in your ad.

9. *Publish* your ad.

<figure><img src="/files/7Uh9RAPTYBFzKL0fjMuw" alt=""><figcaption></figcaption></figure>

{% hint style="info" %}
Also see these FAQs:

* [What are the benefits of Ads That Click to WhatsApp?](https://www.clickatell.com/help-center/whatsapp/general-whatsapp/what-are-the-benefits-of-ads-that-click-to-whatsapp/)
* [What are best practices for Ads that Click to WhatsApp?](https://www.clickatell.com/help-center/whatsapp/general-whatsapp/what-are-best-practices-for-ads-that-click-to-whatsapp/)
  {% endhint %}

### After publishing your ad

Use pre-written [icebreakers ](/whatsapp/channel-capabilities/conversational-components/icebreakers)to encourage customers to start the conversation without formulating their own message.

For scalability, we recommend that you set up a 24/7 chatbot using Clickatell's [Chat Flow](https://www.clickatell.com/products/chatflow/) application so that potential customers can get fast responses after engaging with your ad. This is convenient for your buyers and saves your marketing/support team time since the bot can handle simple tasks while your team has more time for high-level tasks.

Bots can typically answer simple questions with pre-set responses, share FAQs/knowledge-base resources relating to the shopper’s question, provide product recommendations, direct customers with complex queries to agents, present catalogs for customers to browse, and allow them to add items to a cart and purchase it.

You can also direct customers straight to your live customer service agents in Clickatell's[ Chat Desk](https://www.clickatell.com/products/chat-desk/) if you prefer.


# WhatsApp Commerce Messages

Your businesses can present and showcase your products to customers via the WhatsApp channel. Customers can then add selected items to a cart and submit the order to your business.&#x20;

{% hint style="info" %}
To make use of this feature, you need:

* The [**Transact** ](https://guides.clickatell.com/clickatell/packages/transact)package.&#x20;
* Workflows set up in **Chat Flow**.&#x20;
* An active **WhatsApp** subscription.
  {% endhint %}

#### The WhatsApp Commerce feature in action:

{% embed url="<https://vimeo.com/894452660/bf57788b14?share=copy>" fullWidth="true" %}

## How does it work?

1. Create a catalog in the Facebook Business Manager Commerce Platform ([see how](https://www.facebook.com/business/help/1275400645914358?id=725943027795860)).&#x20;
   * You can upload only one catalog per WhatsApp Business Account (WABA).
   * The same catalog can belong to multiple phone numbers.&#x20;
2. [Upload an inventory](https://developers.facebook.com/docs/whatsapp/guides/upload-inventory-to-facebook) to the catalog.
3. [Connect the catalogue](https://www.facebook.com/business/help/158662536425974) to your WABA.
4. Use the [**Multi Product node**](https://guides.clickatell.com/flow/user-facing-nodes/commerce/multiple-product) in Chat Flow to present the catalog of items to your customers via WhatsApp.&#x20;
   * You can present up to 30 items from your business's inventory to customers at a time.
   * Customers can view more information and an image for each item.
   * Customers can add items to their cart and send the shopping cart to your business.
   * You can define the next step after receiving the shopping cart (e.g., requesting delivery info or giving payment options).

{% hint style="info" %}
Clickatell does not upload or manage your business inventory/catalog. This is managed by yourself in the Meta environment and linked to our Chat Flow application as described here. &#x20;
{% endhint %}

The images below indicate how a catalog is presented to the customer in WhatsApp.

<figure><img src="/files/4kPYNA2za6rzCX5DpFx3" alt=""><figcaption></figcaption></figure>

### **Checkout**

When the customer submits their cart from within WhatsApp, Chat Flow receives this new message type that contains additional content like the SKU (product ID), quantity, and price per item as part of the payload. Chat Flow then calculates the order total to be used when the customer pays via our [Chat 2 Pay](https://guides.clickatell.com/chat-2-pay-user-guide/overview/master) services. Once Chat Flow receives a successful payment status back from Chat 2 Pay, we'll pass the order confirmation to you for processing and fulfillment.

### **Ask a Product Question**

Customers can engage with you and ask questions about your products. As part of your "WhatsApp Commerce onboarding" process, Chat Flow will create a placeholder "Ask a Product Question" flow, allowing the flow-builder to build out the experience and behavior you want. For example, you may want to direct these questions to your FAQ bot first or add a Chat Desk node and transfer the customer to a live agent to answer product-related questions.


# Conversational Components

## What are Conversational Components?

WhatsApp conversational components are special in-chat features that make it easier for customers to interact with your business on WhatsApp. These components can be set up and personalized per WhatsApp Business number, making user interactions more interesting and engaging.

Clickatell currently supports the following conversational components:

* [Ice Breakers](/whatsapp/channel-capabilities/conversational-components/icebreakers): Present pre-written, selectable text options to first-time customers to drive and guide their interactions with your business.
* [Commands](/whatsapp/channel-capabilities/conversational-components/commands): Present a list of commands to customers when they type "/". A 'hint" gives the user an idea of what can happen when they use a specific command.

{% hint style="info" %}
These components are only available on **cloud-hosted** WhatsApp accounts. Conversation components are **not** supported on WhatsApp Web.
{% endhint %}

## Setting up WhatsApp Conversational Components

You must configure conversational components per WhatsApp Business phone number via your WhatsApp Manager account.

1. Log in to your [WhatsApp Manager account](https://business.facebook.com/wa/manage/).
2. Hover over the *Account Tools* (suitcase) icon in the left panel and select *Phone Numbers*.

<figure><img src="/files/v5hsXWQIvqf06MInkm4v" alt=""><figcaption></figcaption></figure>

3. Select the gear icon in the *Settings* column next to the number for which you want to add the conversational component.

<figure><img src="/files/mdvfki6EKWRRxMhGKiqQ" alt=""><figcaption></figcaption></figure>

4. Select *Automations* and then select *Edit* for either Ice Breakers or Commands.&#x20;

<figure><img src="/files/s5pcOZR8EEZkokYSkG3P" alt=""><figcaption></figcaption></figure>

5. Add, edit, and rearrange your Icebreakers and Commands. A preview is shown on the right.&#x20;

<figure><img src="/files/0u6EEB0LZW4qNzrBlFNu" alt=""><figcaption><p>Add up to four icebreakers and preview.</p></figcaption></figure>

<figure><img src="/files/0zbJlWfzHOvT0HBRpcal" alt=""><figcaption><p>Add up to 30 commands and preview.</p></figcaption></figure>

6. Save any changes.&#x20;
7. Your icebreakers and commands can now be used by your customers. You can return to these screens and edit your conversational components at any time.

## Testing conversational components

Once you've set up your icebreaker or command, open WhatsApp and start chatting with the WhatsApp Business phone number. It will be available immediately for you to see.

Since icebreakers only work with **first-time** conversations, you'll need to clear the chat first if you have an existing chat thread with the business number. To clear a chat, go to the business's profile in WhatsApp, tap the ellipses ("kebab") menu next to the business name, and select *Clear chat*. When the business now initiates a conversation by sending a template, the icebreakers will appear.

{% hint style="success" %}
Find more information:

* [Icebreakers](/whatsapp/channel-capabilities/conversational-components/icebreakers)
* [Commands](/whatsapp/channel-capabilities/conversational-components/commands)
  {% endhint %}


# Icebreakers

*Icebreakers* are pre-written, selectable text prompts that appear in a message thread the **first time** you chat with a customer. Icebreakers try to anticipate the most common questions first-time customers might have when interacting with your business. They serve as ready-made text options customers can select to start a conversation instead of having to formulate their own message.&#x20;

Icebreakers are great for service interactions, such as customer support or account servicing. For example, you can embed a WhatsApp button on your app or website. When a customer taps the button, they're redirected to your WhatsApp Business account and presented with a set of options they can select from to guide their interaction further. Customers can tap one of these options as a response, or type in a custom response in the message field.

If a customer taps an icebreaker, it is sent as a normal text message. You need to set up a keyword trigger for creating any follow-up bot messages.

*Note: If a WhatsApp user taps a* [*universal link*](https://faq.whatsapp.com/425247423114725?fbclid=IwAR1QxIAvCV6RD7_xp71yFFNCCJtGzw3FBpldBhgOzW8kJ-OdEigRp8WrVQM) *(**wa.me** or **api.whatsapp.com** links) configured with pre-filled text, the user interfaces for **ice breakers** are automatically dismissed.*

{% hint style="info" %}

* You can configure up to **four** ice breakers per WhatsApp Business number.&#x20;
* Each icebreaker can have a maximum of **80 characters**.&#x20;
* Emojis are **not** supported.
* Only appears when a customer opens a chat with you for the **first time**.
  {% endhint %}

<figure><img src="/files/MUUJH2P2xBUFkNp3F564" alt="" width="238"><figcaption></figcaption></figure>

### Use Cases and Examples

Below are some examples of when and how icebreakers can be used.

| Scenario                                                                                                         | Example of an icebreaker                  |
| ---------------------------------------------------------------------------------------------------------------- | ----------------------------------------- |
| You've opened a new store and you want customers to know where you are located.                                  | Where is your new store?                  |
| You are a travel agency with special offers on certain holiday destinations.                                     | Show me more about your Maldives package. |
| You've launched a new set of products and you want potential customers to easily find more information about it. | What does your new sneakers look like?    |


# Commands

You can configure easy-to-use commands that your WhatsApp customers can see by typing a forward slash (/) in a message thread with your business. This can be used at any point during the conversation.

Commands consist of the command itself and a hint to give the customer an idea of what can happen when they use the command.&#x20;

{% hint style="success" %}
For example, you can define the command:

`/imagine - Create images using a text prompt`

When a WhatsApp user types */imagine cars racing on Mars* it triggers a received message webhook with that exact text string assigned to the `body` property. You could then generate and return an image of cars racing on the planet Mars.
{% endhint %}

When a customer taps a command, the command is pre-filled in the text field. The customer then sends it as a normal text message. You can set up a keyword trigger to create any follow-up bot messages.

{% hint style="info" %}

* You can define up to **30 commands**.&#x20;
* Each command can have a maximum of **32 characters.**
* Each hint can have a maximum of **256 characters**.&#x20;
* Emojis are **not** supported.
* Can be used anywhere during a conversation.
  {% endhint %}

<figure><img src="/files/6lail3GUwNFnWYbfZIcY" alt="" width="238"><figcaption></figcaption></figure>

### Use Cases and Examples

Below are some examples of when and how commands can be used.

<table><thead><tr><th width="317">Scenario</th><th width="211">Example of a command</th><th>Example of a hint</th></tr></thead><tbody><tr><td><strong>Order status check:</strong> Let customers quickly enquire about their order's status, streamlining customer service.</td><td>/status</td><td>Check the status of your recent order</td></tr><tr><td><strong>Product catalog access:</strong> Provide customers with instant access to your product catalog, facilitating a seamless browsing experience.</td><td>/catalog</td><td>View our product catalog</td></tr><tr><td><strong>Customer support ticket:</strong> Let customers initiate a support ticket directly for faster problem resolution.</td><td>/support</td><td>Create a support ticket</td></tr><tr><td><strong>Account balance inquiry:</strong> Allow customers to more conveniently retrieve their account balance.</td><td>/balance</td><td>Check your account balance</td></tr><tr><td><strong>Event notifications:</strong> Notify customers of upcoming events or special occasions.</td><td>/upcoming events</td><td>Find information on the latest events happening</td></tr><tr><td><strong>Account information:</strong> Enable customers to retrieve basic account information or updates.</td><td>/account</td><td>View your account details</td></tr><tr><td><strong>Subscription management:</strong> Businesses offering subscription services can allow new customers to subscribe via a command.</td><td>/subscribe</td><td>Manage your subscription preferences</td></tr><tr><td><strong>Feedback submission:</strong> Encourage customers to give feedback on your products or services, improving customer engagement and business processes. </td><td>/feedback</td><td>Share your feedback with us</td></tr></tbody></table>


# Reporting & Analytics

Several reports providing data on your WhatsApp channel and message template usage and performance are available from within your Clickatell Portal.&#x20;

{% hint style="info" %}
Find more details [here](https://clickatell.gitbook.io/chat-commerce-platform/navigation-and-access/reporting-and-analytics/messaging-channels).
{% endhint %}

<figure><img src="/files/5oU8IZbnB65std71xJJ1" alt=""><figcaption><p>Full Analytics Report</p></figcaption></figure>

<figure><img src="/files/PfOCvCa224xFF6scqBRc" alt=""><figcaption><p>Channels Report</p></figcaption></figure>


# What's New? 🎈

Read more about new features, improvements, and bug fixes contained in the latest release of Clickatell's WhatsApp channel offering.

#### 29 August 2024 <a href="#new-features-1" id="new-features-1"></a>

## Release Summary

The release focused on adding the following new features and enhancements:

* Support for data localization for new numbers
* Parity between cloud and on-prem features

Each of these items is described in more detail below.

## Release Details

### Data Localization

Cloud API Local Storage allows clients to control where their message data is stored at rest. If a company is in a regulated industry such as finance, government, or healthcare, they may prefer to have message data stored in a specific country when at rest, due to these regulatory requirements or company policies.&#x20;

Clickatell now supports data localization, which means:&#x20;

* With any **new** WhatsApp number that a client registers, they can select the country where their data at rest should be hosted. This is specified per number.
* Clients have the following options to select from:
  * **APAC**: India, Singapore, Indonesia, South Korea, Japan, Australia
  * **LATAM**: Brazil
  * **MEA**: South Africa, Bahrain, UAE
  * **Europe**: EU (Germany), UK, Switzerland
  * **NORAM**: Canada, USA
* Once selected, clients cannot change the locale again.
* All **existing** numbers are set to the default, i.e., USA.

{% hint style="info" %}
For more information, please reference [this page](https://developers.facebook.com/docs/whatsapp/cloud-api/overview/local-storage/) by Meta.&#x20;
{% endhint %}

<figure><img src="/files/nfeLQAO8qoElW0pUlmWx" alt=""><figcaption><p>When setting up a new WhatsApp number you have the option to edit the location and choose from the provided locations.</p></figcaption></figure>

<figure><img src="/files/g98fu9cDJqhpgQ3PDJ7r" alt=""><figcaption><p>Clicking on the edit button, you can select the data storage location from a drop-down. Once changed and saved, we do not allow clients to edit this again at a later stage.</p></figcaption></figure>

### WhatsApp: Cloud vs On-Prem Parity

The following features are now supported for cloud-hosted WhatsApp numbers. Previously these were only supported for on-prem WhatsApp numbers.

* **Location request messages:** These messages request your end-user's location. They contain body text and a *Send location* button that opens a location-sharing screen when tapped so end-users can share their location. *Read more* [*here*](/whatsapp/channel-capabilities/interactive-messages-lists-reply-buttons-location-requests#how-to-set-up-interactive-messages-1)*.*
* **Coupon code templates:** These marketing templates display a single copy code button. When tapped, the code is copied to the end-user's clipboard. *Read more* [*here*](/whatsapp/channel-capabilities/whatsapp-message-templates/use-interactive-buttons-in-message-templates#copy-offer-code)*.*
* **Catalog templates:** These marketing templates allow you to showcase your product catalog entirely within WhatsApp. *Read more* [*here*](/whatsapp/channel-capabilities/whatsapp-message-templates/showcase-product-catalog-in-message-template)*.*&#x20;
* **Single-Product Messages**: Messages with a single product item from the business's inventory. (Available via One API only). *Read more* [*here*](https://developers.facebook.com/docs/whatsapp/guides/commerce-guides/share-products-with-customers#product-messages). &#x20;
* **Multi-Product Messages**: Messages with up to 30 product items from the business's inventory. *Read more* [*here*](https://developers.facebook.com/docs/whatsapp/guides/commerce-guides/share-products-with-customers#product-messages).


# SMS Overview

Clickatell's SMS offering allows businesses to enable SMS for any application, website, or system through the SMS Gateway or over the Clickatell Portal.

Depending on the type of SMS being sent (i.e., [1-way](/sms/1-way-sms-communication) or [2-way](/sms/2-way-sms-communication) messaging) and the SMS platform used (i.e., the [SMS Gateway](/sms#sending-messages-over-the-sms-gateway) or [Clickatell Portal](#sending-smses-via-the-clickatell-portal)), you will require either a sender ID, [phone numbers](/sms/long-numbers), or [short codes](/sms/short-codes) to send SMS messages. This can be sourced through Clickatell.

{% hint style="info" %}
When sending SMS messages to customers internationally, take into account [country-specific SMS regulations](https://www.clickatell.com/sms-country-regulations/).
{% endhint %}

### Sending SMS messages via the Clickatell Portal

The Clickatell Portal is a cloud-hosted, user-friendly portal with wizard-driven code generation for easy integration with your existing systems. From here, you have access to unlimited free [testing](/sms/getting-started/add-view-and-edit-test-phones), multiple traffic routing and [two-way setup](/sms/2-way-sms-communication) options, and intelligent [reporting dashboards](/sms/reporting-and-analytics).​

{% hint style="success" %}
Using the Clickatell Portal is ideal if:

* You're sending **any number of messages per month.**
* You're planning on **using other messaging channels** in addition to SMS.
* You require an **HTTP API or REST-based API**.
* You require **standard and priority routing**, as well as **standard feature controls**.
* You want **access to Clickatell's products**, such as [Chat Flow](https://help.clickatell.com/chat-flow/), [Chat Desk](https://help.clickatell.com/chat-desk/), and [Broadcast Messenger](https://help.clickatell.com/broadcast-messenger/).
  {% endhint %}

### Sending SMS messages over the SMS Gateway

The SMS Gateway is equipped with specialized APIs that can be integrated with your systems. These APIs can handle bulk SMS messaging and other specialized actions.

With the SMS Gateway, you can send SMS messages securely, reliably, and instantly via multiple API options such as HTTP, REST, SOAP, and SMPP.

{% hint style="success" %}
The SMS Gateway is ideal if:

* You're a large business sending a **minimum of 250 000 messages per month**.
* **SMS is the only channel** you requir&#x65;**.**
* You require **access to specialized APIs** like SMPP.
* You require **custom routing profiles** and **full feature-level controls**.
* You require any type of **special services** such as conversion APIs, custom monitoring, content registration, etc.
  {% endhint %}


# Quick start guide (SMS)

{% embed url="<https://www.youtube.com/watch?v=39wxKQZpndk>" %}

{% embed url="<https://www.youtube.com/watch?v=an7lV4WtZ14>" %}

To get started with sending SMS messages, follow the below steps:\
\
**Step 1:** [**Create**](https://app.clickatell.com/sign-up/create-account?intent_type=SMS&_gl=1*1ubje1z*_gcl_au*MjkxNzc2NDAyLjE3Nzg0OTUwOTkuMTk5MTA0NzgyOS4xNzgyNzE2NjA4LjE3ODI3MTY2MDc.*_ga*MTYyNjkzMjMwLjE3Mzg5MjA3NDI.*_ga_VQEX92MWS1*czE3ODI5MTAwMzEkbzMzMSRnMSR0MTc4MjkxMjI2MSRqNjAkbDAkaDA.&_ga=2.21677243.128726484.1782716461-162693230.1738920742) **and access your account.**&#x20;

Register for a free Clickatell account, verify it, and log in to access your workspace.&#x20;

**Step 2:** **Activate SMS and configure your setup.**

Activate SMS, create a new setup, and configure your messaging type and sender details.&#x20;

<figure><img src="/files/bFTRiY02rZITQ55Afu4F" alt=""><figcaption></figcaption></figure>

**Step 3: Generate your API key.**

Create an SMS API integration and generate your API key for authentication.&#x20;

**Step 4: Test your integration (Sandbox).**

Add test numbers, send test messages, and validate responses before going live.&#x20;

**Step 5: Send and manage SMS messages.**

Send SMS messages via API or your workspace and choose between priority or standard delivery.&#x20;

{% hint style="info" %}
Message length depends on encoding (160 characters standard, \~70 for Unicode).

&#x20;Ensure compliance with the [regulations](https://www.clickatell.com/sms-country-regulations/) of the country that you are sending SMS messages to.&#x20;
{% endhint %}

{% hint style="info" %}
If you plan on using a **US Long Number**, please refer to the [10DLC](/sms/10dlc-regulations-us/what-is-10dlc) section of this guide.
{% endhint %}

{% hint style="info" %}
Helpful Resources:\
[SMS API Explained](https://www.clickatell.com/products/sms-platform/#step-1)

[SMS FAQs](https://www.clickatell.com/help-center/sms/general-sms/)

[Developer Documentation](https://help.clickatell.com/developers-documentation)

[SMS Pricing](https://www.clickatell.com/pricing-and-coverage/message-pricing/)

{% endhint %}


# Activate SMS

{% hint style="info" %}
Only relevant to [Connect Lite](https://guides.clickatell.com/chat-commerce-platform-guide/packages/connect-lite). For other packages, Clickatell will do this on your behalf.
{% endhint %}

1. Navigate to *Products & Services -> Channels -> SMS*.&#x20;
2. Click *+Activate channel.*&#x20;
   * This adds SMS as a channel on the *My Workspace* tab. &#x20;

<figure><img src="/files/2j1XdKXbQ6SE1OhHrPp2" alt=""><figcaption></figcaption></figure>

3. On the *My Workspace* ta&#x62;*,* click the SMS card to open your SMS channel management page.

<figure><img src="/files/8zhEJvkEGYdSRbaDO8R7" alt=""><figcaption></figcaption></figure>

4. From here, you can:

* [Add new SMS setups](/sms/getting-started/add-new-sms-setups).
* [View and manage your SMS setups](/sms/getting-started/view-and-edit-sms-setups).
* [View, manage, and purchase new long numbers and short codes.](/sms/getting-started/add-view-and-edit-sms-numbers)
* [Register for and manage US Long Number (10DLC).](/sms/10dlc-regulations-us/what-is-10dlc)
* [View, manage, and add test phones.](/sms/getting-started/add-view-and-edit-test-phones)

<figure><img src="/files/H7Acrs2AuD1NWF3cIcaa" alt=""><figcaption></figcaption></figure>


# Add new SMS setups

{% hint style="info" %}
Only relevant to Connect Lite. For other packages, Clickatell will do this on your behalf.
{% endhint %}

You can add as many SMS setups as you want. This page explains how to:

* [Add a new setup](#adding-a-new-sms-setup)
* [Select setup type & regions](#select-the-setup-type-and-regions)
  * [Select number(s)](#select-number-s)
* [Select API type](#select-the-api-type)
  * [Set up API details](#set-up-api-details-new-api-setups-only)
* [View API details & send test messages](#view-api-details-and-send-test-messages-optional)

## Adding a new SMS setup

1. Navigate to *My Workspace -> SMS*.
2. Click *+ New SMS Setup*.&#x20;

<figure><img src="/files/7vBGFqs9VXU3mJTlAArK" alt=""><figcaption></figcaption></figure>

3. Follow the steps as prompted by the setup wizard (shown below).

### Select the setup type and regions

1. Select how you plan to use the SMS channel: &#x20;
   * **Via API:** You're prompted to select either the [**1-way**](/sms/1-way-sms-communication) (sending only) or [**2-way**](/sms/2-way-sms-communication) (sending & receiving) messaging type.
   * **Via Campaign Manager:** This tool is ideal for campaigns such as promotions, reminders, alerts, event information, and quick polls. This is managed as a [separate tool](/sms/getting-started/add-new-sms-setups/add-campaign-manager).

{% hint style="warning" %}
**Note:** In certain countries, one-way messaging is **not** allowed.
{% endhint %}

<figure><img src="/files/0q3HDU73RgzbFs6LUet8" alt=""><figcaption></figcaption></figure>

### **Select number(s)**

If you've selected **two-way** communication, you must also:&#x20;

1. Select a long number/short code.
2. Add a new number or use an existing one.

{% hint style="info" %}
See [this section](/sms/getting-started/add-view-and-edit-sms-numbers) of the guide for more details on SMS numbers.
{% endhint %}

{% hint style="warning" %}
Since short codes require an application process and are not available immediately, we recommend that you [**apply for a short number first**](/sms/short-codes) before adding a new SMS setup if you are planning on using a short code for your SMS communications.
{% endhint %}

<figure><img src="/files/JqddDXm6uD9BjINoVplc" alt=""><figcaption></figcaption></figure>

### **Select the API type**

1. Choose between:
   * &#x20;*HTTP* (if you are using SMS as the **only** channel), or&#x20;
   * *One API* (for use with WhatsApp, SMS, and future channels)
2. Create a new API setup or link an existing one.

<figure><img src="/files/WxxCH3URgC3583DjYHJQ" alt=""><figcaption></figcaption></figure>

### **Set up API details (new API setups only)**

1. Enter a **name** for the API.
2. Select whether this must be added in the Sandbox (recommended) or Production **environment.**
3. Select a delivery option under *SMS Service Class*:
   * **Priority SMS delivery:** Our fastest and most direct line of delivery of time-sensitive SMS messages such as one-time PINs (OTPs) and transactional messages.&#x20;
     * *Not to be used for marketing or promotional notifications.*&#x20;
   * **Standard SMS delivery:** For high-quality, reliable SMS delivery of non-time-sensitive SMS messages such as marketing promotions, brand announcements, or CRM messages.&#x20;
4. Edit other **optional settings** (e.g., enabling message parts and configuring callbacks for delivery notifications) by using the toggles.

<figure><img src="/files/iu7bR7hqg4Z3PeHntOYx" alt=""><figcaption></figcaption></figure>

### **View API details & send test messages (optional)**

{% hint style="info" %}
All messages to test phone numbers are free. Once the integration is promoted to production, you will be charged for messages sent.
{% endhint %}

Your API details are displayed.&#x20;

1. The **unique API key** is the authorization key you need to interface with the Clickatell platform.
   * The API key is prepopulated in our example scripts that you can copy and paste.

<figure><img src="/files/xVXSSPnaLtnCsBaqP15x" alt=""><figcaption></figcaption></figure>

2. **Test** the sending and/or receiving of messages from the Sandbox environment by adding up to **three** [**test phone**](/sms/getting-started/add-view-and-edit-test-phones) **numbers** to your account.&#x20;
3. Click *+ Add test phone* and follow the prompts.&#x20;

{% hint style="info" %}
Phone numbers must be entered in the **international format** and contain no spaces or other non-numeric characters.&#x20;
{% endhint %}

4. Click *Complete*.&#x20;
   * Your new SMS Setup is added to the [*My SMS Setups*](/sms/getting-started/view-and-edit-sms-setups) table and is also visible on the[ *API Integrations*](https://clickatell.gitbook.io/chat-commerce-platform/navigation-and-access/user-portal/view-and-edit-api-integrations) page.

<figure><img src="/files/jniCW7JXzySdEXOpAGBk" alt=""><figcaption></figcaption></figure>


# Add Campaign Manager

Campaign Manager is an online tool that allows you to create a custom SMS campaign within minutes, with no coding or developers required.

{% hint style="warning" %}
Your [**billing details**](https://clickatell.gitbook.io/chat-commerce-platform/account-management/billing-and-payments/billing-details) need to be set up before you can enable Campaign Manager on your account.
{% endhint %}

1. Navigate to *Products & Services -> Products -> Campaign Manager*.&#x20;
2. Click *+Activate product.*
   * This adds Campaign Manager as a product on the *My Workspace* tab.

<figure><img src="/files/OOUHEkPq8j6fIPQnbhFY" alt=""><figcaption></figcaption></figure>

3. On the *My Workspace* tab, select the *Campaign Manager* card.

<figure><img src="/files/jP90yME8807SYNLDvHiq" alt=""><figcaption></figcaption></figure>

4. Click *Enable Campaign Manager*.

<figure><img src="/files/YG6fJy2SmZTLLdPpvTIm" alt=""><figcaption></figcaption></figure>

5. Enter the required details and click *Submit*.

<figure><img src="/files/OSXtdvliSyVqWOU1gy5q" alt=""><figcaption></figcaption></figure>

6. Launch the Campaign Tool by navigating to *My Workspace --> Campaign Manager* and clicking *Go to Campaign.*

<figure><img src="/files/ewXyx2ojd4fA0QUzWm7R" alt=""><figcaption></figcaption></figure>

Alternatively, when [adding a new SMS setup](/sms/getting-started/add-new-sms-setups):&#x20;

1. Select *Campaign Manager* in Step 1 where you select how you plan to use your new SMS channel.&#x20;
   * If you haven't activated Campaign Manager, you are asked to provide a business name, industry, and location.&#x20;
   * Click the *Complete* button.

<figure><img src="/files/SJ0w9q97yx6MQlDZW7PC" alt=""><figcaption></figcaption></figure>

2. Click the *Go To Campaign* button to launch Campaign Manager in a new tab.

<figure><img src="/files/Mehdr1VoYOokwFUJD4HA" alt=""><figcaption></figcaption></figure>

3. From here you can create, schedule, and manage your campaigns.

<figure><img src="/files/QYHE18P2jPpIG5lFrQHx" alt=""><figcaption></figcaption></figure>

In *Campaign Manager*, you can use the left navigation panel to access settings and tools for your campaign:

* **Dashboard** - step-by-step walkthrough to set up a new messaging campaign; provides shortcuts for often-used actions
* **Groups** - group your contacts into customer segments and configure campaigns for each group
* **Contacts** - import and manage your contacts and view useful data about your contacts
* **Campaign** - create a new campaign and a campaign queue group/contact; create and re-use campaign templates
* **Calendar** - view and manage all your scheduled campaigns; click on a specific date to schedule a message that will then be sent on that specific day
* **Tools**
  * *Short Links* - create short links from any URL you want to add to your campaign message to minimize the number of characters used; view existing short links and their click-through rate
  * *Non-GSM Character Checker* - ensure that your message contains only GSM characters; messages containing non-GSM characters are limited to only 70 characters
* **Logs** - use the '*Actions*' drop-down to view your SMS Outbox and SMS Inbox; you can view all messages that were sent or are scheduled to be sent and their statuses, as well as view and reply to all messages received
* **Preferences** - edit settings such as company name, timezone, incoming SMS alerts, new subscriber alerts, etc.
* **Logout** - Log out of your Clickatell account


# View & edit SMS setups

1. Navigate to *My Workspace --> SMS*.&#x20;
   * Details about all your current SMS setups are listed in the *My SMS Setups* table.&#x20;

<figure><img src="/files/rLv1ia2tVsfEXAqecCBQ" alt=""><figcaption></figcaption></figure>

2. Click *See All* to view all your setups if you have more than three.
3. Select any setup from the table to open the API details page.&#x20;

<figure><img src="/files/QORuR1CItN1POkCpZ0m7" alt=""><figcaption></figcaption></figure>

4. From here you can edit and test your API.&#x20;
5. Save any changes by clicking *Update Changes*.

<figure><img src="/files/I0EaqkviIDM7IsMrbcwi" alt=""><figcaption></figcaption></figure>


# Add, view, and edit SMS numbers

## Add a new SMS number

{% hint style="info" %}
Only relevant to Connect Lite. For other packages, Clickatell will do this on your behalf.
{% endhint %}

For [two-way SMS communication](/sms/2-way-sms-communication), you need a dedicated number.&#x20;

1. To purchase a new number, go to *My Workspace --> Long Numbers & Short Codes.*
   * Alternatively, you can navigate to *My Workspace -> SMS.*
2. Select *Get Long Number* or *Get Short Code*.&#x20;
3. Follow the prompts to complete the purchase.

<figure><img src="/files/xJusY1kX7jsRsn74kYC6" alt=""><figcaption></figcaption></figure>

{% hint style="success" %}
Numbers can also be purchased as part of the [2-way SMS setup integration wizard](/sms/getting-started/add-new-sms-setups).
{% endhint %}

{% hint style="info" %}
See the relevant pages in this user guide for more detail on adding [short codes](/sms/short-codes) and [long numbers](/sms/long-numbers).
{% endhint %}

## View and edit SMS numbers

1. Navigate to *My Workspace --> Long Numbers & Short Codes.*&#x20;
2. Select a number from this table to view its details, manage the API connected to it, and update the subscription linked to this number *(Connect Lite only)*.

<figure><img src="/files/9HxUP4Jb4MX71KsMm4qf" alt=""><figcaption></figcaption></figure>


# Add, view, and edit test phones

To test your setups in the Sandbox environment, you need to add test phones to your account. You can send as many messages to these registered test phones as you want, free of charge.

{% hint style="info" %}
You can add a maximum of **three** test phones to your account.
{% endhint %}

## Add test phones

1. Navigate to *My Workspace --> SMS.*
2. Select *Manage Test Phones*.

<figure><img src="/files/mq97g14l3mRn3IJs3glI" alt=""><figcaption></figcaption></figure>

3. Select the country this phone number is registered in and add the number of the test phone (**in international format**).
4. Click *Add*.

{% hint style="success" %}
To verify that the number you've entered is valid, an **OTP** will be sent to the number that you've entered.
{% endhint %}

<figure><img src="/files/Dj8aiZb8uKqJWmyYCetM" alt=""><figcaption></figcaption></figure>

4. Enter the OTP and click *Submit PIN*.&#x20;
5. If the PIN was entered correctly, the phone is added as a test phone to your account.&#x20;

<figure><img src="/files/VPqVgrNX1bPzYm3ppwrk" alt=""><figcaption></figcaption></figure>

6. To remove a test phone, simply click the "X" icon next to it.

{% hint style="warning" %}
If the test phone number has not been verified successfully, it will have a status of **Unverified**. You cannot use this number and have to remove it before trying to add it again.
{% endhint %}

{% hint style="info" %}
Test phones can also be set up as part of the [SMS setup wizard](/sms/getting-started/add-new-sms-setups).​
{% endhint %}

## View & edit test phones <a href="#view-and-edit-test-phones" id="view-and-edit-test-phones"></a>

1. Navigate to *My Workspace --> SMS.*
2. Under *My SMS Numbers,* a table lists all your long numbers and short codes.

<figure><img src="/files/NdcFRf5j6TALrKEr3vMU" alt=""><figcaption></figcaption></figure>

3. Select a number from this table to view its details, manage the API connected to it, and update the subscription linked to this number (Connect Lite only).​

<figure><img src="/files/C3TzGYjIMEXANz8NBWpT" alt=""><figcaption></figcaption></figure>


# 1-way SMS communication

**1-way** SMS communication involves **sending** messages only, i.e., customers cannot reply to the messages sent by your business. &#x20;

{% hint style="warning" %}
**Note:** 1-way messaging is not allowed in some countries (e.g., the USA).
{% endhint %}

To engage in 1-way SMS communication, you do **not** require a dedicated number.&#x20;

When selecting 1-way messaging as part of the [SMS setup wizard](/sms/getting-started/add-new-sms-setups), you are **not** required to purchase a long number/short code, and a **random number** will be used as the *from* number.

{% hint style="success" %}
Learn how to send 1-way messages using [One API](https://docs.clickatell.com/channels/one-api/one-api-reference/#tag/One-API/operation/sendMessageREST).
{% endhint %}


# 2-way SMS communication

{% hint style="warning" %}
If you plan on using a **US long number**, please refer to the [10DLC section](/sms/10dlc-regulations-us/what-is-10dlc) of this guide.
{% endhint %}

**2-way** SMS communication involves **sending and receiving** messages, i.e., customers can reply to the messages sent by your business.

To engage in 2-way SMS communication, you require a **dedicated number.**&#x20;

{% hint style="info" %}
Only relevant to Connect Lite. For other packages, Clickatell will do this on your behalf.
{% endhint %}

* You can purchase a[ long number](/sms/long-numbers) or a [short code](/sms/short-codes) from *My Workspace --> SMS* and link it to the 2-way SMS integration.&#x20;
* Numbers can also be purchased as part of the [2-way SMS setup wizard](/sms/getting-started/add-new-sms-setups).

{% hint style="success" %}
Learn how to send 2-way messages using [One API](https://docs.clickatell.com/channels/one-api/one-api-reference/#tag/One-API/operation/sendMessageREST).
{% endhint %}


# Long numbers

In order to receive replies to messages you send (i.e. [2-way communication](/sms/2-way-sms-communication)), you require a dedicated number. You can choose between using a [long number](#what-is-a-long-number) or a [short code](/sms/short-codes).&#x20;

## What is a long number?

* Can be up to 16 digits in length.&#x20;
* Ideal if you want to receive replies but it's not important that people easily remember your number (e.g., marketing campaigns, competitions, booking confirmations, and customer surveys).
* Allows your business to receive replies from local and international destinations.
* Less expensive than [short codes](/sms/short-codes).

{% hint style="info" %}
All **US long numbers** must be registered on the [**10DLC**](/sms/10dlc-regulations-us/what-is-10dlc) environment based on new regulations by The Campaign Registry.&#x20;

You can [register a brand and campaign](/sms/10dlc-regulations-us/apply-for-a-10dlc-brand-and-campaign) for your US long numbers from within the Clickatell Portal itself. **This is only required for US long numbers**.

Refer to [these FAQs](https://www.clickatell.com/help-center/sms/10dlc-us-long-numbers) for more details on 10DLC and why it was introduced.&#x20;
{% endhint %}

## Purchase a long number

{% hint style="info" %}
Only relevant to Connect Lite. For other packages, Clickatell will do this on your behalf.
{% endhint %}

{% hint style="success" %}
Ensure that your [billing details](https://clickatell.gitbook.io/chat-commerce-platform/account-management/billing-and-payments/billing-details) have been set up before purchasing a long number.
{% endhint %}

1. Navigate to *My Workspace -> Long Numbers & Short Codes ->* *Get Long Number.*
   * Alternatively, navigate to *My Workspace --> SMS* and click the *Get Long Number* button under *My SMS Numbers*.

<figure><img src="/files/mSs3AKaK4pCekjQqskHH" alt=""><figcaption></figcaption></figure>

<figure><img src="/files/iyHruLSPpK7gMjzcsxBg" alt=""><figcaption></figcaption></figure>

2. Complete the application wizard presented to you.&#x20;
3. You can select multiple numbers per country, and you can also use the *+ Add Number* button to add numbers for multiple countries.&#x20;

<figure><img src="/files/bV75YS95SRYUva5A1RqO" alt=""><figcaption></figcaption></figure>

4. Select a subscription package and payment method.&#x20;
5. Use the toggle to enable auto-renewal (i.e., your subscription will automatically renew at the end of each subscription period). &#x20;

{% hint style="warning" %}
The auto-renewal option is only available if you've specifically given permission when you [added the payment method](https://clickatell.gitbook.io/chat-commerce-platform/account-management/billing-and-payments/payment-methods).
{% endhint %}

<figure><img src="/files/EnstFqgoahXPEDJFeyjG" alt=""><figcaption></figcaption></figure>

6. Download a pro forma invoice as a PDF document (optional).
7. Click *Purchase* to confirm the purchase.

<figure><img src="/files/6yep1UlhIVUeTu22yNrd" alt=""><figcaption></figcaption></figure>

{% hint style="success" %}
The new long number will now appear in your [*Long numbers & Short codes*](/sms/getting-started/add-view-and-edit-sms-numbers) table and will be available to link to an SMS setup.
{% endhint %}


# Short codes

In order to receive replies to the messages you send (i.e., [two-way communication](/sms/2-way-sms-communication)), you require a dedicated number. You can choose between using a [long number](/sms/long-numbers) or a [short code](#what-is-a-short-code).&#x20;

## What is a short code?

{% hint style="warning" %}
Short codes are **country-specific** and can't be used if you want to receive messages from international customers.
{% endhint %}

* A memorable five or six-digit number.&#x20;
* Ideal if you want to receive replies and it is important that people easily remember your number (e.g., SMS marketing campaigns, lead generation, and promotions).
* Requires an application process that may take up to **16 weeks** to process.&#x20;

## Apply for a short code

{% hint style="info" %}
Only relevant to Connect Lite. For other packages, Clickatell will do this on your behalf.
{% endhint %}

{% hint style="success" %}
Ensure that your [billing details ](https://clickatell.gitbook.io/chat-commerce-platform/account-management/billing-and-payments/billing-details)have been set up before purchasing a short code.
{% endhint %}

1. Navigate to *My Workspace -> Long Numbers & Short Codes ->* *Get Short Code.*
   * Alternatively, you can navigate to *My Workspace --> SMS* and click the *Get Short Code* button.

<figure><img src="/files/9mvJDe9wSbwa3TZukxTO" alt=""><figcaption></figcaption></figure>

<figure><img src="/files/qACc8Fhb3KNsJligJ6uf" alt=""><figcaption></figcaption></figure>

2. Complete the application wizard presented to you.

{% hint style="info" %}
The details you supply during the application process will be used to apply for a standard-rated short code to use in the country you selected **only** and includes information about the service you plan to offer via the short code.&#x20;
{% endhint %}

<figure><img src="/files/yG7uMBj4Fgu4XFA7ECcK" alt=""><figcaption></figcaption></figure>

3. Once you've completed all the required fields, click *Submit*.

{% hint style="info" %}
Depending on the country, it may take several weeks for your short code to be processed.&#x20;
{% endhint %}

<figure><img src="/files/8aNabLteVPubXUv15lgY" alt=""><figcaption></figcaption></figure>

4. You will be **notified** in your [message center](https://clickatell.gitbook.io/chat-commerce-platform/account-management/help-and-message-center#view-notifications) and via email once your short code application has been approved.

{% hint style="warning" %}
You have to **pay a setup fee** before you can start using your short code to send and receive messages.&#x20;
{% endhint %}

5. When you navigate to *My Workspace -> Long Numbers & Short Codes*, you can also click A*dd Now* next to the approved short code to pay.

<figure><img src="/files/bBmRrGpC00djTFs8amxe" alt=""><figcaption></figcaption></figure>


# Reporting & Analytics

Several reports providing data on your SMS channel's usage and performance are available from within your Clickatell Portal.&#x20;

{% hint style="info" %}
Find more details [here](https://clickatell.gitbook.io/chat-commerce-platform/navigation-and-access/reporting-and-analytics/messaging-channels).
{% endhint %}

<figure><img src="/files/QkYIAaee6dGiIKXqJsUe" alt=""><figcaption></figcaption></figure>


# What is 10DLC?

10-digit long code (10DLC) is the new industry-led long code solution for North American application-to-person (A2P) business messaging utilizing a 10-digit phone number.&#x20;

10DLC registration is **applicable to all businesses that use US long numbers** to send and receive messages.

{% hint style="info" %}
Refer to our [FAQs](https://www.clickatell.com/help-center/sms/10dlc-us-long-numbers) for more information.
{% endhint %}

Clickatell gathers the required registration information for your application and submits it to the Campaign Registry for carrier approval.&#x20;

Once both a brand and campaign have been approved, long numbers associated with it can be used to send and receive messages with the benefits of the 10DLC-sanctioned environment for A2P messaging.&#x20;

The Campaign Registry guidelines require users to follow industry best practices according to the [CTIA](https://api.ctia.org/wp-content/uploads/2019/07/190719-CTIA-Messaging-Principles-and-Best-Practices-FINAL.pdf).&#x20;

{% hint style="success" %}
To register your US long number on 10DLC: &#x20;

1. [**Register a brand**](/sms/10dlc-regulations-us/apply-for-a-10dlc-brand-and-campaign#register-a-10dlc-brand-and-campaign) and pay a brand registration fee.&#x20;
2. [**Register one or more campaigns**](/sms/10dlc-regulations-us/apply-for-a-10dlc-brand-and-campaign#step-2-register-a-campaign) for your brand and pay a campaign registration fee.&#x20;
3. [**Link a US long number** ](/sms/10dlc-regulations-us/apply-for-a-10dlc-brand-and-campaign#step-3-linking-a-us-long-number-to-a-brand-and-campaign)to your campaign.
   {% endhint %}

The rest of this section explains in more detail how the 10DLC registration process works in the Clickatell Portal.


# Apply for a 10DLC brand and campaign

When you [purchase a new long number](/sms/long-numbers#purchase-a-long-number) and select "United States" as the country, you are required to register a 10DLC brand and campaign first.&#x20;

## Register a 10DLC brand and campaign

1. Click the *Go to 10DLC Brand & Campaigns* button.

<figure><img src="/files/biKZClDyvJ9z5i35l2Sr" alt=""><figcaption></figcaption></figure>

2. Select *Start Registration* and follow the prompts.

<figure><img src="/files/J5Wm72lfEggufP2AYOhI" alt=""><figcaption></figcaption></figure>

#### **Step 1: Register a brand**&#x20;

First, you have to apply for the registration of your **brand**. Your brand must be **successfully verified** first before you can continue with [registering campaigns](#step-2-register-a-campaign) and [linking a long number](#step-3-linking-a-us-long-number-to-a-brand-and-campaign).&#x20;

{% hint style="info" %}
Only one brand can be created per Employer Identification Number (EIN). Any additional brands would require their own, unique EIN.&#x20;
{% endhint %}

1. Complete all the required fields and click *Next*.

<figure><img src="/files/Ki6paRi17DzQV8kgaJSz" alt=""><figcaption></figcaption></figure>

{% hint style="warning" %}
**A once-off fee is charged for registering a new brand**. This fee is non-refundable and is paid whether your brand is successfully verified or not.&#x20;
{% endhint %}

2. Select your payment method and click *Pay*.&#x20;
3. Upon successful payment, you are returned to the brand dashboard, where you can view your brand details and add campaigns.&#x20;

{% hint style="info" %}
If your brand status is "Unverified", you will have to register a new brand and ensure you enter the [correct business details](https://www.clickatell.com/faqs/answer/6-how-does-a2p-10dlc-registration-work/).&#x20;
{% endhint %}

<figure><img src="/files/i1GedySLmEPxEfiYyck5" alt=""><figcaption></figcaption></figure>

#### **Step 2: Register a campaign**&#x20;

Once you have successfully verified a brand, you can register one or more **campaigns**. A campaign is the **use case** you want to register for your brand to send related messages to end-users.&#x20;

{% hint style="info" %}
Every campaign is associated with a verified brand. You can have multiple campaigns per brand. However, a specific long number can be associated with one campaign only and cannot be shared across multiple campaigns within the brand.
{% endhint %}

1. Click *Add New Campaign*.&#x20;

<figure><img src="/files/ZUIpGWJ4UHqK0rgYSQeo" alt=""><figcaption></figcaption></figure>

2. Complete all the required fields and click *Next*.

<figure><img src="/files/4oJx5urGWNkWuI7xexiM" alt=""><figcaption></figcaption></figure>

{% hint style="warning" %}
**A once-off registration fee is charged per campaign**. This fee is non-refundable.&#x20;
{% endhint %}

3. Select your payment method and payment plan.&#x20;
4. Upon successful payment, you are returned to the brand dashboard where you can view details about your brand details and the associated campaigns.&#x20;

{% hint style="warning" %}
Each campaign you register is subject to a vetting process to confirm that it meets the best practice requirements. **This takes up to 5 business days.**
{% endhint %}

<figure><img src="/files/sMxKLJhZRc9QYqIqsiZu" alt=""><figcaption></figcaption></figure>

{% hint style="success" %}
You can add more campaigns to your verified brand at any time by navigating to *My Workspace --> Long Numbers & Short Codes,* selecting a brand from the table, and clicking *Add New Campaign*.
{% endhint %}

#### **Step 3: Linking a US long number to a brand and campaign**

1. Navigate to *Workspace --> Long Numbers & Short Codes.*
2. Select a brand and a campaign.&#x20;
3. From the drop-down, select the existing US long number you want to link to this campaign.
   * Alternatively, you can purchase a new US long number.&#x20;

{% hint style="info" %}
A long number can only be linked to one campaign at a time. You can link multiple numbers to one campaign.
{% endhint %}

<figure><img src="/files/DX3lxnaYqCGNIISh2AcP" alt=""><figcaption></figcaption></figure>

When you choose to purchase a new US long number, this number will automatically be linked to the brand and campaign in context once payment is successfully completed.&#x20;

<figure><img src="/files/rh88sh0yjvGtq1Ho6cpd" alt=""><figcaption></figcaption></figure>


# Apply for additional 10DLC brands and campaigns

When you [purchase a new long number ](/sms/long-numbers#purchase-a-long-number)and select "United States" as the country, you are notified if you have already registered a 10DLC brand and campaign (see purple in the image below).&#x20;

You may register more 10DLC brands and campaigns following the steps below.

## Register additional 10DLC brands and campaigns

1. Select a state and the long numbers you want to purchase.&#x20;
2. Click *Link to 10DLC*.

<figure><img src="/files/S9p067wgF8JmVlXegIHL" alt=""><figcaption></figcaption></figure>

3. Select from your existing brands and campaigns those you want to link to your long number.
4. &#x20;Click *Link*.&#x20;
5. Click Next.

<figure><img src="/files/nn20rnmutwWj972iQnTz" alt=""><figcaption></figcaption></figure>

{% hint style="success" %}
Alternatively, click *Go to 10DLC Brand & Campaigns* to register a new brand and/or campaign.  &#x20;
{% endhint %}


# Register an existing US long number

If you have **existing US long numbers** (i.e., numbers you've purchased before the 10DLC regulations were introduced), you are also required to link each number to a registered brand and campaign.

## Register an existing US long number

1. Navigate to *My Workspace --> Long Numbers & Short Codes*.&#x20;
2. You will see a *Link to 10DLC* button next to the US long numbers that require linking.&#x20;

<figure><img src="/files/vG3yB3qi8O84rKEG0unD" alt=""><figcaption></figcaption></figure>

3. Select from your existing brands and campaigns those you want to link to your long number and click *Link*.

<figure><img src="/files/1Cnz3JcrFojYieL1JGie" alt=""><figcaption></figcaption></figure>


# View your brand and campaign details

1. Navigate to *My Workspace --> Long Numbers & Short Codes.*
2. See the table at the bottom of the page.&#x20;
   * You can also start a new 10DLC registration from here.

<figure><img src="/files/hgOmlZa2sFiKqr35vvH5" alt=""><figcaption></figcaption></figure>

3. Select a brand from the table to open the *Brand Details* page.&#x20;
   * This page includes a list of all campaigns associated with the selected brand.&#x20;
   * You can also add new campaigns to the brand from here.

<figure><img src="/files/NRWbKBr9a1MySe9A8YBK" alt=""><figcaption></figcaption></figure>

4. Selecting a row from this table opens the *Campaign Details* page.&#x20;
   * This page includes a list of all the numbers associated with the selected campaign.&#x20;
   * You can also link/add new US numbers to the campaign from here.

<figure><img src="/files/Y5nPe02JSu4695qia5AC" alt=""><figcaption></figcaption></figure>

5. Selecting a row from the *Numbers* table opens the [Number Detail page](/sms/getting-started/add-view-and-edit-sms-numbers)&#x20;
   * Here you can view details about the number, the connected API, and subscription details.


# Resubmit a brand

When you [purchase a new long number](/sms/long-numbers#purchase-a-long-number) for the United States, you are required to register a [10DLC ](/sms/10dlc-regulations-us/what-is-10dlc)brand and campaign first. Upon successful submission of the brand application, a brand status - *verified* or *unverified* - is returned from the Campaign Registry. A user cannot proceed with a campaign application until the brand is verified by the Campaign Registry.

You can resubmit a brand that was returned with an "unverified" status instead of having to start the application process from scratch.&#x20;

1. Select any of your unverified brands.
2. Click *Re-submit Brand* to resubmit the registration.&#x20;
   * .You must edit the brand details before resubmitting it for approval.&#x20;

{% hint style="info" %}
Note that for every brand resubmission a fixed application fee is charged. Brand verification is not guaranteed and the result may remain unchanged.&#x20;
{% endhint %}

<figure><img src="/files/8pxoXlP5sRW7gpF0HJxx" alt=""><figcaption></figcaption></figure>


# Overview

{% hint style="info" %}
Only available in Nigeria and South Africa.
{% endhint %}

Unstructured Supplementary Service Data (USSD) is a messaging channel that integrates with [Chat Flow](https://clickatell.gitbook.io/flow/overview) (Clickatell's workflow-building platform) to enable high-speed, interactive communication.&#x20;

With USSD, customers can interact with remote applications from their mobile devices in real-time, without an internet connection.&#x20;

## Using USSD

{% hint style="success" %}
USSD is an effective channel for services such as mobile banking and mobile commerce.
{% endhint %}

The USSD channel equips businesses to do the following:

* **Self-services**: Allow customers to do service registrations, make service queries, and make reservations.
* **Acquisition services**: Allow customers to sign up for services, and facilitate customer acquisition through campaigns and advertisements.
* **Financial services**: Allow customers to manage bank accounts (e.g., check account balances, change pins, and make payments and transfers), top-up prepaid products, and generate OTPs.
* **Information services**: Send news, weather, or sport updates to customers.

### USSD benefits

**Businesses** get the benefit of:

* Simple, engaging messaging with customers.
* Reaching customers via a low-cost channel.
* Support for a high volume of transactions and throughput.
* Secure interactions, as information is not stored or entered on the customer's mobile device
* Seamless integration with APIs.
* New business opportunities in USSD banking and mobile commerce.

**Customers** get the benefit of:

* Self-service experiences.
* A channel that's affordable and easy to use.
* Secure transactions.
* Access to 24/7 support and time-critical notifications.
* Usage without any internet connection, data, or smartphone.&#x20;


# USSD features

{% hint style="success" %}
USSD allows for messages with a maximum of **182 characters**. However, due to differences in the minimum number of characters accepted by the Mobile Network Operators, we recommend you remain within **160 characters**.
{% endhint %}

Clickatell offers two types of USSD messaging services:&#x20;

* **Mobile-initiated interactive messaging** **(or USSD pull):** This enables the customer to dial a number (e.g., \*100#) to initiate a session via their handset. Information could also be displayed as a menu that the customer can respond to and interact with.
* **Network-initiated interactive messaging** **(or USSD push):** This is when the session to the handset is initiated by the application. Similar to mobile-initiated, this information could be a menu that the customer can respond to and interact with.

{% hint style="warning" %}
USSD push is not available in Chat Flow yet.
{% endhint %}

These USSD messaging services are offered for all types of [service codes](/ussd-user-guide/getting-started/service-codes).


# Service codes

The USSD channel relies on one of three service codes:&#x20;

1. **Dedicated service code**: A code typically owned by one account and used by only one user for their company or service. It only has one segment, for example, \*111#. You can add as many sub-codes (extensions) as you want.&#x20;
2. **Semi-dedicated service code**: A code dedicated to one account but shared among other accounts.&#x20;
3. **Shared service** **code**: A code that is shared and used by multiple companies or services. Each company is allocated a channel on Clickatell's dedicated sub-code but the dedicated parent code is shared. You can add as many sub-codes (extensions) as you want, for example, \*111\*01\*xxx#.&#x20;

{% hint style="info" %}
The USSD bearer is accessed by calling a number that starts with the asterisk "\*" or hash/pound sign "#", followed by a combination of numerals, asterisks, and finally the hash/pound sign.&#x20;
{% endhint %}


# Onboarding to USSD

As part of its USSD offering, Clickatell provides the following services:&#x20;

* Channel integration, such as USSD gateway configuration.
* Channel features setup.
* Assistance with USSD service code acquisition.
* Enabling USSD service codes.
* Channel reporting, such as daily logs and custom reports.

{% hint style="info" %}
To activate the USSD messaging channel, contact [Clickatell Sales](https://www.clickatell.com/contact/contact-sales/).
{% endhint %}


# Broadcast Messenger

Broadcast Messenger lets you create and manage marketing campaigns, and send bulk WhatsApp and SMS messages to lists of recipients.

Watch the video below for a complete overview of the Broadcast Messenger tool.

{% embed url="<https://vimeo.com/985642039?share=copy>" %}

The rest of this user guide provides more details about using Broadcast Messenger:

* [Create, schedule, and send](/broadcast-messenger/manage-campaigns/add-a-new-campaign) WhatsApp and SMS messaging campaigns.
* Make use of the [approved WhatsApp templates](/broadcast-messenger/manage-campaigns/add-a-new-campaign) in your account.
* Create, manage, and (re)use [SMS message templates](/broadcast-messenger/manage-campaigns/message-templates).
* [Upload recipient details](/broadcast-messenger/manage-campaigns/add-a-new-campaign) in bulk via the web front-end.
* Receive and view [customer responses](/broadcast-messenger/responses-and-opt-outs/view-responses).
* Create and manage [auto-responses](/broadcast-messenger/responses-and-opt-outs/view-responses).
* Manage customer [opt-outs](/broadcast-messenger/responses-and-opt-outs/manage-opt-outs).
* [View summary data](/broadcast-messenger/manage-campaigns/view-details-and-manage-campaigns) of how campaigns are performing.

<figure><img src="/files/FRKbLaUHS9pn81Katjzz" alt=""><figcaption><p>The Broadcast Messenger landing page.</p></figcaption></figure>


# Activate Broadcast Messenger (self-serve)

{% hint style="info" %}
Only relevant to self-serve customers. For other packages, Clickatell does this on your behalf.
{% endhint %}

1. Go to *Products & Services -> Expore -> Broadcast Messenger.*

<figure><img src="/files/9K88llOhgG6VxrgwEGUX" alt=""><figcaption></figcaption></figure>

2. On the Broadcast Messenger overview page, click *Activate Product.*

<figure><img src="/files/slVTEc7jjkxlZHp7ZcE2" alt=""><figcaption></figcaption></figure>

3. If you haven't added your billing information, you'll be prompted to complete that first.

<figure><img src="/files/2Hc2YImxxDwcIDnlw4yP" alt=""><figcaption></figcaption></figure>

4. Click *View in My Workspace.*

<figure><img src="/files/LrFpfEuWa52Q3KMHPZI8" alt=""><figcaption></figcaption></figure>

5. Broadcast Messenger is added to the workspace. Two One API integrations and SMS setups were also added.

<figure><img src="/files/Dn7YuzNScMYGEIBdvMqs" alt=""><figcaption></figcaption></figure>

6. Clicking the *Broadcast Messenger* tile in *My Workspace* opens the application in a new tab.&#x20;
   * Two departments are created by default for SMS. This reflects the two new One API integrations: **Default Campaign** (used for sending production messages) and **Default Test Campaign** (used for testing whether your campaign’s setup is correct).
   * To **test** a campaign, a test phone must exist in the system. Add test phones via the Clickatell Portal as described [here](https://guides.clickatell.com/sms-channel/getting-started/add-and-edit-test-phones).&#x20;

<figure><img src="/files/k6WE4MHASuO8UMM0T7Ja" alt=""><figcaption></figcaption></figure>

7. You are ready to [create ](/broadcast-messenger/manage-campaigns/add-a-new-campaign)your first SMS campaign!

<figure><img src="/files/bknlOFGtLtvYZDc8htuG" alt=""><figcaption></figcaption></figure>

{% hint style="info" %}
If you are an existing customer using WhatsApp wih Clickatell, you can also create WhatsApp campaigns using the same Broadcast Messenger tool.&#x20;
{% endhint %}


# Quick Start

On the Broadcast Messenger Home page, you can use Clickatell AI Campaign Assist to quickly create an SMS campaign or to suggest potential WhatsApp templates for you.&#x20;

{% hint style="info" %}

* AI suggested WhatsApp templates must still meet WhatsApp policy and go through the normal template approval process.
  {% endhint %}

<figure><img src="/files/2jsxgiQ9NAeIbVdcbDt3" alt=""><figcaption></figcaption></figure>

Simply describe your campaign goals following the tips provided, and the AI assistant will generate suggestions for you.

<figure><img src="/files/i3uQ5VvtlJRDsbKEbLEC" alt=""><figcaption></figcaption></figure>

Preview a suggestion/suggestions to help you decide if it matches your requirements:

<figure><img src="/files/0MvRB6suJGDoVgEqSB4O" alt=""><figcaption></figcaption></figure>

If you choose to use a suggestion, you will be redirected to [Add a new campaign](https://guides.clickatell.com/clickatell-chat-commerce-platform/broadcast-messenger/manage-campaigns/add-a-new-campaign). The chosen text will pre-populate in the Campaign Creation form, where it can be further edited.

The suggestions are based off the following analytics:

* Past campaign performance (e.g. open rates and delivery rates).
* Intent-level chat sentiment from Chat Desk & Chat Flow ( e.g. what is causing customer happiness, complaints, feedback etc).&#x20;
* Client prompts.
* Industry context (e.g. trends within the relevant industry, typical campaigns for the period).

{% hint style="info" %}

* The quality of campaign suggestions will improve as data increases, and the system can learn more from campaigns. For new clients with no campaigns, suggestions will be more reliant on industry data and input prompts.
  {% endhint %}

You can modify your prompt if you would like other campaign suggestions, or you can create a campaign manually, if you'd prefer.


# View campaign list

{% hint style="info" %}
All timestamps in relevant time zones.&#x20;
{% endhint %}

The *Campaign List* serves as the landing page when you open Broadcast Messenger.

From here you can:&#x20;

* [Add a new campaign](/broadcast-messenger/manage-campaigns/add-a-new-campaign).
* View a list with high-level information about all the campaigns in this account.
* Search for a specific campaign (exact matches only).
* [View ](/broadcast-messenger/manage-campaigns/view-details-and-manage-campaigns#view-campaign-details)detailed information about each campaign.
* [Edit ](/broadcast-messenger/manage-campaigns/view-details-and-manage-campaigns#edit-campaign-details)or [delete ](/broadcast-messenger/manage-campaigns/view-details-and-manage-campaigns#delete-campaigns)a campaign.

<figure><img src="/files/ZF5t9iyJj7vBW9fTkNWE" alt=""><figcaption><p>The Campaign List page</p></figcaption></figure>


# Add a new campaign

{% hint style="info" %}
All timestamps in relevant time zones.
{% endhint %}

To add a new campaign:

1. In the [*Campaign List*](/broadcast-messenger/manage-campaigns/campaign-list) tab, click ***+ New Campaign Setup**.*
2. Enter a **name** for your campaign to identify it easily (max. 255 characters).
3. Select the **campaign type:**&#x20;
   * [WhatsApp](#setting-up-a-whatsapp-campaign), or
   * [SMS](#setting-up-an-sms-campaign)
4. Click *Next.*

<figure><img src="/files/AWMDZE6R9F6DcF8Dbn5n" alt=""><figcaption><p>Enter the details of your new campaign.</p></figcaption></figure>

When selecting SMS campaigns, a **Health Check** is shown to highlight if any issues are present that may hinder the successful execution of the campaign.

<figure><img src="/files/zqt6AAJ97ZRv3cdC3Sv4" alt=""><figcaption></figcaption></figure>

### Setting up a WhatsApp Campaign

1. Select the **message template** you want to use.
   * The drop-down lists all WhatsApp templates that are already approved on your Clickatell account.
   * The message body populates automatically and is not editable.&#x20;
   * For media templates, upload the file you want to add as the template header.
   * A preview of the message is shown on the right.&#x20;
     * Note that marketing messages over 5 lines of text will be truncated for end-users with a "*Read more*" option to expand the message.

{% hint style="info" %}
You can only select from the **approved** WhatsApp templates on your account. Find out how to apply for and manage your WhatsApp templates [here](https://guides.clickatell.com/whatsapp-channel/channel-capabilities/whatsapp-message-templates/add-message-templates).
{% endhint %}

<figure><img src="/files/VsZ785Y11GRyKC3EZR9V" alt=""><figcaption><p>Select the specific message template and preview it on the right.</p></figcaption></figure>

The following template types and components are supported:

* **Media Header:**
  * Document (PDF, 30 MB max size)
  * Video (MP4 or 3GPP, 5 MB max size)
  * Image (JPEG or PNG, 5 MB max size)
* **Text:** As [set up](https://guides.clickatell.com/whatsapp-channel/channel-capabilities/whatsapp-message-templates/add-message-templates) via the Clickatell Portal and approved by Meta. Must include at least one variable.
* **Quick replies:** As [set up](https://guides.clickatell.com/whatsapp-channel/channel-capabilities/whatsapp-message-templates/use-interactive-buttons-in-message-templates) via the Clickatell Portal and approved by Meta.
* **Static and dynamic URLs:** As [set up](https://guides.clickatell.com/whatsapp-channel/channel-capabilities/whatsapp-message-templates/use-interactive-buttons-in-message-templates) via the Clickatell Portal and approved by Meta.

All buttons in the template are listed. If it is a **call-to-action button**, the number and URL(s) linked to each button are shown when hovering over it. This number will be dialed if an end-user taps the Call Phone Number button and the URL launched when they tap the Visit Website button. If the URL button is linked to a dynamic URL, it is shown in the format: *<https://example.com/order/\\{{1\\}}>*.

<figure><img src="/files/pgnrbi2Lq4XABPxveXJw" alt=""><figcaption><p>The number/URL linked to the call-to-action button for the selected template is shown upon hover.</p></figcaption></figure>

You cannot change the buttons' text on the templates, as these have been pre-approved. However, if you want to trigger a specific flow in Chat Flow when a customer taps a button, you must ensure the [keyword ](https://guides.clickatell.com/flow/configuration/using-keywords)in Chat Flow and the button keywords (as shown below) match exactly.&#x20;

<figure><img src="/files/SkyE5XEgzq5h2Fv6W4eY" alt="" width="375"><figcaption></figcaption></figure>

2. Select **when** you want to send your campaign:
   * Save a draft campaign to edit later.
   * Send the campaign immediately.
   * Schedule the campaign for a future date.

<figure><img src="/files/QYOqcMn77nT3LuIytLeO" alt=""><figcaption><p>Select when you want to send your campaign.</p></figcaption></figure>

3. Indicate **who** must receive your campaign message.

* Upload a [file ](https://www.clickatell.com/help-center/broadcast-messenger-whatsapp-sms/file-format-import-campaign-contacts/)from your computer (file types: .xlxs, .txt, or .csv; maximum 100MB; maximum 1 million rows).
* In both cases, the column headings in your file are automatically shown as options in a drop-down for each variable in your message. From each drop-down, select the column that must be used to populate each variable.

{% hint style="info" %}
File names may not contain a full stop. For example, use ***test\_file1.csv*** instead of *test.file1.csv*. Commas need to be added at the end of each line. (For an example, see [here](https://www.clickatell.com/help-center/broadcast-messenger-whatsapp-sms/file-format-import-campaign-contacts/).)

It is **required** to select a column containing the recipients' MSISDN numbers. All file columns should match the variables used in the message template.&#x20;
{% endhint %}

<figure><img src="/files/VaOzoijI7sZzbYDDA5HD" alt=""><figcaption><p>Select where you want to import your list of recipients from.</p></figcaption></figure>

* Click *Save and Import*. The table displays an extract of the file you imported for review. You can search for a specific recipient using the MSISDN (mobile) number.

<figure><img src="/files/ynQ3uCC6wnRwUEAR5wI4" alt=""><figcaption><p>Review recipients.</p></figcaption></figure>

4. Click ***Save/Send/Schedule***. This Campaign appears in the Campaign List tab with the applicable status.

### Setting up an SMS Campaign

1. Select **from which number** the campaign must be sent.&#x20;
   * This may be a requirement for delivery to certain countries (e.g., USA), or it may be possible to use a specific short-code or Toll-Free Number (TFN). You can select from your existing numbers.
   * Note that SMS responses are not visible within Broadcast Messenger, only Clickatell Portal.

<figure><img src="/files/EXv3DXWdKGYdUyktkD8y" alt=""><figcaption></figcaption></figure>

2. Select the **format** of your SMS message: &#x20;

* **Free text:** Enter your campaign message as free text.&#x20;
* **Template:** Select from your pre-configured, active [SMS message templates](/broadcast-messenger/manage-campaigns/message-templates). You can modify the message body.&#x20;

<figure><img src="/files/euT7DeeOe4YweA2C0OMp" alt=""><figcaption><p>Select the format of your SMS message.</p></figcaption></figure>

{% hint style="info" %}
Add variables using the format {{1}} to {{9}}. The variables will map to the columns in the recipient file you upload (see 4 below).
{% endhint %}

3. Select **when** you want to send the campaign message:

* Save a draft campaign to edit later.
* Send the campaign immediately.
* Schedule the sending of the campaign for a date in the future.

<figure><img src="/files/7qkqWE8JfomJ909RPtDV" alt=""><figcaption><p>Select when you want to send the campaign message.</p></figcaption></figure>

4. Indicate **who** must receive your campaign message:

* Upload a [file ](https://www.clickatell.com/help-center/broadcast-messenger-whatsapp-sms/file-format-import-campaign-contacts/)from your computer (file types: .xlxs, .txt, or .csv; maximum 100MB; maximum 1 million rows).
* In both cases, the column headings in your file are automatically shown as options in a drop-down for each variable in your message. From each drop-down, select the column that must be used to populate each variable.
* Click *Save and Import*. &#x20;

<figure><img src="/files/Pc5RzhDukk8WrhN5Pb1H" alt=""><figcaption></figcaption></figure>

{% hint style="info" %}
File names may not contain a full stop. For example, use ***test\_file1.csv*** instead of *test.file1.csv*. Commas need to be added at the end of each line. (For an example, see [here](https://www.clickatell.com/help-center/broadcast-messenger-whatsapp-sms/file-format-import-campaign-contacts/).)

It is **required** to select a column containing the recipients' MSISDN numbers.  All file columns should match the variables used in the message template.&#x20;
{% endhint %}

5. Click *Save/Send/Schedule* in the top right corner. This Campaign will now appear in the Campaign List tab with the applicable status.


# Predictive analytics

During campaign creation, Clickatell AI will provide analytics that take into account historical campaign performance data. Forecasting campaign success before sending allows for adjustments to be made to the campaign to ensure optimal engagement.

<figure><img src="/files/ytAFYBTCaEOR4CqPKGYI" alt=""><figcaption></figcaption></figure>

Predictions include:

* Overall Engagement Score for the campaign being created.
* Read Rate.
* Reply Rate.
* Bounce Risk.
* Optimal Send Time - provides the optimal send time for sending the campaign.
* Message Tone Suggestions - Clickatell AI analyzes intent-level chat sentiment for the client on our platforms and recommends message tone adjustments for the campaigns to improve engagement.

{% hint style="info" %}

* Predictions are estimates based on historical data, and are intended to optimize chances of success.
* If very little user data is available, predictions are based on industry benchmarks.
  {% endhint %}


# View details & manage campaigns

{% hint style="info" %}
All timestamps in relevant time zones.
{% endhint %}

From the [*Campaign List*](/broadcast-messenger/manage-campaigns/campaign-list) tab, you can [view](#view-campaign-details), [edit](#edit-campaign-details), and [delete ](#delete-campaigns)campaigns.

## View campaign details

To view detailed information about a campaign, click the "eye" icon next to it.

<figure><img src="/files/OgSOdmr3Gj91AXT8UVza" alt=""><figcaption><p>View details about a campaign.</p></figcaption></figure>

On the *Campaign Details* page, you can see:

* The campaign's [status](/broadcast-messenger/manage-campaigns/campaign-statuses) and name.
* The WhatsApp template used for this campaign (if applicable).
* The date the campaign was created & sent (if applicable).
* Important stats about your campaign.
* Details about the recipient list you used.
* A preview of your campaign message.

You can edit your campaign from here if it hasn't been sent yet.&#x20;

{% hint style="info" %}
In the example below, the *Edit Campaign* button is greyed out since you cannot edit sent campaigns.
{% endhint %}

<figure><img src="/files/1SEdgOPPdDX55LaZqkWc" alt=""><figcaption><p>The Campaign Details page.</p></figcaption></figure>

## Edit campaign details

You can only edit campaigns with a "**New**" or "**Pending**" [status](/broadcast-messenger/manage-campaigns/campaign-statuses), i.e., campaigns that have not been scheduled or sent yet.&#x20;

{% hint style="warning" %}
You can edit a campaign scheduled for delivery in the future, however, the campaign will no longer be scheduled, and you will have to set a new date for sending.&#x20;
{% endhint %}

To edit a campaign, click the "pencil" icon next to it.

<figure><img src="/files/kjidaudLCbdJMe2PC7Zy" alt=""><figcaption><p>Edit a campaign.</p></figcaption></figure>

In the *Edit Campaign* wizard, you can edit any of the campaign fields.

<figure><img src="/files/Mbp4fBhGHeP8TekdCbXp" alt=""><figcaption><p>Edit a WhatsApp campaign.</p></figcaption></figure>

## Delete campaigns

To delete a campaign, click the "bin" icon next to it. You cannot delete **Sent** or **Processing** campaigns. You cannot undo this action.

<figure><img src="/files/ZtfpMfm6VJQ4t3jvaPRt" alt=""><figcaption><p>Delete a campaign.</p></figcaption></figure>


# Campaign statuses

During a campaign's lifecycle, each campaign can have one of the following statuses:

<table><thead><tr><th width="149.33333333333331">Status</th><th>Definition</th><th>Note</th></tr></thead><tbody><tr><td><strong>New</strong></td><td>A newly created campaign that was saved as a draft and has not been sent or scheduled yet.</td><td><ul><li>Recipients and messages can be edited. </li><li>Campaign can be deleted.</li></ul></td></tr><tr><td><strong>Pending</strong></td><td>A campaign that is scheduled to be sent on a future date.</td><td><ul><li>Recipients and messages can be edited, but then the campaign has to be rescheduled.</li><li>Campaign can be deleted.</li></ul></td></tr><tr><td><strong>Processing</strong></td><td><p></p><p>A campaign that is in the process of being sent.</p><p></p></td><td><ul><li>Recipients and messages cannot be edited or deleted.</li></ul></td></tr><tr><td><strong>Sent</strong></td><td>A campaign that has been sent.</td><td><ul><li>Recipients and messages cannot be edited or deleted.</li><li>Delivery details are shown.</li></ul></td></tr></tbody></table>


# Message templates

### WhatsApp Templates

You can[ send a campaign](/broadcast-messenger/manage-campaigns/add-a-new-campaign) using the pre-approved WhatsApp templates in your account. WhatsApp templates are **not** created and managed in Broadcast Messenger. Please refer to the [WhatsApp User Guide](https://guides.clickatell.com/whatsapp-channel/channel-capabilities/whatsapp-message-templates) and [FAQ section](https://www.clickatell.com/help-center/whatsapp/message-templates/) for more information.

### SMS Templates

All active SMS templates are shown in the drop-down on your [campaign creation page](/broadcast-messenger/manage-campaigns/add-a-new-campaign#setting-up-an-sms-campaign) for you to select and send as part of an SMS campaign. This saves you time if you want to send similar campaigns or if you want to create a series of campaigns in advance.&#x20;

<figure><img src="/files/1xY67YjZYzpw7z1Yy1q5" alt=""><figcaption></figcaption></figure>

#### Create a new SMS template:

1. Go to *Templates -> SMS Templates*.
2. Click *+ New Template.*

<figure><img src="/files/6NXoqVVacQXpgRyifSIl" alt=""><figcaption></figcaption></figure>

3. Add a template name and the template message.

<figure><img src="/files/eQSy446cLQB6xMskedE1" alt="" width="425"><figcaption><p>Name your template and enter the text for your message.</p></figcaption></figure>

{% hint style="info" %}
Add variables using the format {{1}} to {{9}}. The variables will map to the columns in the [recipient file](/broadcast-messenger/manage-campaigns/add-a-new-campaign#setting-up-an-sms-campaign) you upload.
{% endhint %}

4. Click *Create*.&#x20;
   * This adds the SMS template to the list in an **Active** state and the template is available to select from in your campaign creation page.
   * You can view, edit, and deactivate/activate templates from this list

{% hint style="info" %}
You can edit your message right before sending it, so you do not need to edit the whole template if you want to make a once-off change to a message.
{% endhint %}


# View responses

{% hint style="info" %}
All timestamps in relevant time zones.
{% endhint %}

When a customer replies to one of your campaign messages, their responses are listed in the *Responses* tab.&#x20;

From here you can:

* See the number and name of the person who replied.
* See the message text, date, and time of each response.&#x20;
* Search for a specific number (MSISDN).
* Download the table of responses as a CSV file.
* Add, view, and edit your auto-response.

An **auto-response** is a message that is automatically sent to your customers when they reply to a campaign message. If you leave this field blank, no auto-response will be sent.&#x20;

<figure><img src="/files/cvD6qgHgVDVsEjwkUq4O" alt=""><figcaption><p>Download customer responses and set up an auto-response from the Responses tab.</p></figcaption></figure>

{% hint style="success" %}
You can handle customer replies via the following Clickatell applications:

* **Chat Desk:** A web-based service desk where agents can engage with customers via SMS or WhatsApp.
* **Chat Flow:** A chatbot builder enabling the automation of replies.

Note that these replies will no longer be visible in the Campaign Manager tool.
{% endhint %}


# Manage opt-outs

{% hint style="info" %}
All timestamps in relevant time zones.
{% endhint %}

The *Opt-Out* *Manager* is accessed by selecting *Opt-Outs* in the left-hand navigation.&#x20;

<figure><img src="/files/1bOw5hkbLbrDbRSlPWTd" alt=""><figcaption></figcaption></figure>

The *Opt-Out* *Manager* lists all recipients who do not want to receive further communication from your business. When a campaign is sent, the campaign’s recipient list is checked against the opt-out list. Recipients who opted out are flagged and will not be sent a message.

In the *Opt-Out* *Manager*, you can:&#x20;

* View a table listing all opted-out numbers on this account and the date and time they unsubscribed.
* Search for a number and export results.
* Filter on the channel the end-user opted out of (SMS, WhatsApp, All).
* Add numbers to the opt-out list, either as a single number or a bulk upload via a .xlsx or .csv file (max. 100MB).

<figure><img src="/files/dkTYNB4DM8EKhkddBhU8" alt=""><figcaption></figcaption></figure>

### **Single opt-out**

When adding a "**Single Opt-Out**”, you can add a WhatsApp or SMS number or both.&#x20;

<figure><img src="https://files.gitbook.com/v0/b/gitbook-x-prod.appspot.com/o/spaces%2FLTbnSU7slq5Jurb1u3jb%2Fuploads%2FzDyTEjHsXjDcZNZwrEQC%2Fimage.png?alt=media&#x26;token=310ee21e-1e18-4135-805a-3e3c25856393" alt="" width="375"><figcaption></figcaption></figure>

When selecting a WhatsApp number that wants to opt out, you must also select the source WhatsApp number(s) they are opting out of.

<figure><img src="https://files.gitbook.com/v0/b/gitbook-x-prod.appspot.com/o/spaces%2FLTbnSU7slq5Jurb1u3jb%2Fuploads%2FB5sSTDxND7ODaE21dD56%2Fimage.png?alt=media&#x26;token=1edbc493-d1fe-41ec-9580-0ef1d6b3092e" alt=""><figcaption></figcaption></figure>

Click *Add Opt-Out*.

A confirmation banner is shown, and the number now appears in the opt-out table.

<figure><img src="https://files.gitbook.com/v0/b/gitbook-x-prod.appspot.com/o/spaces%2FLTbnSU7slq5Jurb1u3jb%2Fuploads%2FQvWanqLYtkF8UQkHfT89%2Fimage.png?alt=media&#x26;token=3bea3bb3-d5b2-4898-89c0-a0eb431185a9" alt="" width="375"><figcaption></figcaption></figure>

### **Bulk upload**

When **bulk uploading opt-outs**, you choose an .xlsx or .csv file to upload. While the file uploads, select the channel (WhatsApp, SMS) these numbers want to opt out of. If WhatsApp, you must also also select the source number(s).

<figure><img src="https://files.gitbook.com/v0/b/gitbook-x-prod.appspot.com/o/spaces%2FLTbnSU7slq5Jurb1u3jb%2Fuploads%2FPwtR4Q8J3QjHHZ1dOmqi%2Fimage.png?alt=media&#x26;token=76818304-0d80-42c8-a854-b1d7f76e2a74" alt="" width="375"><figcaption></figcaption></figure>

Once the file is successfully uploaded, you must select the column in your file containing the number(s) that want to opt out.

Click *Add Opt-Out*.

A confirmation banner is shown, and the number now appears in the opt-out table.

{% hint style="info" %}
To **add or remove** numbers to/from this list, upload a new file. The new file replaces the existing list on this tab.
{% endhint %}

<figure><img src="https://files.gitbook.com/v0/b/gitbook-x-prod.appspot.com/o/spaces%2FLTbnSU7slq5Jurb1u3jb%2Fuploads%2FHHgAW5OVRgZtl5K2Fzsx%2Fimage.png?alt=media&#x26;token=10c87147-5daa-481a-95f4-fb875ce3fd6b" alt=""><figcaption></figcaption></figure>


# Campaign Details Summary

To view details about a campaign:

1. Go to the [*Campaign List*](/broadcast-messenger/manage-campaigns/campaign-list) tab.
2. From the list, select the "eye" icon next to the campaign.

You'll see summary information about the campaign at the top, and a preview of the campaign message to the right.

Key statistics about your campaign's performance are shown, with the list of recipients below it.

<figure><img src="/files/K8MGEGWKzb9pZb2GLqWP" alt=""><figcaption><p>View and download campaign details.</p></figcaption></figure>


# Clickatell Portal Reports

You can find several reports on your WhatsApp and SMS messaging channels and templates in the Clickatell Portal.

To access these reports:

1. Log in to your Clickatell Portal.
2. Go to *Analytics & Reports -> Channels -> Full Analytics.*
3. Use the tabs at the top to navigate to the [SMS report](https://guides.clickatell.com/chat-commerce-platform/navigation-and-access/reporting-and-analytics/messaging-channels#sms-full-analytics), [WhatsApp report](https://guides.clickatell.com/chat-commerce-platform/navigation-and-access/reporting-and-analytics/messaging-channels#whatsapp-full-analytics), or [WA Templated report](https://guides.clickatell.com/chat-commerce-platform/navigation-and-access/reporting-and-analytics/messaging-channels#whatsapp-templated-report).

<figure><img src="/files/i9z3KVcA72emzwKCGH4r" alt=""><figcaption></figcaption></figure>


---

[Next Page](/llms-full.txt/1)